Introduction to Nodes
Overview
Teaching: 45 min
Exercises: 0 minQuestions
What is an OTN-style Database Node?
What is expected from a Node Manager?
Who is this training for?
What is the schedule for the next several days?
Objectives
Understand the relationship between OTN and its Nodes.
Ensure attendees have required background information.
What is a Node?
OTN partners with regional acoustic telemetry networks around the world to enable detection-matching across our communities. An OTN Node is an exact copy of OTN’s acoustic telemetry database structure, which allows for direct cross-referencing between the data holdings of each regional telemetry sharing community. The list of OTN Nodes is available here: https://members.oceantrack.org. Data only needs to be reported to one Node in order for tags/detections to be matched across all.
How does a Node benefit its users?
OTN and affiliated networks provide automated cross-referencing of your detection data with other tags in the system to help resolve “mystery detections” and provide detection data to taggers in other regions. OTN Data Managers perform extensive quality control on submitted metadata to ensure the most accurate records possible are stored in the database and shared with researchers. OTN’s database and Data Portal website are well-suited for archiving datasets for future use and sharing with collaborators. The OTN system and data workflows include pathways to publish datasets with the Ocean Biodiversity Information System, and for sharing via open data portals such as ERDDAP and GeoServer. The data product returned by OTN is directly ingestible by populare acoustic telemetry data analysis packages including glatos, actel, remora, and resonATe. In addition to the data curation materials, OTN offers continuous support and workshop materials detailing the use of these packages and tools.
Below is a link to a presentation from current Node Managers, describing the relationship between OTN and its Nodes, the benefits of the Node system as a community outgrows more organic person-to-person sharing, as well as a realistic understanding of the work involved in hosting/maintaining a Node.
Node Managers
To date, the greatest successes in organizing telemetry communities has come from identifying and working with local on-the-ground Node Managers for each affiliated Node. The trusted and connected ‘data wranglers’ have been essential to building and maintaining the culture and sense of trust in each telemetry group.
In order to be successful as a Node Manager in your region, here are a few tips and guidelines:
- Ensure you set aside time each week to wear your ‘Node Manager hat’.
- Familiarize yourself with the metadata reporting templates, and follow carefully the formats required for each variable.
- Ensure you have continuous communication with the OTN data team so you are able to align your detection matching with all other Nodes, and keep your local toolbox up to date.
- Ensure you have consistent communication with your local telemetry community - knowing who’s who is important for relationship building and growing the community.
- Be willing to learn, and ask questions - we are always trying to improve our tools and processes!
No previous coding or data management experience is required to manage a Node. Anyone who is willing to put in the work to become a Data Manager can be successful. Being involved in the telemetry community as a researcher (or affiliate) is enough to get you started with ‘data wrangling’ for your telemetry community.
Node Training
Each year OTN hosts a training session for Node Managers. This session is not only for new Node Managers, but also a refresher for current Node Managers on our updated tools and processes.
This is a hands-on course, participants will be using the tools to practice loading telemetry data with us, usually using a Training Node we have built for this purpose. This means you will need to install all required software and devote full attention for the next several days.
Here are the general topics that will be covered:
- OTN Node structure and database maintenance
- Data loading workflow: from metadata to detection extracts, and how we track progress in GitLab
- Practice interfacing with an OTN Node database in DBeaver, using SQL scripts
- Practice using OTN’s Nodebooks to quality control, process and verify records, using python and Jupyter notebooks
- Overview of OTN’s Data Push process, and how Node Managers are involved
- Data Policy guidelines as a Node Manager
If you do not intend on learning how to load data to an OTN-style Node (and would prefer instead to be a spectator) please let us know, so we can identify who our hands-on learners will be.
A great resource for Node Managers as they get started will be OTN’s FAQ page. Your local telemetry community will likely have many questions about the Node and how it works, and the FAQs can help answer some of these questions.
Key Points
Your Node is fully compatible with all others like it.
A well-connected Node Manager is essential to serving the research community.
OTN staff are always availble to support Node Managers.
Upholding the Data Policy
Overview
Teaching: 15 min
Exercises: 0 minQuestions
How do I handle data requests?
Objectives
Understand how to uphold the Network’s Data Policy.
As an Node Data Manager, you will have the key responsibility to uphold your Network’s Data Privacy Policy and/or Data Sharing Agreement. You have access to every member’s public and private datasets, a level of access that not even your direct supervisors will have.
For this reason, you need to be intimately familiar with the types of data which are under embargo/private, and what is publicly available according to the Data Policy / Data Sharing Agreement for your Network. You will need to develop an internal protocol for when requests for data access are submitted, to ensure appropriate care is taken to protect the integrity of your members’ data.
OTN recommends creating a “Data Request Response Policy”.
External Requests - Restricted Data
This is an example of how OTN handles these requests:
- Request for data (from person other than data owner) submitted
- Data request is scoped, in a GitLab Issue. All details from requester is included.
- Impacted PIs are identified, and contacted, seeking written permission for requester to access the information.
- Written permission is documented in GitLab Issue, to preserve the paper-trail.
- Data request report is compiled and provided to requester, once all permissions have been received.
Internal Requests
Internal requests, from other Network staff, need to be handled in a similar way. While all Network staff should be familiar with the Data Policy, this may not be the case. It is the Node Manager’s responsibility to ensure that information from the database is not shared outside of internal reports. We need to track requests from all sources, for OTN this even includes the OTN Glider and Field teams, so we can have a record of who has asked for what, and be able to enforce the appropriate Data Policies.
Partner-Node Data Policies
In order to meet everyone’s expectations when it comes to data sharing and maximize the utility of tags releeased, there is one shared rule across all participating Node data policies and data sharing agreements. All nodes and OTN agree that the Data Policy of the Network which holds the tag records will apply to the detections of those tags, in all of the other Nodes in which it is detected. You cannot share information/detections of tags from outside your Node, without first consulting with your partner’s Data Policy. This will likely not be an issue for most Nodes, but is a key consideration for OTN staff when creating data products.
For guidance on the interpretation of your Data Policy, or the Data Policy of a parter Node, OTN, and especially the Director of Data Operations, is available to assist.
Key Points
Node Managers have a key responsbility to ensure the Data Policy is followed.
OTN System, Structure and Outputs
Overview
Teaching: 25 min
Exercises: 0 minQuestions
What does an OTN-style Database look like?
What is the general path data takes through the OTN data system
What does the OTN data system output?
Objectives
Understand the OTN Database structure on a high level
Understand the general path of data of data through the OTN system
Understand what the OTN system can output
OTN Data System
The OTN data system is an aggregator of telemetry data made up of interconnected Node Databases and data processing tools. These work together to connect researchers with relevant and reliable data. At the heart of this system are Nodes and their OTN-style Databases.
Affiliated acoustic telemetry partner Networks may become an OTN Node by deploying their own database that follows the same structure as all the others. This structure allows Nodes to use OTN’s data loading processes, produce OTN data products, and match detections across other Nodes.
Basic Structure
The basic structural decision at the centre of an OTN-style Database is that each of a Node’s projects will be subdivided into their own database schemas. These schemas contain only the relevant tables and data to that project. The tables included in each schema are created and updated based on which types of data each project is reporting.
Projects can have the type tracker, deployment, or data.
- Tracker projects only submit data about tag releases and animals. They get tables based on the tags, animals, and detections of those tags.
- Deployment projects only submit data about receivers and their collected data. These projects get tables related to receiver deployments and detections on their receivers.
- Data projects are projects that deploy both tags and receivers and will submit data related tags, animals, receivers, and detections and will get all the related tables.
In addition to the project-specific schemas, there are some important common schemas in the Database that Node Managers will interact with. These additional schemas include the obis, erddap, geoserver, vendor, and discovery schemas. These schemas are found across all Nodes and are used to create important end-products and for processing.
- The
obisschema holds summary data describing each project contained in the Node as well as the aggregated data from those projects. When data goes into a final table of the project schema it will be inherited into a table inobis(generally with a similar name). - The
erddapschema holds aggregated data re-formatted to be used to serve telemetry data via an ERDDAP data portal. - The
geoserverschema holds aggregated data re-formatted to be used to create geospatial data products published to a GeoServer. - The
vendorschema holds manufacturer specifications for tags and receivers, used for quality control purposes. - The
discoveryschema holds summaries of data across the OTN ecosystem. These tables are used to create summary reports and populate statistics and maps on partner webpages.
The amount of information shared through the discovery tables can be adjusted based on sharing and reporting requirements for each Node.
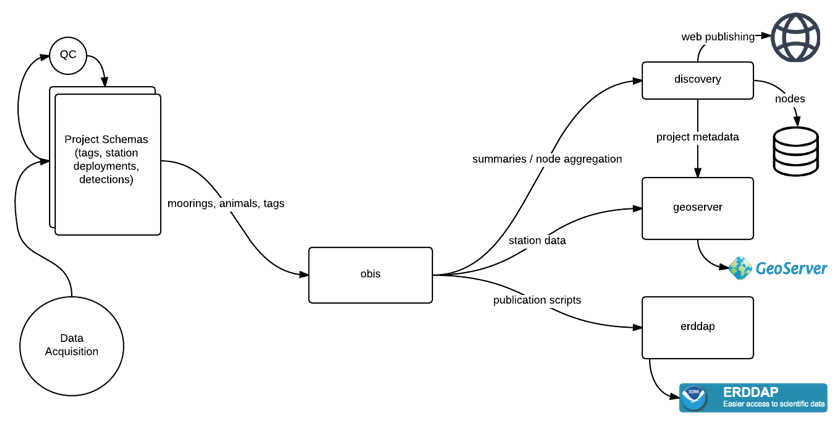
The Path of Data
The OTN data system takes 4 types of data/metadata: project, tag, instrument deployments, and detections. Most data has a similar flow through the OTN system even though each type has different notebooks and processes for loading. The exception to this is project metadata which has a more unique journey because it is completely user-defined, and must be used to initially define and create a project’s schema.
flowchart BT

    tag_start(( )) --> tag_sheet[[tagging metadata sheets]]
    style tag_start fill:#00FF00,stroke:#00FF00,stroke-width:4px
    tag_sheet --> tag_raw(c_tag_meta_suffix)
    style tag_raw fill:#6495ED
    tag_raw --> animcache(animalcache_suffix)
    style animcache fill:#CF9FFF
    tag_raw --> tagcache(tagcache_suffix)
    style tagcache fill:#CF9FFF
    animcache --> otnanim(otn_animals)
    style otnanim fill:#FDDA0D
    tagcache --> otntra(otn_transmitters)
    style otntra fill:#FDDA0D
    otnanim --> obisanim(otn_animals)
    style obisanim fill:#B8B8B8
    otntra --> obismoor(moorings)
    style obismoor fill:#B8B8B8

    rcv_start(( )) --> rcv_sheet[[deployment metadata sheets]]
    style rcv_start fill:#00FF00,stroke:#00FF00,stroke-width:4px
    rcv_sheet --> rcv_raw(c_shortform_suffix)
    style rcv_raw fill:#6495ED
    rcv_raw --> stat(stations)
    style stat fill:#CF9FFF
    rcv_raw --> rcv(rcvr_locations)
    style rcv fill:#CF9FFF
    stat --> moor(moorings)
    style moor fill:#FDDA0D
    rcv --> moor
    moor --> obismoor

    det_start(( )) --> det_sheet[[detection instrument data]]
    style det_start fill:#00FF00,stroke:#00FF00,stroke-width:4px
    det_sheet --> event_raw(c_events_suffix)
    style event_raw fill:#6495ED
    event_raw --> events(events)
    style events fill:#CF9FFF
    events --> moor
    det_sheet --> det_raw(c_detections_suffix)
    style det_raw fill:#6495ED
    det_raw --> det(detections_yyyy)
    style det fill:#CF9FFF
    det --> otndet(otn_detections_yyyy)
    style otndet fill:#FDDA0D
    otndet --> obisdet(otn_detections_yyyy)
    style obisdet fill:#B8B8B8

    obisanim --> obis[(Parent schema)]
    style obis fill:#B8B8B8,stroke:#000000
    obismoor --> obis
    obisdet --> obis

    obis --> done(( ))
    style done fill:#FF0000,stroke:#FF0000
Project Data
Project data has a unique workflow from the other input data and metadata that flows into an OTN Node, it is generally the first bit of information received about a project, and will be used to create the new schema in the Database for a project. The type of project selected (tracker, deployment, or data) will determine the format of the tables in the newly created schema. The type of project will also impact the loading tools and processes that will be used later on. The general journey of project data is:
- To register a new project a researcher will fill out a project metadata template and submit it to the Node Manager.
- The Node Manager will visually evaluate the template to catch any obvious errors and then run the data through the OTN Nodebook responsible for creating and updating projects (
Create and Update Projects). - The
Create and Update Projectsnotebook will make a new schema in the Database for that project, and fill it with the required tables based on the type of project. - Summary tables are populated at this time (
scientificnames,contacts,otn_resourcesetc). - After this, OTN analysts will verify the project one last time to make sure every necessary field is filled out and properly defined.
Tag, Deployment and Detections Data
Even though tag, deployment, and detections data all have their own loading tools and processes, their general path through the database is the same.
- Their data workflows all begin with a submission of data or metadata files from a researcher.
- The Node Manager ensures there is a copy of the file on the Node’s document management website.
- The Node Manager carries out visual quality control to catch any obvious errors.
- The data is then processed through the relevant OTN Nodebooks. This process is outlined by the task list associated with the GitLab Issue made for this data.
- The data will first be loaded into the “raw” tables. This is the table that holds the raw data as submitted by the researcher (the naming convention for raw tables is that they always have the prefix
c_and will have a suffix indicating the date it was loaded, typicallyYYYY_MM). - After the raw data table is verified, the data will move to the “intermediate” tables which act as a staging area for partially-processed data.
- After the intermediate table is verified, data will move to the “upper” tables, where the data is finished processing and is in its final form. This is the data that will be used for aggregation tables such as
obisand for outputs such as Detection Extracts.
OTN Data Products
The OTN Database has specific data products available, based upon the clean processed data, for researchers to use for their scientific analysis.
In order to create meaningful Detection Extracts, OTN and affiliated Nodes only perform cross-matching events every 4 months (when a reasonable amount of new data has been processed). This event is called a synchronous Data Push. In a Data Push:
- All recently-loaded data is verified and updated.
- Detections are matched to their relevant tag across all Nodes (Cross-Node Matching).
- Once cross-node matching is done, Detection Extracts are created, containing all the new detections matches for each project. Detection Extract files are formatted for direct ingestion by analysis packages such as glatos and resonate.
- Summary schemas like
discovery,erddap, andgeoserverare updated with the newly verified data.
Summary schema records can be used to create maps and other record overviews such as this map of active OTN receivers:

Backing Up Your Data
As with any database, it is important to make sure the data held by the OTN Database Node is protected. To ensure you are protected your Database and potentially the files contributed to your Node by the research community you support should be backed up properly, in the event your primary Database crashes, is corrupted, is lost, or any other unexpected event.
You should discuss and coordinate a backup strategy with the groups or institutions responsible for your Database’s administration, and find out their policies and practices for performing backups. Backup strategies may vary from group to group but it is a good idea to make sure they are adequately backing up your data daily, if not multiple times a day, and keep copies of backups in different physical locations in the case that something happens at a single location.
OTN is happy to offer guidance and recommendations to any group.
Key Points
All OTN-style Databases have the same structure
Databases are divided into project schemas which get certain tables based on the type of data they collect
Data in the OTN system moves from the raw tables to the intermediate tables to the upper tables before aggregation
Setup and Installing Needed Software
Overview
Teaching: 10 min
Exercises: 50 minQuestions
What software does a Node Manager need?
Why do I need the recommended software?
How do I install the required software?
Objectives
Understand how to install required software and prepare to load data
Ensure attendees have the required software installed and are ready to use it
The NodeBook environment and supporting software
In order to work efficiently as a Node Manager, the following programs are necessary.
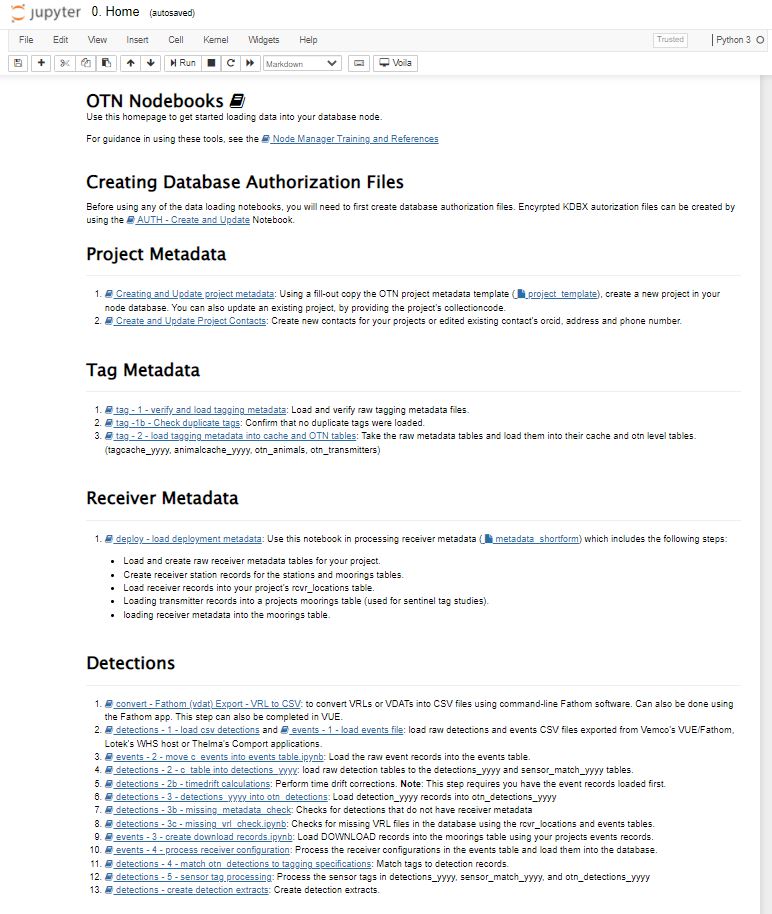
To standardize the verification and quality control process that all contributing data is subjected to, OTN has built custom quality control workflows and tools for Node Managers, often referred to as the OTN Nodebooks. The underlying functions are written in Python and workflows that rely on them can be undertaken through the use of Jupyter Notebooks. In order to use these tools, and interact with your database, you will need to install a Python environment and the software packages that support the workflows. Updates to these tools, as well as up-to-date installation instructions are always available on the OTN GitLab.
This lesson will give attendees a chance to install all the relevant software, under the supervision of OTN staff.
Python/Mamba
Python is a general-purpose programming language that has become the most popular language on GitHub and in many of the computational sciences. It is the main language used by OTN to standardize our data processing pipeline.
Mamba is a fast, cross-platform Python distribution and package manager. When you install Mamba (through Miniforge) you get a self-contained version of the Python interpreter (which enables your computer to run Python code), and many of the core Python libraries. Managing your Python installation with Mamba allows you to install and keep updated all the supporting packages needed for the Nodebooks with one command rather than having to install each one individually.
Miniforge Windows - https://conda-forge.org/miniforge/
- Select the option install for Just Me (recommended).
- Check the option to Add Miniforge3 to my PATH environment variable.
Miniforge Mac -
- Setup homebrew by running the command:
/bin/bash -c "$(curl -fsSL https://raw.githubusercontent.com/Homebrew/install/HEAD/install.sh)"- Note: this operation requires elevated privileges (sudo) - Use the commands provided by brew’s installation output to add brew to your system path
- Use brew to install miniforge:
brew install miniforge - Add miniforge to your zsh environment by typing conda init zsh. Restart the terminal
Miniforge Linux (Debian)
- Download the Shell script (.sh) file from https://conda-forge.org/miniforge/
- Recommended: Choose Python 64-bit Linux Installer
- Change the run permissions for the miniforge installer script. ie
chmod +x Miniforge3-[version]-Linux-x86_64.sh - Run
./Miniforge3-[version]-Linux-x86_64.shin the Linux terminal to activate the installer. - Add this conda installation to your terminal environment by running
conda init. Restart the terminal to see the changes reflected.
Git
Git is a version-control system for text, it helps people to work on code collaboratively, and maintains a complete history of all changes made to the files in a project. We use Git at OTN to track and disseminate changes to the Nodebooks that are made by our developer team, and occasionally you will need to use Git to update your Nodebooks and receive those changes.
Install Git
-
Windows- https://git-scm.com/download/win
-
Linux (Debian) - run the command:
sudo apt install git
Nodebooks - iPython Utilities
The ipython-utilities project contains the collection of Jupyter notebooks used to load data into the OTN data system.
Create an Account
First, you will need a GitLab account. Please fill out this signup form for an account on GitLab.
Then, OTN staff will give you access to the OTN-Partner-Nodes group, which hosts all of the relevant Projects for Node Managers.
Install iPython Utilities
- Determine the folder in which you wish to keep the iPython Utilities Nodebooks.
- Open your terminal or command prompt.
- Type
cdfollowed by a space. - You then need to get the filepath to the folder in which you wish to keep the iPython Utilities Nodebooks. You can either drag the folder into the terminal/command prompt OR right-click on the folder, select ‘Copy as Path’ from the dropdown menu, and paste the result into the terminal/command prompt.
- You should have a command that looks like
cd /path/to/desired/folder. - Press Enter, and your terminal/command prompt will navigate to the folder you provided.
- Type
- Create and activate the “nodebook” python enviornment. The creation process will only need to happen once.
- In your terminal, run the command
conda create -n nodebook python=3.9 - Activate the nodebook environment by running
conda activate nodebook
- In your terminal, run the command
- Next, run:
git clone https://gitlab.oceantrack.org/otn-partner-nodes/ipython-utilities.git. This will get the latest version iPython Utilities from our GitLab. - Navigate to the newly-created ipython-utilities subdirectory by running
cd ipython-utilities. - Switch to the
integrationbranch (which contains the most up-to-date code) by runninggit checkout integration. - Now to install all required python packages by running the following:
mamba env update -n nodebook -f environment.yml
To open and use the OTN Nodebooks:
- MAC/WINDOWS/LINUX: Open your terminal and navigate to your ipython-utilities directory by running
cd /path/to/ipython-utilities. Then, run the commands:conda activate nodebookto activate the nodebook python environmentjupyter notebook --config="nb_config.py" "0. Home.ipynb"to open the Nodebooks in a browser window.
- DO NOT CLOSE your terminal/CMD instance! This will need to remain open in the background in order for the Nodebooks to be operational.
More operating system-specific instructions and troubleshooting tips can be found at: https://gitlab.oceantrack.org/otn-partner-nodes/ipython-utilities/-/wikis/New-Install-of-Ipython-Utilities
Database Console Viewer
There are database administration applications to assist with interacting directly with your database. There are many options available but DBeaver and DataGrip are the most popular options at OTN.
- https://dbeaver.io/ (free and open access - recommended)
- https://www.jetbrains.com/datagrip (free institutional/student access options - another option)
In the next lesson we will practice using our database console viewer and connecting to our node_training database.
More Useful Programs
In order to work efficiently as a Node Manager, the following programs are necessary and/or useful.
Cross-Platform
Visual Studio Code - An advanced code editing integrated development environment (IDE). Also contains extensions that can run JuPyTeR notebooks, open CSV files in a visually appealing way, as well as handle updating your Git repositories.
For WINDOWS users
Path Copy Copy - For copying path links from your file browser. Since many of the notebooks require you to provide the path to the file you wish to load, being able to copy and paste the entire path at once can save a lot of time.
Notepad++ - For reading and editing code, csv files etc. without altering the formatting. Opening CSV files in Excel can change the formatting of the data in the file (this is a common problem with dates). Notepad++ will allow you to edit CSV files (and code, if necessary) without imposing additional formatting on data.
Tortoise Git - For managing git, avoiding command line. Depending on what new features have been recently added, you may be asked to use a different branch of the notebook repository than the main one (i.e. integration). Although using git through the command line is supported, you may prefer to manage your Nodebooks via a graphical user interface (GUI). Tortoise Git can provide that.
For MAC users
Source Tree - For managing git, avoiding command line.
Node Training Datasets
We have created test datasets to use for this workshop. Each attendee has their own files, available at this link: http://129.173.48.161/data/repository/node_training/node-training-files-1
Please find the folder with your name and download. Save these somewhere on your computer, and UNZIP all files.
Key Points
Node Manager tasks involve the use of many different programs
OTN staff are always available to help with installation of these programs or any issues
There are many programs and tools to help Node Managers
Data Loading Workflow
Overview
Teaching: 30 min
Exercises: 45 minQuestions
How does a Node Manager receive data?
How does a Node Manager track their To-Do list?
How can a Node Manager interact with their database directly?
Objectives
Understand the data-loading workflow
Understand how to create and use GitLab Issues
Understand how to access and query your database tables
Understand how to use the
AUTH - Create and Updatenotebook to maintain your database credentials file
Data Managers receive data from a researcher and then begin the process of QA/QC and data matching:
- Records are received and a GitLab Issue is created.
- Data are QA/QC’d using the OTN Nodebooks, and all progress is tracked in GitLab. Feedback between Data Manager and researchers happens at this stage, until data is clean and all GitLab tasks are completed.
- Successful processing can be checked by using DBeaver to query and explore the database.
flowchart LR
    data_start(( )) --> get_data(Receive metadata </br>from researchers)
    style data_start fill:#00FF00,stroke:#00FF00,stroke-width:4px
    get_data --> gitlab(Create Gitlab issue </br>with template)
    gitlab --> viz{Visually inspect, </br>does metadata have errors?}
    viz --yes--> req(Request corrected data </br>from researchers)
    req --> end1(( ))
    style end1 fill:#FF0000,stroke:#FF0000
    viz --no--> run_checklist(Run data through checklist)
    run_checklist --> otn_part(Pass to OTN for </br>final verification)
    otn_part --> end2(( ))
    style end2 fill:#FF0000,stroke:#FF0000
Researcher data submission
There are many ways to receive data from researchers in your community/group. Find and make official the way that works for your community and ensure that way becomes standard practice for reporting to your Node.
File management website
The most common way to receive data and metadata from a researcher is through some type of file management website. This will require either an email notification system for the Node Manager or constant checking to look for new submissions.
OTN-managed Nodes can always use the same Plone file management portal software that OTN itself uses to create and maintain private-access data repository folders into which researchers can deposit their data and metadata. These private folders also serve as the location where Detection Extracts are distributed to users, when available.
The FACT Network currently uses a custom instance of Research Workspace for the same purpose.
The ACT and GLATOS Networks use a custom data-submission form managed through their networks’ web sites.
Its common for groups of researchers to use DropBox, Google Drive, or something similar to share data/metadata when the Network is still small. This can be a great, accessible option but the caveat is that is is much more difficult to control access to each individual folder to protect the Data Policy, and it may be difficult to determine when new data has been submitted.
Email-only submission
Generally, each Node Manager has an email address for communicating with their network’s data submitters (ex: Data @ TheFACTNetwork . org). This is a great way to ensure all Node-related emails are contained in the same account in the case of multiple Node Managers or the succession of a new Node Manager. With proper email management, this can be a very successful way to ask Node users to submit their data/metadata to your Node.
It is not recommended to use a personal email account for this, since all the files and history of the project’s data submissions will be lost if that Manager ever moves away from the role. If the account is hosted at an institution, it may be advisable to submit requests to raise institutional limits on constraints like email storage in advance.
Documenting data submission
Using one of the suggested means above, a user has submitted data and metadata to the Node Manager. Now what?
OTN uses GitLab Issues with templates of task-lists to ensure we NEVER forget a step in data loading, and that no file is ever lost/forgotten in an inbox.
Immediately upon receipt of a data file, you are advised to login to OTN’s GitLab. You will have a project for your Node named
Once on the GitLab project page, you should navigate to the Issues menu option, on the left side. Think of your GitLab issues as your running “TODO List”! You will want to create a new Issue for each piece of data that is submitted.
NOTE: GitLab Issues are often referred to as “tickets”
Creating GitLab issues
By choosing the New Issue button in the top-right of your screen, you will be taken to a new, blank, issue form. You will need to fill out the following fields:
- Title: Write the project name/code, the type of data submitted, and the submission date, this makes the ticket searchable in the future (eg:
HFX tag metadata 2022-02) - Type: Should be type
Issue. - Description:
- There are pre-made Templates to choose from here, using the drop down menu. Ensure you choose the relevant checklist for the type of data that was submitted (eg:
Tag_metadata). This will populate the large description field! - Ensure you include the link to the submitted data file OR use the
Attach a fileoption to attach a copy of the submitted data file to the issue.
- There are pre-made Templates to choose from here, using the drop down menu. Ensure you choose the relevant checklist for the type of data that was submitted (eg:
- Assignee: Assign to yourself if this is a task for you, or to anyone else to whom you want to delegate.
- Milestone: These are the upcoming Data Push dates. You should choose the nearest future PUSH date as the Milestone for this issue.
- Labels: This is for your reference - choose a label that will help you remember what stage of processing this issue is in. Some common examples include
Needs QC,Waiting for Metadata,Waiting for VRLs,Request PI Clarificationetc. You can create new labels at any time to help sort your tickets.
With the above information supplied, you can click the Create Issue button.
Using GitLab to track progress
As you approach the deadline for data-loading, before a data PUSH, you should begin to work on your Issues which fall under that Milestone. When you open an issue, you will be able to see the remaining tasks to properly load/process that data along with the name of the OTN Nodebook you should use to complete each task.
Keep GitLab open in your browser as you work through the relevant Nodebooks. You should check off the tasks as you complete them, and insert any comments you have into the bottom of the ticket. Comments can include error messages from the Nodebook, questions you have for the researcher, any re-formatting required, etc. At any time you can change the Labels on the issue, to help you remember the issue’s status at a glance.
Once you are done for the day, you’ll be able to come back and see exactly where you left off, thanks to the checklist!
You can tag anyone from the OTN Data Team in your GitLab issue (using the @NAME syntax). We will be notified via email to come and check out the Issue and answer any questions that have been commented.
Once you have completed all the tasks in the template, you can edit the Assignee value in the top-right corner, and assign to someone from OTN’s Database team (currently, Angela or Yinghuan). They will complete the final verification of the data, and close the issue when completed. At this time, you can change the issue Label to Verify, or something similar, to help visually “mark it off” your issue list on the main page.
GitLab practice
At this time we will take a moment to practice making GitLab Issues, and explore other pages on our GitLab like, Milestones, Repository, Snippets, and Wiki.
Database access
As part of the OTN workflow, it may be prudent to use a database client like DBeaver to view the contents of your Node’s database directly and make sure the data has been loaded as expected.
DBeaver is an open-source application for interacting directly with databases. There are lots of built-in tools for query writing and data exploration. We will assume that workshop attendees are novices in using this application.
Connecting to your database
For this training we will connect to a Node Training test database, as practice. Once you open DBeaver, you will need to click on the Database menu item, and choose New Database Connection. A popup will appear, and you will choose the PostreSQL logo (the elephant) then click Next. Using the .auth file provided to you by OTNDC you will complete the following fields:
- Host: this could be something like
matos.asascience.comfor your DB, but we will use the IP address:129.173.48.161for our Node Training DB. - Database: this will be your database name, something like
pathnode. For training, it will benodetraining. - Port: this is specified in your
.authfile and will be four digits. For training, this port will be set to5432. - Username/Password: your personal username and password. For training, your username will be your first initial plus last name (ex:
jsmith). Your password will be this username backwards.
Next, choose Test Connection and see if it passes the tests. If so, choose Finish and you’re now connected to your database!
On the left-side you should now see a Database Navigator tab, and a list of all your active database connections. You can use the drop down menu to explore all the schemas aka: collections stored in your database. You can even view each individual table, to confirm the creation steps in the Nodebooks were successful.
Writing a query in DBeaver
If you wish to write a query to see a specific portion of your already-loaded data, you should first open a new SQL console. Choose SQL Editor from the top menu, then New SQL Script. A blank form should appear.
While writing SQL is out of the scope of this course, there are many great SQL resources available online. The general premise involves creating conditional select statements to specify the data you’re interested in. As an example, select * from hfx.rcvr_locations where rcv_serial_no = '12345'; will select all records from the HFX schema’s rcvr_locations table where the serial number is 12345.
To run a query, ensure your cursor (the vertical line that shows where you are editing text) is on the line you want to run, then either 1) right-click, and choose Execute, or 2) press CTRL-ENTER (CMD-ENTER for Mac). The results of your query will be displayed in the window below the SQL console.
OTN is here to support you as you begin to experiment with SQL queries and the OTN database structure, and can help you build a library of helpful custom queries that you may want or need.
Exercise: Database Querying
Let’s take a moment to explore some of the tables in the Node Training database, and write some example SQL queries.
Key Points
Node-members cannot access the database, you are the liason
Data submissions and QC processes should be trackable and archived
OTN is always here to help with any step of the process
Connecting to the Database from the Nodebooks
Overview
Teaching: 15 min
Exercises: 15 minQuestions
How can a Node Manager connect with their database in the Nodebooks?
How can a Node Manager connect with other Nodes for matching?
How can a Node Manager use Gitlab Automation in the Database Fix Nodebooks?
Objectives
Understand how to use the
AUTH - Create and Updatenotebook to maintain your database credentials file
Connecting to your Database from the Nodebooks
Now that we have explored and set up some of the tools needed to work as a Node Manager, we can begin preparing our Nodebook connection files. To enhance security, OTN uses encrypted, password-protected .kdbx files to store login credentials for your database. To create these, we have developed an interactive AUTH - Create and Update Nodebook.
- Open the OTN Nodebooks
- Open your terminal, and navigate to your ipython-utilities directory, using
cd /path/to/ipython-utilities.Then, run the commands:conda activate nodebookto activate the nodebook python environmentjupyter notebook --config="nb_config.py" "0. Home.ipynb"to open the Nodebooks in a browser window.
- Open your terminal, and navigate to your ipython-utilities directory, using
- Your Nodebooks should open in a new browser window, showing the
Homepage. - Open the
AUTH - Create and UpdateNodebook
Imports cell
This section will be common for most Nodebooks: it is a cell at the top of the notebook where you will import any required packages and functions to use throughout the notebook. It must be run first, every time.
Path to file
This cell needs to be edited. Between the quotes you will type the filepath to the .kdbx file you would like to create, or one which already exists that you would like to edit. The format should look like:
file_location = 'C:/Users/path/to/node_auth.kdbx'
Run this cell to save the input.
Create Password
Run this cell. You will be prompted to create a password for the file (if it is a new file) or to enter the existing password if you are accessing an existing file. Ensure that you remember this master password, as you will be using it every time you connect to the database through the Nodebooks.
Create or Update Main Connections
Run this cell. This section will have an editable form. If it is a new file, all fields will be blank. If it is an existing file, the previously-entered information will display. You may now edit the information, pressing the blue button when you are finished to save your results.
- Conn Name: this is customizable - what is the name of this connection? We recommend choosing something like “OTN Database” to help you remember.
- Host: this will be something like
matos.asascience.comfor your DB, but for training purposes we will use the IP of our Node Training DB:129.173.48.161. - Port: this is specified in your
.authfile and will be four digits. Use5432for Node Training. - DB Name: this will be your database name, something like
pathnode. For training, it will benodetraining. - Username/Password: your personal username and password. For training, your username will be your first initial plus last name (ex:
jsmith). Your password will be this username backwards.
Create or Update DBLink Connections
In order to match detections across databases, you will need to establish DBLink connections to other OTN Nodes. This information can be stored in your .kdbx file, and will give you limited access to information required to match detections and create detection extracts.
Run this cell. This section will have an editable form. If it is a new file, all fields will be blank, and you can choose Add Connection. If it is an existing file, the previously-entered information will display for each DBLink Connection you’ve specified. You may now edit the information, pressing the update or save button when you are finished to save your results.
Please contact OTN if you need any of the following information:
- Conn Name: this is customizable - what is the name of this connection? Something like
fact-link-to-migramaris informative. - Host: this will be something like
matos.asascience.comfor the DB you are trying to connect to (i.e. not your own Node db host). - Port: this will be the port required to connect to the remote DB (not your Node db).
- DB Name: this will be the name of the database you are trying to connect to (not your Node db), something like
otnunit. - User/Password: the username and password of the DBLink user for your database. Not your own node admin’s connection information.
Once you have saved your new DBLink connection, you can create another. Continue until you have established connections to all remote Nodes. Currently, you will require DBLinks to 7 Nodes, but this is rapidly expanding.
Test Connections
The next two cells will test the connection information you entered. Success messages will look like this for your main connection:
Auth password:········
Connection Notes: None
Database connection established
Connection Type:postgresql Host:db.your.org Database:your_db User:node_admin Node: Node
and like this for your DBLink connections:
Testing dblink connections:
	fact-link-to-Node1: DBLink established on user@db.load.oceantrack.org:5432 - Node: NODE1
	fact-link-to-Node2: DBLink established on user@db.load.oceantrack.org:5432 - Node: NODE2
	fact-link-to-Node3: DBLink established on user@db.load.oceantrack.org:5432 - Node: NODE3
	fact-link-to-Node4: DBLink established on user@db.load.oceantrack.org:5432 - Node: NODE4
	fact-link-to-Node5: DBLink established on user@db.load.oceantrack.org:5432 - Node: NODE5
	fact-link-to-Node6: DBLink established on user@db.load.oceantrack.org:5432 - Node: NODE6
	fact-link-to-Node7: DBLink established on user@db.load.oceantrack.org:5432 - Node: NODE7
You are now able to use the filepath to your .kdbx file to run all the Nodebooks.
Change KDBX password
If you have been passed a template .kdbx file from OTNDC with prefilled information, you should use this section to change the password to ensure your privacy is protected.
You will need to enter:
- Current Password (provided by OTNDC) for your template file
- New Password (of your choosing)
Press Save to change the password of your .kdbx. Ensure that you remember this password, as you will be using it every time you connect to the database through the Nodebooks.
Add a Git Access Token
This will be relevant for users of the Database Fix suite of Nodebooks only. If you are not going to use these tools, you can skip this cell in the Nodebooks.
A Gitlab Access Token will allow Nodebooks to access your GitLab account and insert comments into an Issue directly, as you are working on it. This has been developed for the Database Fix Notebooks to ensure all changes made within the notebooks are documented in GitLab properly. The automation is part of the OTNGitlabAutomation package.
Instructions to create a Personal Access Token are found on our wiki here
You can create one by following the steps below:
- In the top-right corner of gitlab, click your avatar.
- Select Edit profile.
- On the left sidebar, select Access Tokens. Enter a name for your token and optionally set expiry date for the token.
- Under ‘Select scopes’ select ‘api’.
- Select Create personal access token.
- A new token will be created at the top of the page. Make sure you save it somewhere as you won’t be able to access it again. Treat this token like a password as it can be used to access GitLab under your user.
Once you have created your access token, run this cell.
You will need to enter your personal access token.
Press Add Token to insert the token into your .kdbx.
Re-running this cell will allow you to update your access token any time it expires.
Key Points
Node-members cannot access the database, you are the liaison
Data submissions and QC processes should be trackable and archived
OTN is always here to help with any step of the process
Project Metadata
Overview
Teaching: 90 min
Exercises: 0 minQuestions
How do I register a new project in the Database?
Objectives
Understand how to complete the template
Understand how to use the Gitlab checklist
Learn how to use the
Create and Update ProjectsnotebookLearn how to use the
Create Plone folders and add usersnotebook
Process workflow
The process workflow for project metadata is as follows:
flowchart LR
    proj_start(( )) --> get_meta(Receive
project metadata
from researchers)
    style proj_start fill:#00FF00,stroke:#00FF00,stroke-width:4px
    get_meta --> gitlab(Create
Gitlab
issue)
    gitlab --> inspect(Visually
inspect)
    inspect --> nodebook(QC with
nodebooks)
    nodebook --> plone(Verify repository
folder
is correct)
    plone --> email(Email project
contacts
onboarding information)
    email --> otn(Pass to
OTN)
    otn --> end2(( ))
    style end2 fill:#FF0000,stroke:#FF0000
The first step when you are contacted by a researcher who wants to register their project with the database is to request Project Metadata. For most Nodes, this is in the form of a plaintext .txt file, using the template provided here. This file allows the researcher to provide information on the core attributes of the project, including the scientific abstract, associated investigators, geospatial details, temporal and taxonomic range.
Completed Metadata
Immediately upon receipt of the metadata, you must create a new Gitlab Issue. Please use the Project Metadata Issue checklist template.
Here is the Issue checklist, for reference:
Project Metadata
- [ ] - NAME add label *'loading records'*
- [ ] - NAME define type of project  **select here one of Data, Deployment, Tracker**
- [ ] - NAME create schema and project records (`Creating and Updating project metadata` notebook)
- [ ] - NAME add project contact information (`Creating and Updating project metadata` notebook)
- [ ] - NAME add scientificnames (`Creating and Updating project metadata` notebook)
- [ ] - NAME verify all of above (`Creating and Updating project metadata` notebook)
- [ ] - NAME [Plone-users only] create new project repository users (`Create Plone Folders and Add Users` notebook)
- [ ] - NAME [Plone-users only] create project repository folder (`Create Plone Folders and Add Users` notebook)
- [ ] - NAME [Plone-users only] add project repository users to folder (`Create Plone Folders and Add Users` notebook)
- [ ] - NAME [Plone-users only] access project repository double-check project repository creation and user access
- [ ] - NAME add project metadata file to relevant project folder (Plone site, Research Workspace etc)
- [ ] - NAME email notification of updated metadata file to PI and individual who submitted
- [ ] - NAME send onboarding email to all contacts
- [ ] - NAME label issue with *'Verify'*
- [ ] - NAME pass issue to OTN DAQ staff
- [ ] - NAME [OTN only] manually identify if this is a loan, if so add record to otnunit.obis.loan_tracking (`Creating and Updating project metadata` notebook)
- [ ] - NAME [OTN only] if this is a loan, update links for PMO
- [ ] - NAME pass issue to OTN analyst for final verification
- [ ] - NAME verify project in database

**project metadata txt file**
Visual Inspection
Once the researcher provides the completed file, the Data Manager should complete a visual check for formatting and accuracy.
Please make sure of the following:
- Is the PI-provided collection code unique/appropriate? Do you need to create one yourself? Existing schemas/collection codes can be seen in the database.
- Are there typos in the title or abstract?
- Are the contacts formatted correctly?
- Are the species formatted correctly?
- Does the location make sense based on the abstract, and is it formatted correctly (one per line)?
Often, the Contacts section has been improperly formatted. Pay close attention here.
Below is an example of a properly completed metadata form, for your reference.
===FORM START===
0. Intended/preferred project code, if known? (May be altered by OTNDC)
format: XXXX (3-6 uppercase letters that do not already have a representation in the OTN DB. Will be assigned if left blank)

NSBS

1. Title-style description of the project?
format:  < 70 words in 'paper title' form

OTN NS Blue Shark Tracking

2. Brief abstract of the project?
format: < 500 words in 'abstract' form

In the Northwest Atlantic, the Ocean Tracking Network (OTN), in collaboration with Dalhousie University, is using an acoustic telemetry infrastructure to monitor the habitat use, movements, and survival of juvenile blue sharks (Prionace glauca). This infrastructure includes state-of-the-art acoustic receivers and oceanographic monitoring equipment, and autonomous marine vehicles carrying oceanographic sensors and mobile acoustic receivers. Long-life acoustic tags (n=40) implanted in the experimental animals will provide long-term spatial resolution of shark movements and distribution, trans-boundary migrations, site fidelity, and the species’ response to a changing ocean. This study will facilitate interspecific comparisons, documentation of intra- and interspecific interactions, and permit long-term monitoring of this understudied predator in the Northwest Atlantic. The study will also provide basic and necessary information to better inform fisheries managers and policy makers. This is pertinent given the recent formulation of the Canadian Plan of Action for Shark Conservation.

3. Names, affiliations, email addresses, and ORCID (if available) of researchers involved in the project and their role.

The accepted Project Roles are defined as:
Principal Investigator: PI or Co-PI. The person(s) responsible for the overall planning, direction and management of the project.
Technician: Person(s) responsible for preparation, operation and/or maintenance of shipboard, laboratory or deployed scientific instrumentation, but has no invested interest in the data returned by that instrumentation.
Researcher: Person(s) who may use/analyse the data to answer research questions, but is not the project lead. Can be a student if their involvement spans past the completion of an academic degree.
Student: Person(s) researching as part of a project as part of their work towards an academic degree.
Collaborator: A provider of input/support to a project without formal involvement in the project.

Please add 'Point of Contact' to the contact(s) who will be responsible for communicating with OTN.

format: Firstname Lastname, Employer OR Affiliation, Project Role (choose from above list), email.address@url.com, point of contact (if relevant), ORCID

Fred Whoriskey, OTN, principal investigator, fwhoriskey@dal.ca, 0000-0001-7024-3284
Sara Iverson, OTN, principal investigator, sara.iverson@dal.ca
Caitlin Bate, Dal, researcher, caitlin.bate@dal.ca, point of contact


4. Project URL - can be left blank
format: http[s]://yoursite.com

https://members.oceantrack.org/

5. Species being studied?
format: Common name (scientific name)

blue shark (Prionace glauca)
sunfish (Mola mola)

6. Location of the project?
format: (city, state/province OR nearby landmark OR lat/long points in decimal degree), one per line

Halifax, NS
44.19939/-63.24085

7. Start and end dates of the project, if known?
format: YYYY-MM-DD to YYYY-MM-DD ('ongoing' is an acceptable end date)

2013-08-21 to ongoing

8. Citation to use when referencing this project:
format: Lastname, I., Lastname, I. YYYY. [Title from question 1 or suitable alternative] Will be assigned if left blank.


===FORM END===
Quality Control - Create and Update Projects
Each step in the Issue checklist will be discussed here, along with other important notes required to use the Nodebooks.
Imports Cell
This section will be common for most Nodebooks: it is a cell at the top of the notebook where you will import any required packages and functions to use throughout the notebook. It must be run first, every time.
You will have to edit one section: engine = get_engine()
- Within the open brackets you need to paste the path to your database
.kdbxfile which contains your login credentials. Ensure that the path is enclosed in quotation marks. - On MacOS computers, you can usually find and copy the path to your database
.kdbxfile by right-clicking on the file and holding down the “option” key. On Windows, we recommend using the installed software Path Copy Copy, so you can copy a unix-style path by right-clicking. - The path should look like
engine = get_engine('C:/Users/username/Desktop/Auth files/database_connection.kdbx').
Project Metadata Parser
This cell is where you input the information contained in the Project Metadata .txt file. There are two ways to do this:
- You can paste in the filepath to the saved
.txt. You should ensure the formatting follows this example:project_template_path = '/path/to/project_metadata.txt' - You can paste the entire contents of the file, from
===FORM START=== to ===FORM END===inclusive, into the provided triple quotation marks.
Note that each of the above options is contained in its own cell in the notebook, and you only need to do one of the two.
Once either option is selected, you can run the cell to complete the quality control checks.
The output will have useful information:
- Are there strange characters in the collection code, project title, or abstract?
- Were the names and affiliations of each contact successfully parsed? Are there any affiliated institutions which are not found? Are there any contacts which were not found that you expected to be?
- Is the project URL formatted correctly?
- Are all the species studied found in WoRMS? Are any of them non-accepted taxonomy (entries with accepted taxonomies will have a success message of the format
INFO: Genus species is an accepted taxon, and has Aphia ID XXXXXX., followed by a URL)? Which ones have common names that do not match the WoRMS records (look at bottom of each species record for success:OK: Animal name is an acceptable vernacular name for Genus species)? NOTE: any mismatches with common name can be fixed at a later stage, make a note in the Issue for your records - Is the suggested Bounding Box appropriate based on the abstract? NOTE: any issues with the scale of the bounding box can be fixed at a later stage, make a note in the Issue for your records
- Are the start and end dates formatted correctly?
Generally, most of the error messages arise from the Contacts and Species sections.
If any information does not parse correctly, you should fix it in the source file and re-run the cell until you are happy with the output.
Manual Fields - Dropdown Menu
There are some fields which need to be set up by the Data Manager, rather than the researcher. These are in the next cell.
Run the cell to generate a fillable form with these fields:
- Node: select your node
- Collaboration Type: based on the abstract, are they deploying only tags (
Trackerproject), only receivers (Deploymentproject) or both tags and receivers (Dataproject)? - Ocean: choose the most appropriate ocean region based on the abstract.
- Shortname: usually a summarised version of the project title, which will be used as the name of the Data Portal folder. ex:
OTN Blue Sharks. - Longname: use the Title provided by the researcher, or something else, which is in “scientific-paper” style. ex:
Understanding the movements of Blue sharks through Nova Scotia waters, using acoustic telemetry. - Series Code: this will generally be the name of your node. Compare to values found in the database
obis.otn_resourcesif you’re unsure. - Institution Code: The main institution responsible for maintaining the project. Compare to values found in the database
obis.institution_codesandobis.otn_resourcesif you’re unsure. If this is a new Institution, please make a note in the Issue, so you can add it later on - Country: based upon the abstract. Multiple countries can be listed as such:
CANADA, USA, EGYPTetc. - State: based upon the abstract. Multiple states can be listed as such:
NOVA SCOTIA, NEWFOUNDLANDetc. - Local Area: based upon the abstract. Location information. ex:
Halifax - Locality: based upon the abstract. Finest-scale of location. ex:
Shubenacadie River - Status: is the project completed, ongoing or something else?
To save and parse your inputted values DO NOT re-run the cell - this will clear all your input. Instead, the next cell is the one which needs to be run to parse the information.
Verify the output from the parser cell, looking for several things:
- Are all the fields marked with a green
OK? - Is the following feedback included in the institution code section:
Found institution record for XXX in your database:followed by a small, embedded table?
If anything is wrong, please begin again from the Manual Field input cell.
If the institution code IS NOT found - compare to values found in the database obis.institution_codes and obis.otn_resources. If this is a new Institution, please make a note in the Issue, so you can add it later on
Task List Checkpoint
In Gitlab, this task can be completed at this stage:
- [ ] - NAME define type of project **select here one of Data, Deployment, Tracker**
Please edit to include the selected project type, in harmony with the selected field in the Nodebook.
Verifying Correct Information
At this stage, we have parsed all the information that we need in order to register the project in the database. There is now a cell that will print out every saved value for your review.
You are looking for:
- Typos
- Strange characters
- Correct information based on abstract
If this information is satisfactory, you can proceed.
Adjust Bounding Box
The cell titled Verify the new project details before writing to the DB is the final step for verification before the values are written to the database. At this stage, a map will appear with the proposed Bounding Box for the project.
Based on the abstract, you can use the Square Draw Tool to re-draw the bounding box until you are happy with it.
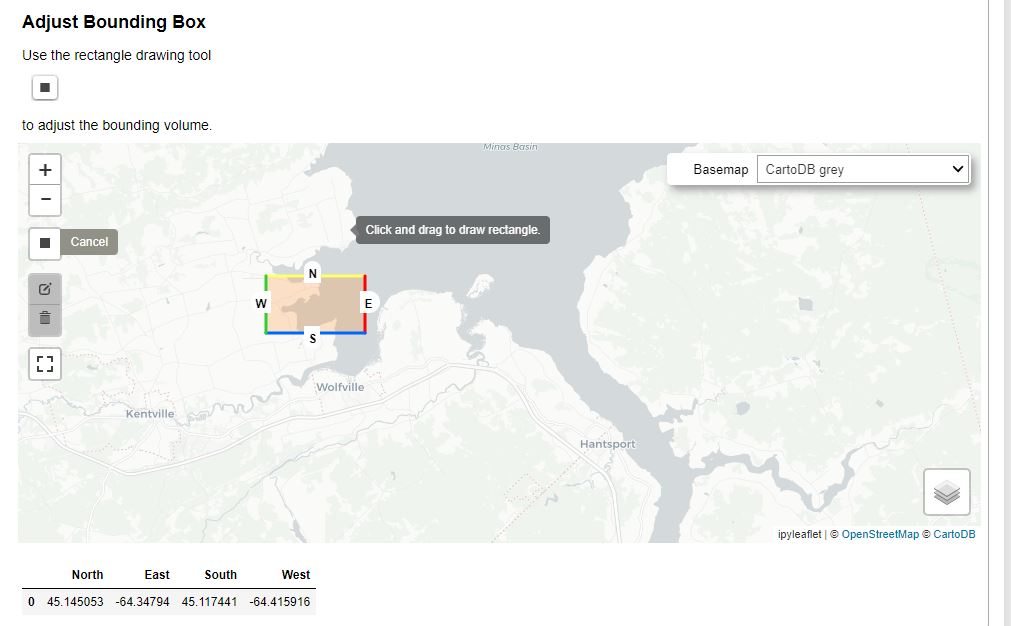
Once you are happy, you can run the next cell in order to save your bounding adjustments. The success output should be formatted like this:
--- Midpoint ---
Latitude:
Longitude:
Create New Institution
STOP - confirm there is no Push currently ongoing. If a Push is ongoing, you must wait for it to be completed before processing beyond this point.
Remember above, where we noted whether the provided institution was new or existed on obis.institution_codes? This cell is our opportunity to add any new institutions. If all institutions (for each contact, plus for the project as a whole) exist, then you can skip this cell.
To run the cell, you will need to complete:
- Institution Code: a short-code for the institution (ex: DAL)
- Institution Name: the full institution name (ex: Dalhousie University)
- Institution Website: the institution’s website (ex: https://www.dal.ca/). You can confirm the URL is valid with the
Check URLbutton. - Organization ID: Press the
Search Org IDbutton. A list of potential WikiData, GRID, ROR, EDMO and NERC results for the institution will appear. Choose the best match, and paste that URL into the blank Organization ID cell. - Institution Country: the country where the institution is headquartered
- Institution State: the state where the institution is headquartered
- Institution Sector: one of Unknown, Government/Other Public, University/College/Research Hospital, Private, or Non-profit.
Once all values are completed, press Create Institution and confirm the following output:
Institution record 'DAL' created.
You can re-run this cell as many times as you need, to add each missing institution.
Write Project to the Database
STOP - confirm there is no Push currently ongoing. If a Push is ongoing, you must wait for it to be completed before processing beyond this point.
Finally, it is time to write the project records to the database and create the new project!
First, you should run this cell with printSQL = True. This will run the code, but print the SQL query instead of running it against the database. This enables you to do a dry run and make sure everything is in order before you register your project. If there are no errors, you can edit the cell to read printSQL = False and run again. This will register the project!
You will see some output - confirm each line is accompanied by a green OK.
Task List Checkpoint
In Gitlab, this task can be completed at this stage:
- [ ] - NAME create schema and project records ("Creating and Updating project metadata" notebook)
Save Contact Information
At this stage, the next step is to add contact information for all identified collaborators.
This cell will gather and print out all contacts and their information. Review for errors. If none exist, move to the next cell.
The next cell writes to the database: STOP - confirm there is no Push currently ongoing. This cell will add each contact to the database, into the obis.contacts and obis.contacts_projects tables, as needed.
Valid output will be of this format:
Valid contact:  Fred Whoriskey OTN principalInvestigator fwhoriskey@dal.ca
Created contact Fred Whoriskey
Task List Checkpoint
In Gitlab, this task can be completed at this stage:
- [ ] - NAME add project contact information ("Creating and Updating project metadata" notebook)
Add Species Information
The following section will allow you to add the required information into the obis.scientific_names table.
The first cell imports the required function.
The second cell, when run, will create an editable input form for each animal.
You should review to confirm the following:
- the scientific name matches an accepted WoRMS taxon. There should be a URL provided and no error messages.
- the common name is acceptable. If it is not, you can choose a value from the dropdown menu (taken directly from WoRMS’
vernacularlist) OR you can enter a custom value to match the common name provided by the researcher.
Once you are sure that both the scientific and common names are correct, based on the information provided by both the project and the notebook, you may click the Add to project button for each animal record you’d like to insert.
There will be a confirmation display in the notebook to demonstrate if the insertion was successful.
Task List Checkpoint
In Gitlab, this task can be completed at this stage:
- [ ] - NAME add scientificnames ("Creating and Updating project metadata" notebook)
OPTIONAL: Add Project Loan Information
The following section is used by OTN staff to track projects which are recipients of OTN-equipment loans. This section is not within the scope of this Node Manager Training, because it requires a login file for the
otnunitdatabase.
Skip to Verification
Once you scroll past the Project Loan Information section, you will see a yellow star and the words Skip to the new project Verification. You should click the button provided, which will help you scroll to the bottom of the notebook, where the Verify section is located.
This is a chance to visually review all the fields you just entered. You should run these cells and review all output to ensure the database values align with the intended insertions.
Task List Checkpoint
In Gitlab, this task can be completed at this stage:
- [ ] - NAME verify all of above ("Creating and Updating project metadata" notebook)
Other Features of this Notebook
There are more features in the Create and Update Projects Nodebook than those covered above.
Schema Extension
This section is to be used when you have a project which is either Tracker or Deployment and is expanding to become a Data project. Ex: a project which was only tagging has begun deploying receivers.
You can use this Nodebook to create the missing tables for the schema. Ex: if a tagging project begins deploying receivers, the schema would now need stations, rcvr_locations, and moorings tables created.
Schema Updating
This section is to be used to change the values contained in obis.otn_resources. The first cell will open an editable form with the existing database values. You can change the required fields (ex: abstract).
To save and parse your inputted values DO NOT re-run the cell - this will clear all your input. Instead, the next cell is the one which needs to be run to parse the information.
Review the output of the parser cell and check for typos.
The next cell will show the changes that will be made to the project data. You can copy this output and paste it into the relevant Gitlab Issue for tracking.
The final cell will make the desired changes in the database. Ensure printSQL = False if you want the cell to execute directly.
Successful output will be of this format:
'Resource record for HFX has been updated.'
The following highlighted section is relevant only to Nodes who use Plone for their document management system
Quality Control - Create Plone Users and Access
If you are part of a Node that uses Plone as your document repository, then the following will be relevant for you.
Imports Cell
This section will be common for most Nodebooks: it is a cell at the top of the notebook where you will import any required packages and functions to use throughout the notebook. It must be run first, every time.
You will have to edit one section:
engine = get_engine()
- Within the open brackets you need to open quotations and paste the path to your database
.kdbxfile which contains your login credentials.- On MacOS computers, you can usually find and copy the path to your database
.kdbxfile by right-clicking on the file and holding down the “option” key. On Windows, we recommend using the installed software Path Copy Copy, so you can copy a unix-style path by right-clicking.- The path should look like
engine = get_engine(‘C:/Users/username/Desktop/Auth files/database_connection.kdbx’).Plone Login
The first cell is another import step.
The second cell requires input:
- Proper Plone log-in information must be written in the
plone_auth = get_plone_auth('./plonetools/plone_auth.json')file.- In order to do this, click on the
Jupytericon in the top left corner of the page.- This will bring you to a list of folders and notebooks. Select the
plonetoolsfolder. From there, select theplone_auth.jsonfile and input your Plone base URL, username, and password. Please ensure the base_url in your json file ends in a slash, likehttps://members.oceantrack.org/!- You can now successfully log into Plone.
Now, when you run the cell, you should get the following output:
Auth Loaded:
------------------------------------------------------------------------------
base_url: https://members.oceantrack.org/
user_name: user
verify ssl: False
Finally, the third cell in this section will allow you to login. You should see this message:
Login Successful!Access Project Information
Some information is needed in order to create the project Plone folders.
There are three ways to enter this information:
- Access Project Information from Database
- Manual Project Information Form - Parse Contacts
- Manual Project Information Form - Insert Contacts into Textfields
The first option is generally the easiest, if the project has already been successfully written to the database using the
Create and Update ProjectsNodebook. To do this, you enter thecollectioncodeof your project, and run the cell. If there are no errors, you can click theSKIPbutton which will take you down the Nodebook to the next section.Create Missing Users
This section will use the registered project contacts and compare against existing Plone users. It will compare by email, fullname, and lastname.
If a user is found, you will not need to create a new account for them.
If a user is not found, you will have to create an account for them. To do this, you can use the editable form in the next cell.
The editable cell will allow you to choose each contact that you’d like to register, and will autofill the information (including a suggested username). The password should be left blank. Once you are happy with the form, click
Add User. An email will be sent to the new user, prompting them to set a password. Then you can repeat by selecting the next contact, etc.Once all contacts have Plone accounts (new or otherwise) you are finished.
Task List Checkpoint
In Gitlab, this task can be completed at this stage:
- [ ] - NAME create new project repository users ("Create Plone Folders and Add Users" notebook)Create Project Repository
To create the project folder you must first enter the relevant Node information:
- otnunit:
node = None- safnode, migramar, nepunit:
node = "node"- lowercase with quotation marks, fill in the value based on the path in Plone.- all other nodes (not hosted by OTN):
node = NoneRunning this cell will print out an example of the URL, for your confirmation. Ensure the
collectioncodeandNodeare correct.The expected format:
https://members.oceantrack.org/data/repository/node_name/collectioncode(node name is for SAF, MigraMar, and NEP only)If you are confident the folder path is correct, you can run the next cell and confirm the following success message:
Creating collection folder 'collectioncode'. Done!
https://members.oceantrack.org/data/repository/node_name/collectioncode
Task List Checkpoint
In Gitlab, this task can be completed at this stage:
- [ ] - NAME create project repository folder ("Create Plone Folders and Add Users" notebook)Add Users to Repository
Now that the users AND folder have been created, the users must be given access to the new folder.
Using the final cell in the
Plone repository folder creationsection, you will be provided with an editable search-bar.Type in the Plone username of each contact (new and existing). Search results will appear:
- Select the User who you would like to add
- Choose their permissions
- Click “Change repo permissions” to add them to the folder.
Review for the following success message:
Changed https://members.oceantrack.org/data/repository/node_name/collectioncode sharing for username:
	Contributor=True Reviewer=True Editor=True Reader=True
Then you may choose
Add another userand begin again.The acceptable folder permissions may vary depending on the project role of the contact. Here are some guidelines:
- Principal Investigator: all permissions
- Researcher: all permissions except
Reviewer- Student: all permissions except
Reviewer- Technician: only
ContributorandReader- Collaborator: only
ContributorandReaderThis is very fluid and can be edited at any time. These are guidelines only!
Task List Checkpoint
In Gitlab, this task can be completed at this stage:
- [ ] - NAME add project repository users to folder ("Create Plone Folders and Add Users" notebook)OPTIONAL: Add Project Loan Information
The following section is used by OTN staff to track projects which are recipients of OTN-equipment loans. This section is not within the scope of this Node Manager Training, because it requires a login-file for the
otnunitdatabase.
Final Steps
The remaining steps in the Gitlab Checklist are completed outside the Nodebooks.
First: you should access the created Repository folder in your browser and confirm if the title and sharing information is correct. If so, add the project metadata .txt file into the “Data and Metadata” folder to archive.
Next, you should send an email to the project contacts letting them know their project code and other onboarding information. Please note that OTN has a template we use for our onboarding emails. It is recommended that you create a template for your Node which includes relevant reporting instructions.
Finally, the GitLab ticket can be assigned to an OTN analyst for final verification in the database.
Key Points
Loading project metadata requires subjective decisions and judgement by the Data Manager
Loading project metadata is a required first step towards managing a project’s data in the Node
Tagging Metadata
Overview
Teaching: 90 min
Exercises: 0 minQuestions
How do I load new tags into the Database?
Objectives
Understand the proper template-completion
Understand how to use the Gitlab checklist
Learn how to use the
Tag-1notebookLearn how to use the
Tag-1bnotebookLearn how to use the
Tag-2notebook
Process workflow
The process workflow for tag metadata is as follows:
flowchart LR
    tag_start(( )) --> get_meta(Receive
tag metadata
from researchers)
    style tag_start fill:#00FF00,stroke:#00FF00,stroke-width:4px
    get_meta --> gitlab(Create
Gitlab
issue)
    gitlab --> inspect(Visually
inspect)
    inspect --> nodebook(Process and verify
with nodebooks)
    nodebook --> plone(Add metadata
to repository folder)
    plone --> otn(Pass to
OTN)
    otn --> end2(( ))
    style end2 fill:#FF0000,stroke:#FF0000
Once a project has been registered, the next step (for Tracker and Data project types) is to begin to quality control and load the project’s tagging metadata into the database. Tagging metadata should be reported to your Node in the template provided here. This file holds information about the deployment of any and all tags (acoustic, PIT, satellite, floy etc.) in or on animals for the purposes of tracking their movements using either listening stations or via mark/recapture. Any biological metrics that were measured at tagging time, i.e. length, weight, population, are also able to be recorded for association with the tagging event, permitting future analyses.
Recall that there are multiple levels of data tables in the database for tagging records: raw tables (“raw”), cache tables (“intermediate”) and otn tables (“upper”). The process for loading tagging metadata evaluates and promotes the data through each of these levels, as reflected by the GitLab task list.
Completed Metadata
Immediately, upon receipt of the metadata, create a new GitLab issue. Please use the Tag Metadata Issue checklist template.
Here is the Issue checklist, for reference:
Tag Meta Data
- [ ] - NAME add label *'loading records'*
- [ ] - NAME load raw tag metadata (`tag-1` notebook) **put_table_name_in_ticket**
- [ ] - NAME confirm no duplicates in raw table, review and remove (`tag-1b` notebook)
- [ ] - NAME verify raw table (`tag-2` notebook)
- [ ] - NAME post updated metadata to project folder (OTN members.oceantrack.org, FACT RW etc) if needed
- [ ] - NAME email notification of updated metadata file to PI and individual who submitted
- [ ] - NAME build cache tables (`tag-2` notebook)
- [ ] - NAME verify cache tables (`tag-2` notebook)
- [ ] - NAME load otn tables (`tag-2` notebook)
- [ ] - NAME verify otn tables (`tag-2` notebook)
- [ ] - NAME verify tags are not part of another collection (`tag-2` notebook)
- [ ] - NAME label issue with *'Verify'*
- [ ] - NAME pass issue to analyst for final verification
- [ ] - NAME check for double reporting (verification_notebooks/Tag Verification notebook)
Visual Inspection
Once the researcher provides the completed file, the Data Manager should complete a visual check for formatting and accuracy.
In general, Tagging Metadata has 3 sections:
- information about the tag
- information about the animal
- information about the tag deployment
Information about the tag comes from Tag Specifications and is mandatory. Information about the animal is limited to the sampling conducted. The minimum requirement here is simply the common and scientific names. All other columns for biological parameters are optional. Information about the tag deployment includes location and dates and is mandatory to complete.
Data Managers should check for the following in the metadata:
- Is there any information missing from the essential columns? These are:
- tag_type
- tag_manufacturer
- tag_model
- tag_serial_number (if not completed,
unknowncan be entered ONLY IF animal_id is also completed with unique values) - tag_id_code
- tag_code_space
- tag_implant_type
- est_tag_life
- common_name_e
- scientific_name
- release_location
- release_latitude
- release_longitude
- utc_release_date_time
- If any of the above mandatory fields are blank, follow-up with the researcher will be required if:
- you cannot discern the values yourself
- you do not have access to the Tag Specifications from the manufacturer (relevant for the columns containing
taginformation).
- Are the
tag_id_codeandtag_code_spacevalues formatted correctly? - Is the
UTC_release_date_timecolumn formatted correctly?
Often formatting errors occur in the information about the tag. Pay close attention here.
The metadata template available here has a Sample Data Row as an example of properly-formatted metadata, along with the Data Dictionary sheet which contains detailed expectations for each column. Refer back to these often. We have also included some recommendations for filling in the tag metadata template on our FAQ page. Here are some guidelines:
-
Animals with >1 associated tag (sensors, or double-tagging): add one line PER
TRANSMITTER IDinto the Tag Metadata form. TheANIMAL_IDcolumn, or theTAG_SERIAL_NUMBERcolumn must be the same between the rows in order to link those 2 (or more) records together. Explanations: TagTAG_CODE_SPACE(this is the “protocol”, and is available from tag specifications) can be formatted like “A69-1303” or “R64K” depending on the manufacturer. When a tag has sensors, it needs 1 line in the tag metadata per sensor. Each line should be nearly identical, but have differentTAG_ID_CODEs(each associated with a sensor).Records with the sameTAG_SERIAL_NUMBERand/orANIMAL_IDwill be recognized as 1 tag in our database. - Animals with anchor tags (ie: FLOY, spaghetti, streamer, dart, t-bar tags): ensure the
TAG_TYPEcolumn =ANCHOR. You may leave the following columns empty:tag_manufacturer,tag_model,tag_id_code,tag_code_spaceandest_tag_life. - Animals with satellite tags: ensure the
TAG_TYPEcolumn =SATELLITE. You may leave the following columns empty:tag_id_codeandtag_code_space.
Please ensure each tag applied to an animal (of any type) has its own row. Anchor tags (inlcuding FLOY, spaghetti, streamer, dart, t-bar tags), radio tags (including PIT, VHF), satellite tags (and more) each need their own row in the metadata sheet.
Quality Control - Tag-1 Nodebook
Each step in the Issue checklist will be discussed here, along with other important notes required to use the Nodebook.
Imports cell
This section will be common for most Nodebooks: it is a cell at the top of the notebook where you will import any required packages and functions to use throughout the notebook. It must be run first, every time.
There are no values here which need to be edited.
Path to File
In this cell, you need to paste a filepath to the relevant Tagging Metadata file. The filepath will be added between the provided quotation marks.
Correct formatting looks something like this:
# Path to your tagging metadata file - Formats Accepted: (csv, xls or xlsx)
filepath = r"C:/Users/path/to/tag_metadata.xlsx"
Once you have added your filepath, you can run the cell.
Verification of File Contents - formatting
First, you must choose which sheet you would like to quality control. Generally, it will be named Tag Metadata but is often customized by researchers. Once you have selected the sheet name, do not re-run the cell to save the output - simply ensure the correct sheet is highlighted and move onto the next cell.
This cell will now complete the first round of Quality Control checks.
The output will have useful information:
- Is the sheet formatted correctly? Correct column names, datatypes in each column etc.
- Are either the
animal_idortag_serial_numbercolumns completed? - Are there any
harvest_datevalues in the metadata? Are they all after theutc_release_date_time? Note:In our metadata we use the harvest_date column to indicate when the tag was removed from the fist animal before being re-used. - Is the information about the animal formatted according to the Data Dictionary?
- Are there any tags which are used twice in the same sheet?
- Are there potential transcription errors in the
tag_code_space? Ex: drag-and-drop errors from Excel - Are the scientific and common names used accepted by WoRMS? If there are errors flagged here which state
Vernacular records not found for Aphia ID: 12345please make a note, but continue on. This will be fixed at a later stage
The Nodebook will indicate the sheet had passed quality control by adding a ✔️green checkmark beside each section. The Nodebook will also generate an interactive plot for you to explore, summarizing the tags released over time, by species.
If there is information that fails these quality control checks, you should fix the source file (potentially requiring confirmation of accurate fixes from the researcher) and try again.
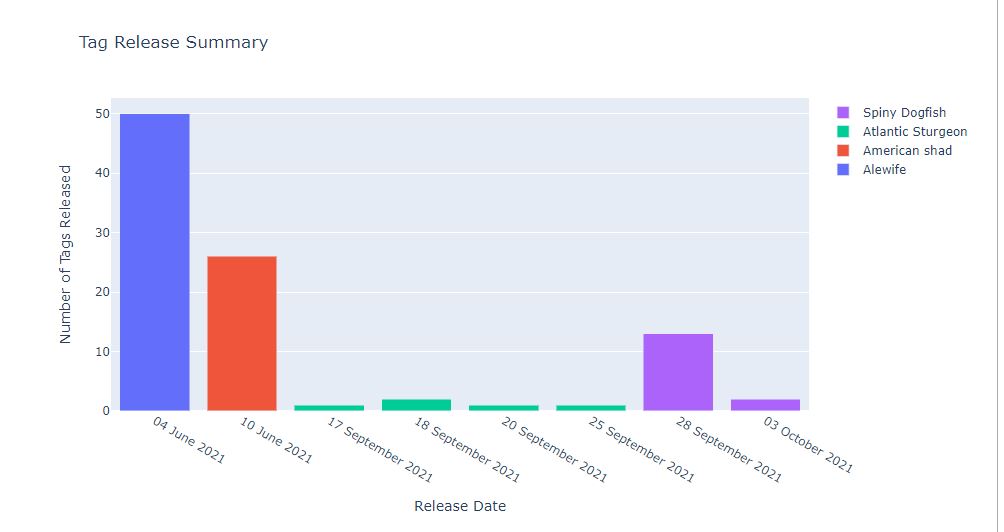
Connection to Database
You will have to edit two sections:
schema = 'collectioncode'- Please edit to include the relevant project code, in lowercase, between the quotes.
engine = get_engine()- Within the open brackets you need to open quotations and paste the path to your database
.kdbxfile which contains your login credentials. - On MacOS computers, you can usually find and copy the path to your database
.kdbxfile by right-clicking on the file and holding down the “option” key. On Windows, we recommend using the installed software Path Copy Copy, so you can copy a unix-style path by right-clicking. - The path should look like
engine = get_engine(‘C:/Users/username/Desktop/Auth files/database_connection.kdbx’).
- Within the open brackets you need to open quotations and paste the path to your database
Once you have added your information, you can run the cell. Successful login is indicated with the following output:
Auth password:········
Connection Notes: None
Database connection established
Connection Type:postgresql Host:db.load.oceantrack.org Database:otnunit User:admin Node:OTN
Bounding Box Check
The following cell will map the locations of all the tag deployments, compared to the bounding box of the project. This is used to confirm the following:
- the tag release locations are in the part of the world expected based on the project abstract. Ex: lat/long have correct +/- signs
- the project bounding box is correct
If it appears the tag release locations have incorrect signs, you can fix it in the source file and re-run the cell.
If it appears there are tag release locations which are on land, you may want to reach out to the researcher for corrected coordinates.
If the bounding box needs to be expanded to include the tags, you can use the Square Draw Tool to re-draw the bounding box until you are happy with it. Once all tags are drawn inside the bounding box, press the Adjust Bounding Box button to save the results.
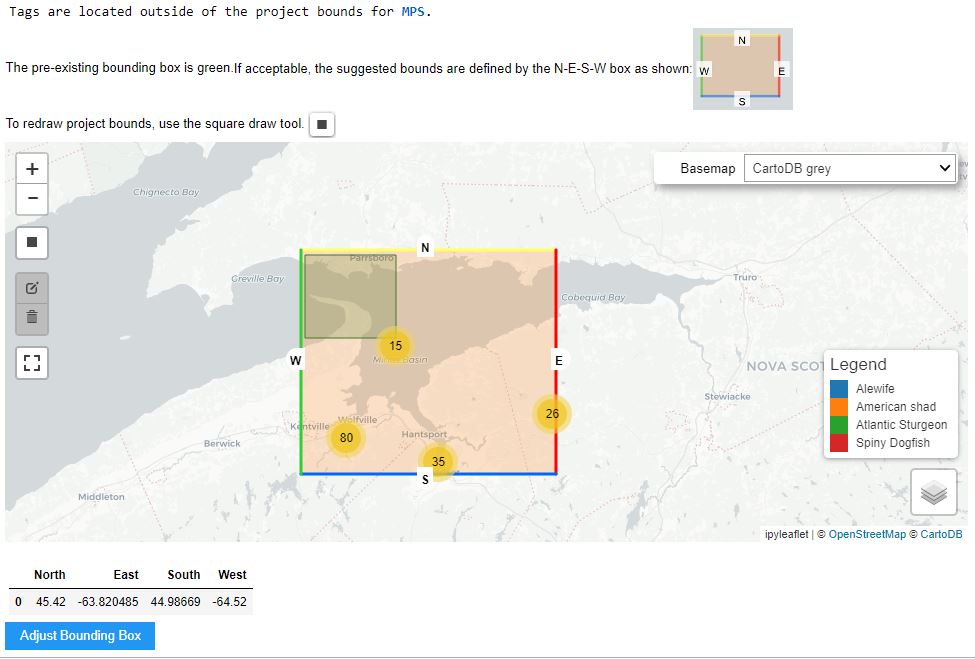
Verification of File Contents - against database
This cell will now complete the second round of Quality Control checks using data already held in the Database.
The output will have useful information:
- Have these tags been used on other projects in the database? Check the dates to ensure they don’t overlap and that there is no double-reporting.
- Do we have the Tag Specifications from the manufacturer? Do the
tag_id_code,tag_code_spaceandest_tag_lifematch the specifications for each provided serial number? Are there typos or errors that require clarification from the researcher? - Is the information about the animal formatted according to the Data Dictionary?
- Are all the life stages in the
obis.lifestage_codestable? If not, the reported life stage should be compared to the values in theobis.lifestage_code table, and adjusted to match the DB records if possible. Otherwise, use theadd_lifestage_codesNodebook. - Are all length types in the
obis.length_type_codestable? If not, the reported length type code should be compared to the values in theobis.length_type_codestable, and adjusted to match the DB records if possible. Otherwise, use theadd_lengthtype_codesNodebook. - Are all the age units in the
obis.control_unitstable? If not, the reported age units should be compared to the values in theobis.control_unitstable, and adjusted to match the DB records if possible. Otherwise, use theadd_control_unitsNodebook.
- Are all the life stages in the
- Are there any tags in this sheet which have been previously reported on this project in the metadata? ex: duplicates.
- Do the scientific and common names match the records previously added to
obis.scientificnamesfor this schema? If not, please check the records in theobis.scientificnames(using DBeaver) and compare to the source file to confirm there are no typos. If this is indeed a new species tagged by this project, use thescientific_name_checkNodebook to add the new species. - Are all the provided
tag_modelvalues present in theobis.instrument_modelstable? If not, please check the records in theobis.instrument_models(using DBeaver) and the source file to confirm there are no typos. If this is a new model which has never been used before, use theadd instrument_modelsNodebook to add the new tag model. - Are there any tags in this sheet which have been previously reported on this project in the metadata, but with different deployment dates? ex: overlapping/missing harvest dates
- Are there any tags flagged as overlapping tag deployments, but not as duplicate tags? There may be an error with the tag’s serial number. Check if the tag’s ID exists in the otn_transmitters table of the schema or in the
vendor.c_vemco_tagstable, and compare it to the tag in the tagging metadata sheet. Fix the tag in the tagging metadata sheet if any errors are found. - Are there any release dates in the future?
The Nodebook will indicate the sheet had passed quality control by adding a ✔️green checkmark beside each section.
If there is information that fails quality control, you should fix the source file (potentially by speaking to the researcher) and try again.
Loading the Raw Table
ONLY once the source file has successfully passed ALL quality control checks can you load the raw table to the database.
In this cell, you will have to edit one section in order to name the raw table. Between the quotes, please add your custom table suffix. We recommend using year_month or similar, to indicate the most-recently tagged animal in the metadata sheet.
table_suffix = "YYYY_MM"
The Nodebook will indicate the success of the table-creation with the following message:
Reading file: otn_metadata_tagging.xlsx.
Tag Metadata sheet found, reading file... OK
Loading 'otn_metadata_tagging.xlsx' file into collectioncode.c_tag_meta_YYYY_mm... OK
Loaded XX records into table collectioncode.c_tag_meta_YYYY_mm
True
Find Raw Data Table in DB (schema.c_tag_meta_YYYY_MM)
- This table will includes all the OTN compulsory columns for tag metadata as well as the ones the researcher includes. But only OTN compulsory columns are QCed: `select * from schema.c_tag_meta_YYYY_MM where tag_serial_number ='xxxxxx'` - Cache Tables (`schema.animalcache_YYYY_MM  ` & `schema.tagcache_YYYY_MM`)
- These are the intermediate tables in the tag process
- These two types of tables grab the necessary information from the raw table and splits it into two intermediate tables: One is the animal cache which contains all the information related to the tagged animals in this project on YYYY_MM. Another is tagcache related to the tag information.  Both tables contain release locations, release date, project code, institution, etc.
Task list checkpoint
In Gitlab, this task can be completed at this stage:
- [ ] - NAME load raw tag metadata ('tag-1' notebook) **put_table_name_in_ticket**
Ensure you paste the table name (ex: c_tag_meta_YYYY_mm) into the section indicated, before you check the box.
Quality Control - Tag-1b Nodebook
Once the raw table is successfully loaded, the next step is to ensure any previously-loaded tags are not re-added to the database (causing duplication errors).
Imports cell
This section will be common for most Nodebooks: it is a cell at the top of the notebook where you will import any required packages and functions to use throughout the notebook. It must be run first, every time.
There are no values here which need to be edited.
Table Name and Database Connection
You will have to edit three sections:
engine = get_engine()- Within the open brackets you need to open quotations and paste the path to your database
.kdbxfile which contains your login credentials. - On MacOS computers, you can usually find and copy the path to your database
.kdbxfile by right-clicking on the file and holding down the “option” key. On Windows, we recommend using the installed software Path Copy Copy, so you can copy a unix-style path by right-clicking. - The path should look like
engine = get_engine(‘C:/Users/username/Desktop/Auth files/database_conn_string.kdbx’).
- Within the open brackets you need to open quotations and paste the path to your database
schema = 'collectioncode'- Please edit to include the relevant project code, in lowercase, between the quotes.
table_name = 'c_tag_meta_YYYY_mm'- Within the quotes, please add the name of the raw table.
Once you have added your information, you can run the cell. Successful login is indicated with the following output:
Auth password:········
Connection Notes: None
Database connection established
Connection Type:postgresql Host:db.load.oceantrack.org Database:otnunit User:admin Node:OTN
Checking for Duplicates
This cell, once run, may print out that there are No Duplicates Found. If so, you can complete the task in Gitlab and move to the Tag-2 notebook
However, if there is output identifying duplicates, some review is necessary.
Immediately, the Nodebook will create a new table, named schema.c_tag_meta_YYYY_mm_no_dup which is an exact copy of your raw table. There will be a print-out saying the following (under a table):
Building schema.c_tag_meta_YYYY_mm_no_dup table:
The following SQL queries will display the differences/similarities between the raw table (schema.c_tag_meta_YYYY_mm_no_dup) record and the otn_animals or otn_transmitters table record.
Then, there will be two interactive tables provided, which can be used to identify and delete any duplicate records from the no_dup table.
- Comparison to otn_animals
- Comparison to otn_transmitters
All text should be black, and you should scroll through the entire table, row-by-row, to review any values where the cell is highlighted/flashing RED. These are highlighting differences between the values in the raw table vs values in the otn table, for this animal record.
If there are no highlighted/flashing red cells in a row, you can delete the record from the no_dup table by using the delete button on the left-side of the table. You can also use the Select All button if appropriate.
If there are highlighted/flashing red cells in a row, you must compare the highlighted values. These cannot be deleted without review since they are not exact duplicates, and could indicate an update to the database records is needed.
Ex: life_stage from the raw table might = SMOLT while lifestage from otn_animals might = ADULT. This will cause the column lifestage_equal? to read FALSE and the cells to flash red. In this example, it could indicate that the researcher was correcting an error in the previously-submitted record (this animal was actually a smolt, not adult) and therefore we need to update the record in our database. In this case, you would need to email the researcher to confirm, pause processing this Issue, and create a new DB_fix Issue with the information which needs updating.
If you review all the flashing red cells and find they are only rounding errors, or similar non-significant data changes, you can determine that they are indeed duplicate records. You can now use the delete button on the left-side of the table. You can also use the Select All button, if all records are true duplicates.
Once you have selected a row to be deleted, the text will turn red to help you visualize your selection.
Deleting Duplicates
Once you have identified all the true duplicate records, this next cell will remove them from the no_dup table. Success will be indicated with this message, and a table:
Compiling list of deletions to the schema.c_tag_meta_YYYY_mm_no_dup table.
Delete the following XXX records from schema.c_tag_meta_YYYY_mm_no_dup?
You will be able to press the button to confirm, and the Nodebook will remove all the records.
Task list checkpoint
In Gitlab, this task can be completed at this stage:
- [ ] - NAME confirm no duplicates in raw table, review and remove ("tag-1b" notebook)
Ensure you paste the no_dup table name (ex: c_tag_meta_2021_09_no_dup), if relevant, into the Issue before you check the box. This is now the raw table that will be used for the result of the data-loading process.
Quality Control - Tag-2 Nodebook
Now that the raw table is free from duplicates, we can begin to move the records into the higher-level cache and otn tables, where they will be matched to detections.
Imports cell
This section will be common for most Nodebooks: it is a cell at the top of the notebook where you will import any required packages and functions to use throughout the notebook. It must be run first, every time.
There are no values here which need to be edited.
Database Connection
You will have to edit one section:
engine = get_engine()- Within the open brackets you need to open quotations and paste the path to your database
.kdbxfile which contains your login credentials. - On MacOS computers, you can usually find and copy the path to your database
.kdbxfile by right-clicking on the file and holding down the “option” key. On Windows, we recommend using the installed software Path Copy Copy, so you can copy a unix-style path by right-clicking. - The path should look like
engine = get_engine(‘C:/Users/username/Desktop/Auth files/database_conn_string.kdbx’).
- Within the open brackets you need to open quotations and paste the path to your database
Once you have added your information, you can run the cell. Successful login is indicated with the following output:
Auth password:········
Connection Notes: None
Database connection established
Connection Type:postgresql Host:db.load.oceantrack.org Database:otnunit User:admin Node:OTN
Table Name
You will have to edit two sections:
table_name = 'c_tag_meta_YYYY_mm'- Within the quotes, please add the name of the raw table. Might be the
no_duptable if relevant.
- Within the quotes, please add the name of the raw table. Might be the
schema = 'collectioncode'- Please edit to include the relevant project code, in lowercase, between the quotes.
Verification of File Contents - against database
This cell will now complete the final round of Quality Control checks. These are exactly the same as the checks at the end of the tag-1 Nodebook.
The output will have useful information:
- Have these tags been used on other projects in the database? Check the dates to ensure they don’t overlap, and double-reporting is not taking place.
- Do we have the Tag Specifications from the manufacturer? Do the
tag_id_code,tag_code_spaceandest_tag_lifematch the specifications for each provided serial number? Are there typos or errors that require clarification from the researcher? - Is the information about the animal formatted according to the Data Dictionary?
- Are all the life stages in the
obis.lifestage_codestable? If not, the reported life stage should be compared to the values in theobis.lifestage_code table, and adjusted to match the DB records if possible. Otherwise, use theadd_lifestage_codesNodebook. - Are all length types in the
obis.length_type_codestable? If not, the reported length type code should be compared to the values in theobis.length_type_codestable, and adjusted to match the DB records if possible. Otherwise, use theadd_lengthtype_codesNodebook. - Are all the age units in the
obis.control_unitstable? If not, the reported age units should be compared to the values in theobis.control_unitstable, and adjusted to match the DB records if possible. Otherwise, use theadd_control_unitsNodebook.
- Are all the life stages in the
- Are there any tags in this sheet which have been previously reported on this project in the metadata? ex: duplicates.
- Do the scientific and common names match the records which are previously added to
obis.scientificnamesfor this schema? If not, please check the records in theobis.scientificnames(using DBeaver) and compare to the source file to confirm there are no typos. If this is indeed a new species tagged by this project, use thescientific_name_checkNodebook to add the new species. - Are all the provided
tag_modelvalues present in theobis.instrument_modelstable? If not, please check the records in theobis.instrument_models(using DBeaver) and the source file to confirm there are no typos. If this is a new model which has never been used before, use theadd instrument_modelsNodebook to add the new tag model. - Are there any tags in this sheet which have been previously reported on this project in the metadata, but with different deployment dates? ex: overlapping/missing harvest dates
- Are there any tags being flagged as overlapping tag deployments, but not as duplicate tags? There may be an error with the tag’s serial number. Check if the tag’s ID exists in the otn_transmitters table of the schema or in the
vendor.c_vemco_tagstable, and compare it to the tag in the tagging metadata sheet. Fix the tag in the tagging metadata sheet if any errors are found. - Are there any release dates in the future?
The Nodebook will indicate the sheet had passed quality control by adding a ✔️green checkmark beside each section.
If there is information which is not passing quality control, you should fix the source file (potentially speaking to the researcher), delete or edit the raw table, and try again.
Task list checkpoint
In Gitlab, this task can be completed at this stage:
- [ ] - NAME verify raw table ("tag-2" notebook)
Loading to Cache Tables
The first cell will create the cache tables, with the following success messaging:
Creating table schema.tagcache_YYYY_mm
Creating table schema.animalcache_YYYY_mm
Table creation finished.
The next step will populate the tag_cache and animal_cache tables. This separates the information about the tag and the information about the animal, joining the records by a unique catalognumber based on the tag deployment information.
Running this cell will provide the following success message:
Added XX records to the schema.animalcache_YYYY_mm table
Added XX records to the schema.tagcache_YYYY_mm table
You need to pay special attention to the number of records loaded to the animal and tag caches. If these numbers don’t match you may need to investigate why there are more tags than animals or vice versa. Possible reasons the values may not match:
- There are some animals with only anchor tags, no acoustic tags (so no record is added to
tag_cache, just to animal cache). - There are some animals with >1 tag attached, or a tag with >1 pinger ID (multiple records added to
tag_cache, for each animal)
If the values are acceptable, you can move on.
Task list checkpoint
In Gitlab, this task can be completed at this stage:
- [ ] - NAME build cache tables ("tag-2" notebook)
Verifying Cache Tables
This cell will now complete the Quality Control checks of the cache tables.
The output will have useful information:
- Are there more animals than tags?
- Were all records loaded from raw to cache successfully?
- Do all animals have tag records, and all tags have animal records?
- Are there blank strings that need to be set to NULL? If so, press the
Set to NULLbutton. - Is the species information and location information formatted correctly?
- Are the sex, age, common name and instrument model records present in the
obistable controlled vocabulary? - Do the length/weight values make sense for that species/lifestage? If not, change in the
animal_cachetable. - Are there any remaining overlapping tags?
- Are Tag Specifications available, and do they match the records? Be mindful that harvested tags will have a different tag life than is stated in the Specifications.
The Nodebook will indicate the sheet had passed quality control by adding a ✔️green checkmark beside each section.
If there are any errors go into database and fix the cache tables themselves, and re-run the cell.
Find Cache Tables in DB (schema.animalcache_YYYY_MM & schema.tagcache_YYYY_MM)
- These are the intermediate tables in the tag process
- These two types of tables grab the necessary information from the raw table and splits it into two intermediate tables: One is the animal cache which contains all the information related to the tagged animals in this project on YYYY_MM. Another is tagcache related to the tag information.  Both tables contain release locations, release date, project code, institution, etc.
Task list checkpoint
In Gitlab, this task can be completed at this stage:
- [ ] - NAME verify cache tables ("tag-2" notebook)
Loading to OTN Tables
STOP - confirm there is no Push currently ongoing. If a Push is ongoing, you must wait for it to be completed before processing beyond this point
This cell will populate the otn_animals and otn_transmitters master-tables, with the following success messaging:
Added XX records to schema.otn_animals table from animalcache_YYYY_mm
Added XX records to schema.otn_transmitters table from tagcache_YYYY_mm
The number of records added should match the number from the cache table loading step.
Task list checkpoint
In Gitlab, these tasks can be completed at this stage:
- [ ] - NAME load otn tables ("tag-2" notebook)
Verifying OTN Tables
This cell will now complete the Quality Control checks of the tag and animal records contained in the entire schema. We are no longer checking our newly-loaded records only, but also each previously-loaded record.
The output will have useful information:
- Are there more animals than tags?
- Do all animals have tag records, and all tags have animal records? Do their SNs/Datetimes match?
- Are there overlapping tags within the schema?
- Are there tags outside of the project bounding box?
- Are the values formatted properly for
the_geom,lenthtype,length2type,ageunits,sex? - Are there blank strings that need to be set to NULL? If so, press the
Set to NULLbutton in that cell. - Are there extra spaces that need to be clipped? If so, press the
Remove extra spacesbutton. - Do the length/weight values make sense for that species/lifestage? If not, change in the
otn_animalstable, or contact researcher. - Are the date-fields formatted correctly?
- Are there Tag Specifications available, and do they match the records? Be mindful that harvested tags will have a different tag life than is stated in the Specifications.
- Have these tags been used on other projects in the database? Check the dates to ensure they don’t overlap, and double-reporting is not taking place.
The Nodebook will indicate the sheet had passed quality control by adding a ✔️green checkmark beside each section.
If there are any errors, contact the researcher to scope potential data fixes, then open a DB-Fix Ticket, and use the Database Fix Notebooks to resolve the issues.
Find OTN Tables in DB (schema.otn_animals & schema.otn_transmitters)
- Similar to the Cache Tables, these 2 OTN tables will contain all animal & tag in this projects across all time.
- An example query:
select * from schema.otn_transmitters ot where catalognumber = 'XXXXX'
Task list checkpoint
In Gitlab, these tasks can be completed at this stage:
- [ ] - NAME verify otn tables ("tag-2" notebook)
- [ ] - NAME verify tags are not part of another collection (`tag-2` notebook)
Final Steps
The remaining steps in the Gitlab Checklist are completed outside the notebooks.
First: you should access the Repository folder in your browser and add the cleaned Tag Metadata .xlsx file into the “Data and Metadata” folder.
Then, please email a copy of this file to the researcher who submitted it, so they can use the “cleaned” version in the future.
Finally, the Issue can be passed off to an OTN-analyst for final verification in the database.
Key Points
Loading tagging metadata requires judgement from the Data Manager
Communication with the researcher is essential when errors are found
Deployment Metadata
Overview
Teaching: 90 min
Exercises: 0 minQuestions
How do I load new deployments into the Database?
Objectives
Understand how to complete the template
Understand how to use the GitLab checklist
Learn how to use the
Deploynotebook
Process workflow
The process workflow for deployment metadata is as follows:
flowchart LR
    tag_start(( )) --> get_meta(Receive
deployment metadata
from researchers)
    style tag_start fill:#00FF00,stroke:#00FF00,stroke-width:4px
    get_meta --> gitlab(Create
Gitlab
issue)
    gitlab --> inspect(Visually
inspect)
inspect --> nodebook(Process and verify
with nodebooks)
    nodebook --> plone(Add metadata
to repository folder)
    plone --> otn(Pass to
OTN)
    otn --> end2(( ))
    style end2 fill:#FF0000,stroke:#FF0000
Once a project has been registered, the next step (for Deployment and Data project types) is to begin to quality control and load the instrument deployment metadata into the database. Deployment metadata should be reported to the Node in the template provided here. This file will contain information about the deployment of any instruments used to detect tagged subjects or collect related data. This includes stationary test tags, range test instruments, non-acoustic environmental sensors, and so on. Geographic location is recorded, as well as the duration of the deployment for each instrument. The locations of these listening stations are used to fix detections geographically.
Recall that there are multiple levels of data-tables in the database for deployment records: raw tables, rcvr_locations, stations and moorings. The process for loading instrument metadata reflects this, as does the GitLab task list.
Submitted Metadata
Immediately upon receipt of the metadata, create a new GitLab issue. Please use the Receiver_metadata Issue checklist template.
Here is the Issue checklist, for reference:
Receiver Metadata
- [ ] - NAME add label *'loading records'*
- [ ] - NAME load raw receiver metadata (`deploy` notebook) **put_table_name_in_ticket**
- [ ] - NAME check that station locations have not changed station "NAMES" since last submission (manual check)
- [ ] - NAME verify raw table (`deploy` notebook)
- [ ] - NAME post updated metadata file to project repository (OTN members.oceantrack.org, FACT RW etc)
- [ ] - NAME email notification of updated metadata file to PI and individual who submitted
- [ ] - NAME load station records (`deploy` notebook)
- [ ] - NAME verify stations (`deploy` notebook)
- [ ] - NAME load to rcvr_locations (`deploy` notebook)
- [ ] - NAME verify rcvr_locations (`deploy` notebook)
- [ ] - NAME add transmitter records receivers with integral pingers (`deploy` notebook)
- [ ] - NAME load to moorings (`deploy` notebook)
- [ ] - NAME verify moorings (`deploy` notebook)
- [ ] - NAME label issue with *'Verify'*
- [ ] - NAME pass issue to OTN DAQ for reassignment to analyst
- [ ] - NAME check if project is OTN loan, if yes, check for lost indicator in recovery column, list receiver serial numbers for OTN inventory updating.
- [ ] - NAME pass issue to OTN analyst for final verification
- [ ] - NAME check for double reporting (verification_notebooks/Deployment Verification notebook)

**receiver deployment files/path:**
Visual Inspection
Once the researcher provides the completed file, the Data Manager should complete a visual check for formatting and accuracy.
In general, the deployment metadata contains information on the instrument, the deployment location, and the deployment/recovery times.
Check for the following in the deployment metadata:
- Is there any information missing from the essential columns? These are:
- otn_array
- station_no
- deploy_date_time
- deploy_lat
- deploy_long
- ins_model_no
- ins_serial_no
- recovered
- recover_date_time
- If any of the above mandatory fields are blank, follow-up with the researcher will be required if:
- you cannot discern the values yourself.
- you do not have access to the Tag or Receiver Specifications from the manufacturer (relevant for the columns containing transmitter information).
- Are the station names in the metadata consistent with those already loaded to the database (ex. ‘_yyyy’ appended to station names or special characters in the metadata)?
- Are all lat/longs in the correct sign? Are they in the correct format (decimal degrees)?
- Do all transceivers/test tags have their transmitters provided?
- Are all recoveries from previous years recorded?
- Do comments suggest anything was lost or damaged, where recovery indicator doesn’t say “lost” or “failed”?
In general, the most common formatting errors occur in records where there are >1 instrument deployed at a station, or where the receiver was deployed and recovered from the same site.
The metadata template available here has a Data Dictionary sheet which contains detailed expectations for each column. Refer back to these definitions often. We have also included some recommendations on our FAQ page. Here are some guidelines:
- Deployment, download, and recovery information for each station is entered on a single line.
- When more than one instrument is deployed, downloaded, or recovered at the same station, enter each one on a separate line using the same
OTN_ARRAYandSTATION_NO. - When sentinel tags are co-deployed with receivers, their information can be added to
TRANSMITTERandTRANSMIT_MODELcolumns, on the same line as the receiver deployment. - If a sentinel tag is deployed alone then a new line for that station, with as much information as possible, is added.
- When stations are moved to a new location, but the researcher wants to keep the same station names, we often recommend appending ‘_yyyy’ to the station name, but this change might be forgotten the next time they submit metadata. So, we need to manually compare between the database and the metadata for special cases like this. Researchers may also submit station names with special characters which have been previously corrected and loaded to the database We need to make sure those same changes are reflected in the new metadata.
- When an instrument is deemed lost, a value of
lorlostshould be entered in the “recovered” field; if the instrument is found, this can be updated by changing the recovery field toforfoundand resubmitting the metadata sheet. - Every time an instrument is brought to the surface, enter
yto indicate it was successfully recovered, even if only for downloading and redeployment. A new line for the redeployment is required.
Task List Checkpoint
In GitLab, this task can be completed at this stage:
- [ ] - check that station locations have not changed station "NAMES" since last submission (manual check)
Quality Control - Deploy Nodebook
Each step in the Issue checklist will be discussed here, along with other important notes required to use the Nodebook.
Imports Cell
This section will be common for most Nodebooks: it is a cell at the top of the notebook where you will import any required packages and functions to use throughout the notebook. It must be run first, every time.
There are no values here which need to be edited.
Path to File
In this cell, you need to paste a filepath to the relevant Deployment Metadata file. The filepath will be added between the provided quotation marks.
Correct formatting looks something like this:
# Shortfrom metadata path (xls, csv)
filepath = r'C:/Users/path/to/deployment_metadata.xlsx'
You also must select the format of the Deployment metadata. Currently, only the FACT Network uses a slightly different format than the template available here. If its relevant for your Node, you can edit the excel_fmt section.
Correct formatting looks something like this:
excel_fmt = 'otn' # Deployment metadata format 'otn' or 'fact'
Once you have added your filepath and chosen your template format, you can run the cell.
Next, you must choose which sheet you would like to quality control. Generally, it will be named Deployment but is often customized by researchers. Once you have selected the sheet name, do not re-run the cell to save the output - simply ensure the correct sheet is highlighted and move onto the next cell.
Table Name and Database
You will have to edit three sections:
schema = 'collectioncode'- Please edit to include the relevant project code, in lowercase, between the quotes.
table_name = 'c_shortform_YYYY_mm'- Within the quotes, please add your custom table suffix. We recommend using
year_monthor similar, to indicate the most-recently deployed/recovered instrument in the metadata sheet.
- Within the quotes, please add your custom table suffix. We recommend using
engine = get_engine()- Within the open brackets you need to open quotations and paste the path to your database
.kdbxfile which contains your login credentials. - On MacOS computers, you can usually find and copy the path to your database
.kdbxfile by right-clicking on the file and holding down the “option” key. On Windows, we recommend using the installed software Path Copy Copy, so you can copy a unix-style path by right-clicking. - The path should look like
engine = get_engine('C:/Users/username/Desktop/Auth files/database_conn_string.kdbx').
- Within the open brackets you need to open quotations and paste the path to your database
Once you have added your information, you can run the cell. Successful login is indicated with the following output:
Auth password:········
Connection Notes: None
Database connection established
Connection Type:postgresql Host:db.for.your.org Database:your_db_name User:your_node_admin Node:Node
Verification of File Contents
Run this cell to complete the first round of Quality Control checks.
The output will have useful information:
- Is the sheet formatted correctly? Correct column names, datatypes in each column, etc.
- Compared to the
stationstable in the database, are the station names correct? Have stations “moved” location? Are the reported bottom_depths significantly different (check for possibleftvsmvsftmerrors). - Are all recovery dates after the deployment dates?
- Are all the provided
ins_model_novalues present in theobis.instrument_modelstable? If not, please check the records in theobis.instrument_modelsand the source file to confirm there are no typos. If this is a new model which has never been used before, use theadd instrument_modelsNodebook to add the new instrument model. -
Do all transceivers/test tags have their transmitters provided? Do these match any manufacturer specifications we have in the database? Note: For VR2AR and VR2Tx type receivers, researcher can record internal transmitters under the ‘transmitter’ column (example format: A69-1303-12345). We will then associate these ‘detections’ with the receiver! Though it’s not a compulsory information, it does help us distinguish real and tesing detections for your project, which can reduce the risk of mismatching.
- Are there any overlapping deployments (one serial number deployed at multiple locations for a period of time)?
- Are all the deployments within the Bounding Box of the project. If the bounding box needs to be expanded to include the stations, you can use the
Square Draw Toolto re-draw the bounding box until you are happy with it. Once all stations are drawn inside the bounding box, press theAdjust Bounding Boxbutton to save the results. - Are there possible gaps in the metadata, based on previously-loaded
detectionsfiles? This will be investigated in theDetections-3bNodebook if you need more details.
The Nodebook will indicate the sheet has passed quality control by adding a ✔️green checkmark beside each section. The Nodebook will also generate an interactive plot for you to explore, summarizing the instruments deployed over time, and a map of the deployments.
Using the map, please confirm the following:
- The instrument deployment locations are in the part of the world expected based on the project abstract. Ex: lat/long have correct +/- signs.
- The instrument deployments do not occur on land.
If there is information that fails quality control, you should fix the source-file (potentially after speaking to the researcher) and try again.
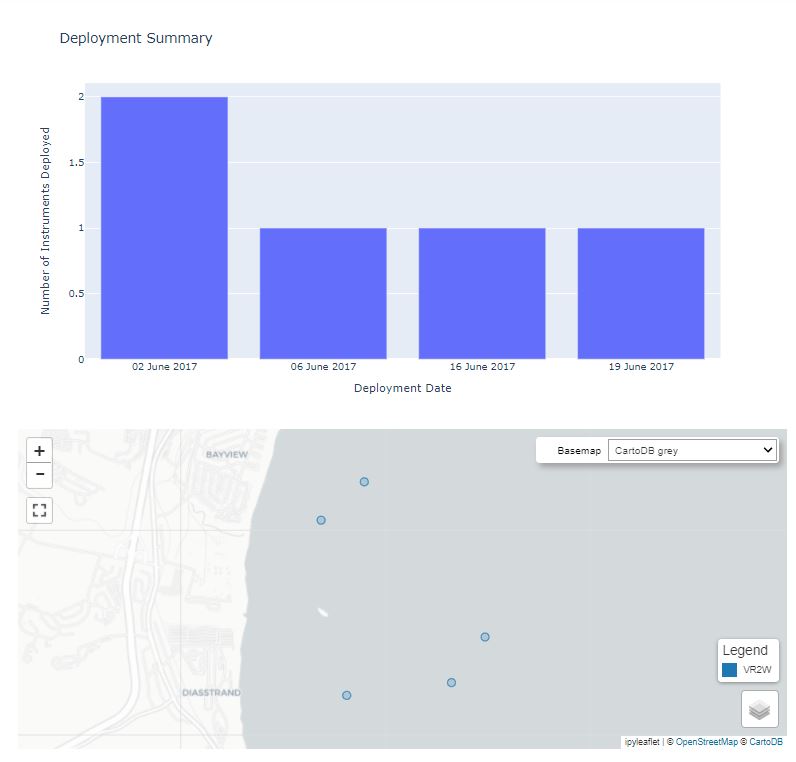
Loading the Raw Table
ONLY once the source file has successfully passed ALL quality control checks can you load the raw table to the database.
You have already named the table above, so there are no edits needed in this cell.
The Nodebook will indicate the success of the table-creation with the following message:
Reading file 'deployment_metadata.xlsx' as otn formatted Excel.
Table Loading Complete:
 Loaded XXX records into table schema.c_shortform_YYYY_mm
Task List Checkpoint
In GitLab, this task can be completed at this stage:
- [ ] - load raw receiver metadata ("deploy" notebook) **put_table_name_in_ticket**
Ensure you paste the table name (ex: c_shortform_YYYY_mm) into the indicated section before you check the box.
Verify Raw Table
This cell will now complete the Quality Control checks of the raw table. This is to ensure the Nodebook loaded the records correctly from the Excel sheet.
The output will have useful information:
- Are there any duplicate records?
- Is there missing information in the
ar_model_noandar_serial_nocolumns? If so, ensure that it makes sense for receivers to be deployed without Acoustic Releases in this location (ex: diver deployed). - Do all transceivers/test tags have their transmitters provided? Do these match any manufacturer specifications we have in the database?
- Are there any non-numeric serial numbers? Do these make sense (ex: environmental sensors)?
- Are the deployments within the bounding box?
- Is the
recoveredcolumn completed correctly, based on thecommentsand therecovery_datecolumns? - Are there blank strings that need to be set to NULL? If so, press the
Set to NULLbutton in that cell.
The Nodebook will indicate the sheet had passed quality control by adding a ✔️green checkmark beside each section.
If there are any errors, go into database and fix the raw table directly, or contact the researcher and then fix the raw table.
Task List Checkpoint
In GitLab, this task can be completed at this stage:
- [ ] - NAME verify raw table ("deploy" notebook)
Find Raw Data Table in DB (schema.c_shortform_YYYY_MM)
- This table will includes all the OTN compulsory columns for receiver metadata as well as the ones the researcher includes. But only OTN compulsory columns are QCed.
- An example query: `select * from schema.c_shortform_2020_04 cs where ins_model_no ilike '%CTD%'`
Loading Stations Records
STOP - confirm there is no Push currently ongoing. If a Push is ongoing, you must wait for it to be completed before processing beyond this point
Only once the raw table has successfully passed ALL quality control checks can you load the stations information to the database stations table.
Running this cell will first check for any new stations to add, then confirm the records in the stations table matches the records in the moorings table where basisofrecord = 'STATION'.
If new stations are identified:
- Compare these station names to existing stations in the
stationstable in the database. Are they truly new, or is there a typo in the raw table? Did the station change names, but it is in the same location as a previous station? - If there are fixes to be made, change the records in the raw table, or contact the researcher to confirm.
- If all stations are truly new, you should review the information in the editable form, then select
Add New Stations.
The success message will look like:
Adding station records to the stations table.
Creating new stations...
Added XX new stations to schema.moorings
If the stations and moorings tables are not in sync, you will need to compare the two tables for differences and possibly update one or the other.
Task List Checkpoint
In GitLab, this task can be completed at this stage:
- [ ] - load station records ("deploy" notebook)
Verify Stations Table
This cell will now complete the Quality Control checks of the stations records contained in the entire schema. We are no longer only checking against our newly-loaded records, but also each previously-loaded record in this schema/project. This will help catch historical errors.
The output will have useful information:
- Were all the stations from our raw table promoted to the
stationstable and themooringstable? - Are all stations in unique locations?
- Are all stations within the project’s bounding box?
- Does the date in the
stationstable match the first deployment date for that station? - Are there blank strings that need to be set to NULL? If so, press the
Set to NULLbutton in that cell. - Are any of the dates in the future?
The Nodebook will indicate the sheet had passed quality control by adding a ✔️green checkmark beside each section.
If there are any errors, you could directly connect to the database and fix the raw table directly, or contact the researcher and then fix the raw table using updated input metadata. If there are problems with records that have already been promoted to the stations or moorings tables, you will need to create a db fix ticket in Gitlab in order to correct the records in the database.
Task List Checkpoint
In GitLab, this task can be completed at this stage:
- [ ] - verify stations ("deploy" notebook)
Find Station Tables in DB(schema.stations & schema.rcvr_locations)
- These Station tables are intermediate tables. They grab the necessary information from the raw table.
- `schema.stations` contains all distinct the deployment stations information from that schema across all years. Column `date` and `intended_lon`, `intended_lat` represent the first time and coordinate (lon,lat) this station was added.
- Note: In `schema.stations` table, all stations have the distinct names with distinct coordinates. The notebook will show errors, if the researcher put different coordinates for the same location or put the same coordinate for different locations. Here we can use corresponding DB fix tool to change station names.
- An example query: `select * from schema.stations where station_name in ('A','B')`
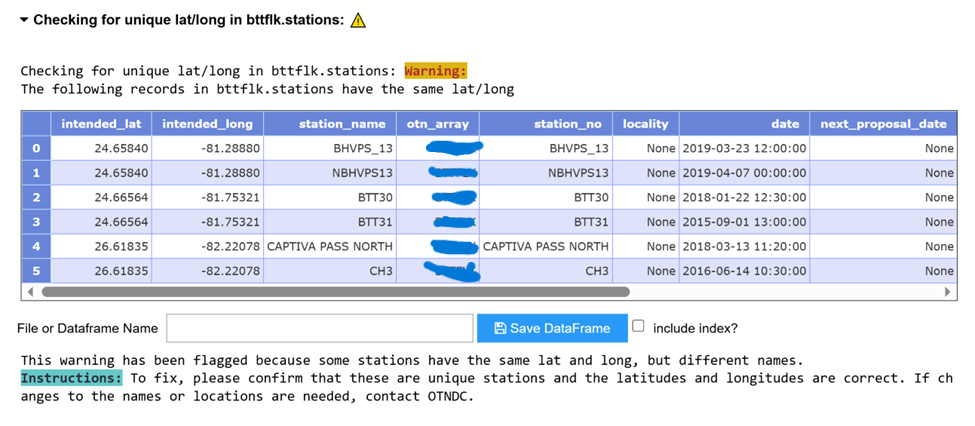
Load to rcvr_locations
Once the station table is verified, the receiver deployment records can now be promoted to the “intermediate” rcvr_locations table.
The cell will identify any new deployments to add and any previously-loaded deployments which need updating (ex: they have been recovered).
If new deployments are identified:
- Compare these deployments to existing deployments in the
rcvr_locationstable in the database. Are they truly new, or is there a typo in the raw table? Did the station change names, but it is in the same location as before? Did the serial number change, but the deployment location and date are the same? - If there are fixes to be made, change the records in the
rawtable or contact the researcher. - If all deployments are truly new, you can then select
Add Deployments.
If deployment updates are identified:
- Review the suggested changes: do not select changes which remove information (ex: release 590023 –>
Noneis not a good change to accept). - Use the check boxes to select only the appropriate changes.
- Once you are sure the changes are correct, you can then select
Update Deployments.
Each instance will give a success message such as:
Loading deployments into the rcvr_locations_table
Loaded XX records into the schema.rcvr_locations table.
Task List Checkpoint
In GitLab, this task can be completed at this stage:
- [ ] - load to rcvr_locations ("deploy" notebook)
Verify rcvr_locations
This cell will now complete the Quality Control checks of the rcvr_locations records contained in the entire schema. We are no longer only checking our newly-loaded records, but also each previously-loaded record for this schema/project. This will help catch historical errors.
The output will have useful information:
- Have all deployments been loaded from the raw table? Please note that instruments where a sentinel tag is deployed alone at a station will not be loaded to rcvr_locations, and so these will likely be flagged in this section for your review.
- Are there blank strings that need to be set to NULL? If so, press the
Set to NULLbutton in that cell. - Based on comments, are there any instances where a receiver’s status should be changed to “lost”?
- Are all instruments in the
obis.instrument_modelstable? - Are there any overlapping deployments?
- Are
the_geom,serialnumber, andcatalognumberformatted correctly?
The Nodebook will indicate the table has passed quality control by adding a ✔️green checkmark beside each section.
If there are any errors with records that have already been promoted to the rcvr_locations table, you will need to create a db fix ticket in Gitlab to correct the records in the database. You may need to contact the researcher before resolving the error.
Task List Checkpoint
In GitLab, this task can be completed at this stage:
- [ ] - verify rcvr_locations ("deploy" notebook)
Find schema.rcvr_locations tables in DB
- These tables are also imtermediate tables which contains all deployment information for all receivers from that schema across all years. Station is treated as an area, receivers can be deployed at the same station with different coordinates. Column
deploy_dateanddeploy_lon,deploy_latshows each receiver’s deployment date and coordinates.- Note: In
schema.rcvr_locationstable, you may see the same station has different coordinates. But the notebook will show errors if the same receiver’s overlapping deployments. Here we can look and this table for information we need to change and use corresponding DB fix tool. - An example query:
select * from schema.rcvr_locations rl where rl.rcv_serial_no = 'XXXXX'
- Note: In
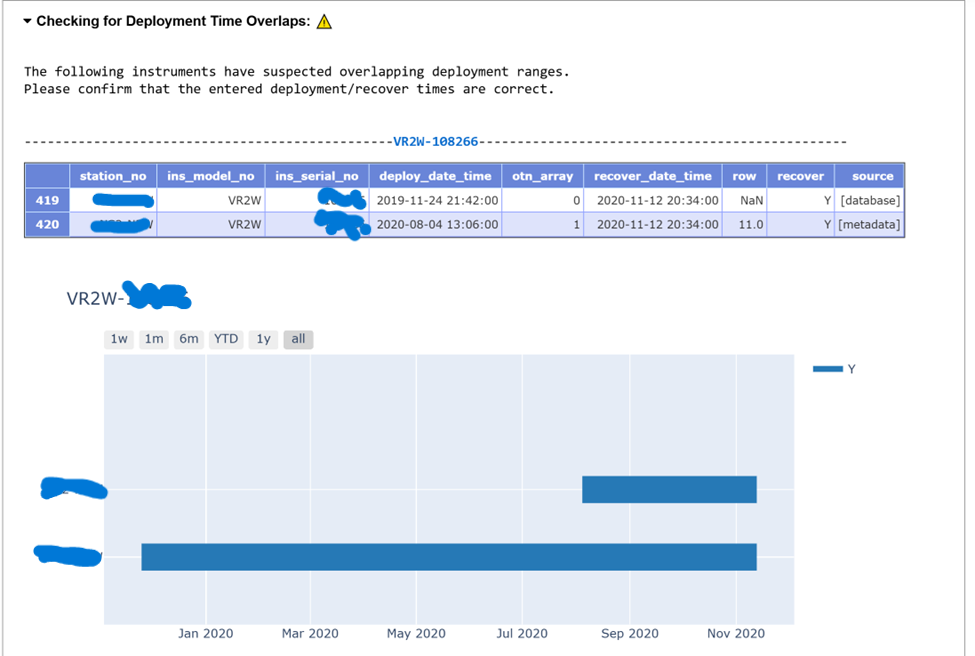
Load Transmitter Records to Moorings
The transmitter values associated with transceivers, co-deployed sentinel tags, or stand-alone test tags will be loaded to the moorings table in this section. Existing transmitter records will also be updated, if relevant.
If new transmitters are identified:
- Review for accuracy then select
Add Transmitters.
If transmitter updates are identified:
- Review the suggested changes: do not select changes which remove information (ex: release 590023 –>
Noneis not a good change to accept). - Use the check boxes to select only the appropriate changes.
- Once you are sure the changes are correct, you can then select
Update Transmitters.
Task List Checkpoint
In GitLab, this task can be completed at this stage:
- [ ] - load transmitter records receivers with integral pingers ("deploy" notebook)
Load Receivers to Moorings
The final, highest-level table for instrument deployments is moorings.
The cell will identify any new deployments to add and any previously-loaded deployments which need updating (ex: they have been recovered).
Please review all new deployments and deployment updates for accuracy, then press the associated buttons to make the changes. At this stage, the updates are not editable: any updates chosen from the rcvr_locations section will be processed here.
You may be asked to select an instrumenttype for certain receivers. Use the drop-down menu to select before adding the deployment.
Task List Checkpoint
In GitLab, this task can be completed at this stage:
- [ ] - load to moorings ("deploy" notebook)
Verify Moorings
This cell will now complete the Quality Control checks of the moorings records contained in the entire schema. We are no longer only checking our newly-loaded records, but also each previously-loaded record in this project/schema.
The output will have useful information:
- Have all deployments been loaded from rcvr_locations?
- Do we have manufacturer specifications for the receivers or tags deployed?
- Are there blank strings that need to be set to NULL? If so, press the
Set to NULLbutton in that cell. - Do the
STATIONSrecords match the information in thestationstable? - Are all instruments in the
obis.instrument_modelstable? - Are there any overlapping deployments or receivers or tags?
- Are there duplicate download records?
- Are the
latitude,longitude,the_geom,serialnumber, andcatalognumberformatted correctly?
The Nodebook will indicate the table has passed quality control by adding a ✔️ green checkmark beside each section.
If there are any errors with records that have already been promoted to the moorings table, you will need to create a db fix ticket in Gitlab to correct the records in the database. You may need to contact the researcher before resolving the error.
Find Mooring Tables in DB
- `schema.moorings` contains all receiver, transmitter, event information from this project. Note: the notebook will show errors if the same transmitter_ID has been used in different receivers. We can check this table to check more information on transmitter_ID and may need to use the corresponding DB fix tool to change transmitter_ID.
- An example query: `select * from schema.moorings where basisofrecord = 'TRANSMITTER' and relationshiptype = 'STATION'`
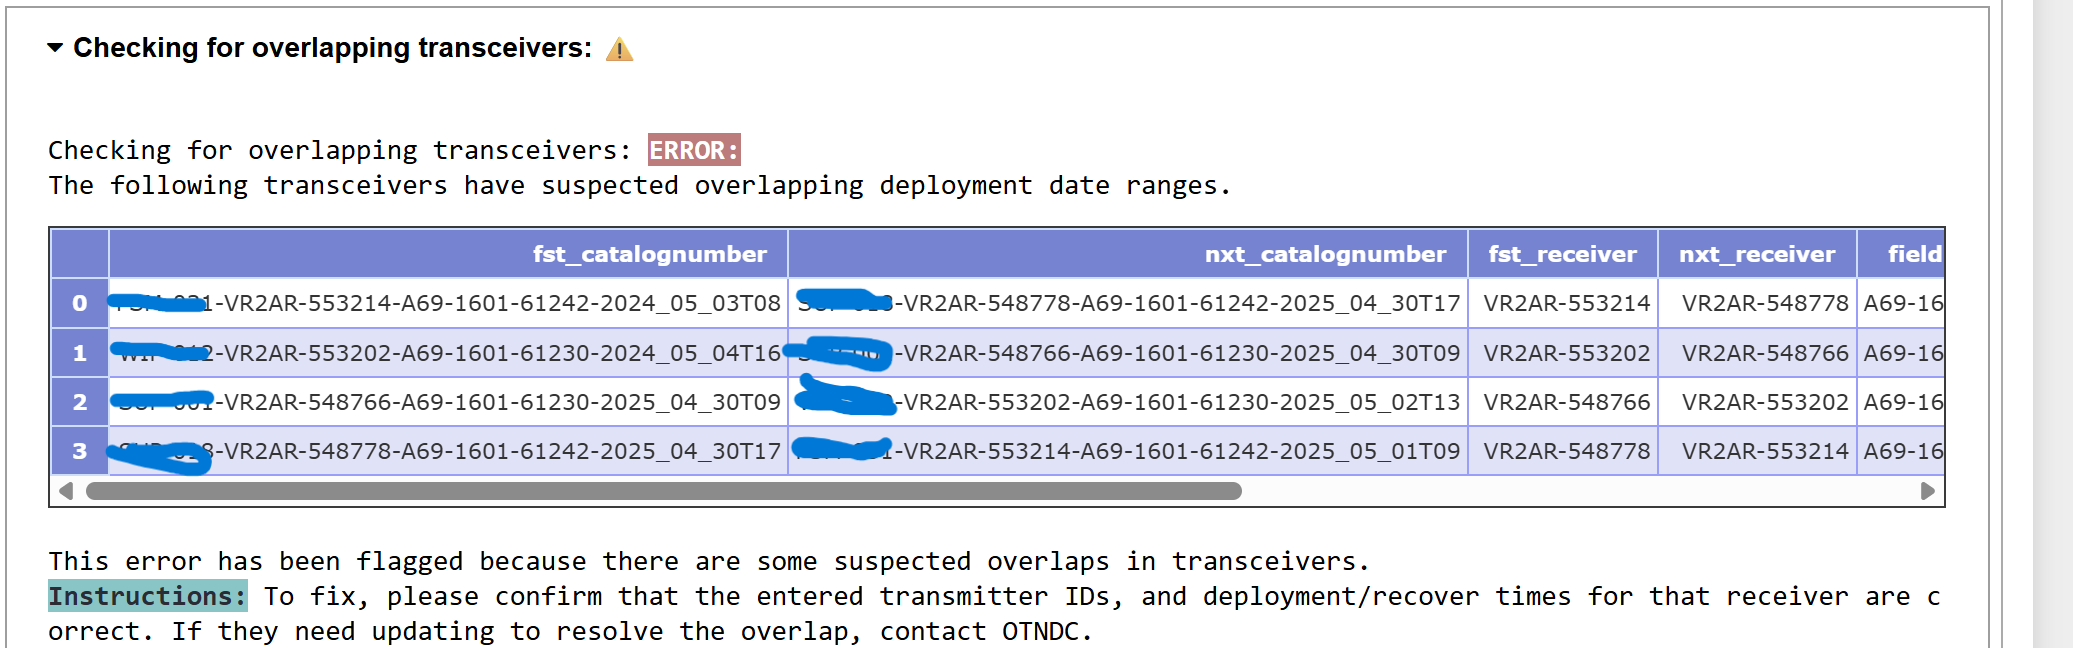
Task List Checkpoint
In GitLab, this task can be completed at this stage:
- [ ] - verify moorings ("deploy" notebook)
Final Steps
The remaining steps in the GitLab Checklist are completed outside the Nodebooks.
First: you should access the Repository folder in your browser and add the cleaned Deployment Metadata .xlsx file into the “Data and Metadata” folder.
Finally, the GitLab ticket can be reassigned to an OTN analyst for final verification in the database.
Key Points
Loading receiver metadata requires judgement from the Data Manager
Communication with the researcher is essential when errors are found
Detection Loading
Overview
Teaching: 120 min
Exercises: 0 minQuestions
What is the workflow for loading detection data?
What do I need to look out for as a Node Manager when loading detections?
Objectives
Understand how to use the GitLab checklist
Understand the workflow for detection data in the OTN system
Learn common errors and pitfalls that come up when loading detections
Process workflow
The process workflow for detection data is as follows:
flowchart LR
    tag_start(( )) --> get_meta(Receive
detection data
from researchers)
    style tag_start fill:#00FF00,stroke:#00FF00,stroke-width:4px
    get_meta --> gitlab(Create
Gitlab
issue)
    gitlab --> inspect(Visually
inspect)
    inspect --> convert(Convert to
CSVs)
    convert --> nodebook(Process and verify
with nodebooks)
    nodebook --> plone(Add data
to repository folder)
    plone --> otn(Pass to
OTN)
    otn --> end2(( ))
    style end2 fill:#FF0000,stroke:#FF0000
Once deployment metadata has been processed for a project, the related detections may now be processed. Detection data should be reported to the Node as a collection of raw, unedited files. These can be in the form of a zipped folder of .VRLs, a database from Thelma Biotel or any other raw data product from any manufacturer. The files contain only transmitter numbers and the datetimes at which they were recorded at a specific receiver. The tag metadata and deployment metadata will provide the associated geographic and biological context to this data.
Submitted Records
Immediately upon receipt of the data files, you must create a new GitLab issue. Please use the Detections Issue checklist template.
Here is the Issue checklist, for reference:
Detections
- [ ] - NAME add label *'loading records'*
- [ ] - NAME load raw detections and events `(detections-1` notebook and `events-1` notebook **OR** `Convert - Fathom Export` notebook and `detections-1` notebook) **(put table names here)**
- [ ] - NAME upload raw detections to project folder (OTN members.oceantrack.org, FACT RW etc) if needed
- [ ] - NAME verify raw detections table (`detections-1` notebook)
- [ ] - NAME load raw events to events table (`events-2` notebook)
- [ ] - NAME load to detections_yyyy (`detections-2` notebook) **(put detection years that were loaded here)**
- [ ] - NAME verify detections_yyyy (looking for duplicates) (`detections-2` notebook)
- [ ] - NAME load to sensor_match_yyyy (`detections-2` notebook) **(put sensor years that were loaded here)**
- [ ] - NAME timedrift correction for affected detection and sensor years (`detections-2b` notebook)
- [ ] - NAME verify timedrift corrections (`detections-2b` notebook)
- [ ] - NAME manually check for open, unverified receiver metadata, **STOP** if it exists! (**put Gitlab issue number here**)
-----
- [ ] - NAME load to otn_detections_yyyy (`detections-3` notebook) **(put affected years here)**
- [ ] - NAME verify otn_detections_yyyy (`detections-3` notebook)
- [ ] - NAME load sentinel records (`detections-3` notebook)
- [ ] - NAME check for missing receiver metadata (`detections-3b` notebook)
- [ ] - NAME check for missing data records (`detections-3c` notebook)
- [ ] - NAME load download records (`events-3` notebook)
- [ ] - NAME verify download records (`events-3` notebook)
- [ ] - NAME process receiver configuration (`events-4` notebook)
- [ ] - NAME label issue with *'Verify'*
- [ ] - NAME pass issue to OTN analyst for final steps
- [ ] - NAME check for double reporting (verification_notebooks/`Detection Verification` notebook)
- [ ] - NAME match tags to animals (`detections-4` notebook)
- [ ] - NAME overwrite sentinel tags with animal tags (`detections-4b` notebook)
- [ ] - NAME do sensor tag processing (`detections-5` notebook) - only done if vendor specifications are available
- [ ] - NAME update detection extract table

**detections files/path:**
Visual Inspection
Once the researcher provides the files, the Data Manager should first complete a visual check for formatting and accuracy.
Look for the following in the detection data:
- Do the files appear edited? Look for
_editedin file name. - Is the file format the same as expected for that manufacturer? Ex.
.vrlor.vdatfor Innovasea - not.csvor.rldformats. - Is there data for each of the instrument recoveries that was reported in the
deployment metadata?
Convert to CSV
Once the raw files are obtained, the data must often be converted to .csv format by the Node Manager. There are several ways this can be done, depending on the manufacturer.
For Innovasea
convert - Fathom (vdat) Export - VRL to CSVNodebook- This will use the
vdat.exeexecutable to export from VRL/VDAT to CSV. Please consult the OTN Data Centre for the latest and OS specificvdatexecutable version. - Instructions for this Nodebook are below
- This will use the
- Fathom Connect App
- Choose “export data”
- Select the relevant files and import into the Fathom Connect application
- Export all data types, and choose the location you want to save the files
- VUE (WARNING: As of September 2025, VUE has been deprecated by Fathom and Fathom Connect. The only remaining exception is VMT/VR2/VR3 downloads, which still require VUE. Please send any VRL files that failed to convert to support.team@innovasea.com for further analysis.)
- Open a new
database - Import all the
VRLfiles provided- Note: when prompted with setting Time Zone, set to UTC.
- Select
export detectionsand choose the location you want to save the file- Note: on
Data Exporttab must selectRaw sensor values
- Note: on
- Select
export eventsand choose the location you want to save the file
- Open a new
For Thelma Biotel
- Use the
ComPortsoftware to open the.tbdbfile and export as CSV
For Lotek
- Exporting to CSV is more complicated, please reach out to OTN for specific steps for a given instrument model
For all other manufacturers, contact the OTN Data Centre to get specifics on the detection data loading workflow.
convert - Fathom (vdat) Export - VRL to CSV Nodebook
This will use the vdat.exe executable to export from VRL/VDAT to CSV.
IMPORTANT NOTE: newer versions of vdat.exe are only being supported on Windows. Mac users will not be able to use this Nodebook. For instructions on using a program like Wine to run windows programs on other operating systems, contact the OTN Data Centre.
Before you begin, you will need to ensure you have access to a Fathom vdat executable. This executable ships with Fathom Connect for desktop computers as vdat.exe
- Access the Vemco (Innovasea) website to download
Fathom Connect- https://support.fishtracking.innovasea.com/s/downloads - Agree to the Licence
- The app will install on your computer, along with the newest version of
vdat.exe - Locate your ProgramFiles on your computer. Locate the
InnovaSeasubfolder, and theFathomfolder within. - Copy the full filepath to your
vdat.exefile for use in the Nodebook - this will look likeC:/Program Files/Innovasea/Fathom/vdat.exe
NOTE: Older versions of VDAT may have unintended consequences when converting newer files (like Open Protocol-enabled Innovasea receivers), and should not be used. Versions newer than vdat-9.3.0-20240207-74ad8e-release are safe to process Open Protocol data. NOT RECOMMENDED BY OTN: If you are desperate for an older version of vdat.exe you can find them here
- MAC Users Only
- Locate the vdat executable in your terminal by navigating with the command
cd /path/to/vdat/file - Enable execution by running
chmod +x vdat
- Locate the vdat executable in your terminal by navigating with the command
Imports cell
This section will be common for most Nodebooks: it is a cell at the top of the notebook where you will import any required packages and functions to use throughout the notebook. It must be run first, every time.
User Input
You will have to edit 3 sections
- vdat_path: Within quotation marks, paste the filepath to the fathom executable (
vdat.exe) - vrl_dir: Within quotation marks, paste the path to a folder containing the VRLs or VDATs you would like to convert. Example:
vrl_dir = r"/path/to/vrl_files/" - export_path: Within quotation marks, paste the path to the folder to which you would like the CSV exported. Example:
export_path = r"/path/to/csv_export/"
Run this cell. There is no output.
Check vdat exists
The Nodebook will indicate the file had passed quality control by adding a ✔️green checkmark and printing the vdat version.
NOTE: Older versions of VDAT may have unintended consequences when converting newer files (like Open Protocol-enabled Innovasea receivers), and should not be used. Versions > vdat-9.3.0-20240207-74ad8e-release are safe to process Open Protocol data.
Get List of Files
Run this cell to see a list of the VRLs or VDAT files the Notebook has idenfitied inside your vrl_dir folder.
Process Files
Run this cell to begin converting your files to CSV. They will be saved into the folder you supplied for export_path above.
The Nodebook will indicate each file has been converted by adding a ✔️green checkmark beside each section as it progresses.
Review Partially Converted CSV Files
Run this cell, open and observe each .csv file that had DATA ERRORS during conversion.
Option 1: Accept current CSV file with DATA ERROR(s) - if not too much data is missing: No action required
Option 2: Remove partially converted CSV(s) and replace with output from alternative vendor software
Once this step is complete, you may move onto the Detections - 1 Nodebook.
detections - 1 - load csv detections
Detections-1 loads CSV detections files into a new database table. If detections were exported using Fathom or the convert - Fathom (vdat) Export - VRL to CSV Nodebook, the receiver events records will also be loaded at this stage. This is because these applications combine the detections and events data in one CSV file.
Import cells and Database Connections
As in all Nodebooks, run the import cell to get the packages and functions needed throughout the notebook. This cell can be run without any edits.
The second cell will set your database connection. You will have to edit one section: engine = get_engine()
- Within the open brackets you need to open quotations and paste the path to your database
.kdbxfile which contains your login credentials. - On MacOS computers, you can usually find and copy the path to your database
.kdbxfile by right-clicking on the file and holding down the “option” key. On Windows, we recommend using the installed software Path Copy Copy, so you can copy a unix-style path by right-clicking. - The path should look like
engine = get_engine('C:/Users/username/Desktop/Auth files/database_conn_string.kdbx').
Once you have added your information, you can run the cell. Successful login is indicated with the following output:
Auth password:········
Connection Notes: None
Database connection established
Connection Type:postgresql Host:db.for.your.org Database:your_db_name User:your_node_admin Node:Node
User Input
Cell three requires input from you. This information will be used to get the raw detections CSV and to be able to create a new raw table in the database.
file_or_folder_path = r'C:/Users/path/to/detections_CSVs/'- Paste a filepath to the relevant CSV file(s). The filepath will be added between the provided quotation marks.
- This can be a path to a single CSV file, or a folder of multiple CSVs.
table_suffix = 'YYYY_mm'- Within the quotes, please add your custom table suffix. We recommend using the year and month (i.e,
YYYY_MM) or similar, to indicate the most-recently downloaded instrument.
- Within the quotes, please add your custom table suffix. We recommend using the year and month (i.e,
schema = 'collectioncode'- Please edit to include the relevant project code, in lowercase, between the quotes.
There are also some optional inputs:
load_detections: A true or false value using the table suffix you supplied.stacked: This is for Fathom exports only and refers to how they should be parsed.
Once you have added your information, you can run the cell.
NOTE: You will receive a warning before loading excessive amount of detections from HR receivers. An option is also available to summarize the detections prior to loading. Contact OTN Data Centre for assitant.
Verify Detection File and Load to Raw Table
Next, the Nodebook will review and verify the detection file(s) format, and report any error. Upon successful verification, you can then run the cell below which will attempt to load the detections into a new raw table.
Should this cell reports errors—such as invalid dates (e.g., dates falling in the 1970s or future years) or duplicate events—please contact the OTN Data Centre to correct the underlying raw tables.
The Nodebook will indicate the success of the table-creation with a message such as this:
Reading fathom files...
Loading Files...
X/X
Task list checkpoint
In GitLab, this task can be completed at this stage:
- [ ] - NAME load raw detections and events ('detections-1' notebook and 'events-1' notebook **OR** 'Batch Fathom Export' notebook and 'detections-1' notebook) **(put table names here)**
Ensure you paste the table name (ex: c_detections_YYYY_mm) into the indicated section before you check the box.
Verify Raw Detection Table
This cell will now complete the Quality Control checks of the raw table. This is to ensure the Nodebook loaded the records correctly from the CSVs.
The output will have useful information:
- Are there any duplicates?
- Are the serial numbers formatted correctly?
- Are the models formatted correctly?
The Nodebook will indicate the sheet had passed quality control by adding a ✔️green checkmark beside each section.
If there are any errors, contact OTN for next steps.
Task list checkpoint
In GitLab, these tasks can be completed at this stage:
- [ ] - NAME verify raw detections table ('detections-1' notebook)
events - 1 - load events into c_events_yyyy
Events-1 is responsible for loading receiver events files into raw tables. This is only relevant for CSVs that were NOT exported using Fathom or the convert - Fathom (vdat) Export - VRL to CSV Nodebook.
Import cell
As in all Nodebooks, run the import cell to get the packages and functions needed throughout the notebook. This cell can be run without any edits.
User Inputs
Cell two requires input from you. This information will be used to get the raw events CSV and to be able to create a new raw table in the database.
filepath = r'C:/Users/path/to/events.csv'- Paste a filepath to the relevant CSV file. The filepath will be added between the provided quotation marks.
table_name = 'c_events_YYYY_mm'- Within the quotes, please add your custom table suffix. We recommend using the year and month (i.e,
YYYY_MM) or similar, to indicate the most-recently downloaded instrument.
- Within the quotes, please add your custom table suffix. We recommend using the year and month (i.e,
schema = 'collectioncode'- Please edit to include the relevant project code, in lowercase, between the quotes.
There are also some optional inputs:
file_encoding: How the file is encoded. ISO-8859-1 is the default encoding used in VUE’s event export.
Once you have added your information, you can run the cell.
Verifying the events file
Before attempting to load the event files to a raw table the Nodebook will verify the file to make sure there are no major issues. This will be done by running the Verify Events File cell. If there are no errors, you will be able to continue.
The Nodebook will indicate the success of the file verification with a message such as this:
Reading file 'events.csv' as CSV.
Verifying the file.
Format: VUE 2.6+
Mandatory Columns: OK
date_and_time datetime:OK
Initialization(s): XX
Data Upload(s): XX
Reset(s): XX
Find Raw Data Table in DB (schema.c_events_YYYY_MM & schema.c_detections_YYYY_MM)
- The event table contains some environmental and receiver data for this project at this time, for e.g., temperature, depth, and battery.
- The detection table contains detection information for this project at this time. Here you can see tags detected by each receiver through different times.
Database Connection
You will have to edit one section: engine = get_engine()
- Within the open brackets you need to open quotations and paste the path to your database
.kdbxfile which contains your login credentials. - On MacOS computers, you can usually find and copy the path to your database
.kdbxfile by right-clicking on the file and holding down the “option” key. On Windows, we recommend using the installed software Path Copy Copy, so you can copy a unix-style path by right-clicking. - The path should look like
engine = get_engine('C:/Users/username/Desktop/Auth files/database_conn_string.kdbx').
Once you have added your information, you can run the cell. Successful login is indicated with the following output:
Auth password:········
Connection Notes: None
Database connection established
Connection Type:postgresql Host:db.for.your.org Database:your_db_name User:your_node_admin Node:Node
Load the events file into the c_events_yyyy table
The second last cell loads the events file into a raw table. It depends on successful verification from the last step. Upon successful loading, you can dispose of the engine then move on to the next Nodebook.
The Nodebook will indicate the success of the table-creation with the following message:
File loaded with XXXXX records.
100%
Task list checkpoint
In GitLab, these tasks can be completed at this stage:
- [ ] - NAME load raw detections and events ('detections-1' notebook and 'events-1' notebook **OR** 'Batch Fathom Export' notebook and 'detections-1' notebook) **(put table names here)**
Ensure you paste the table name (ex: c_events_YYYY_mm) into the indicated section before you check the box.
events - 2 - move c_events into events table
This Nodebook will move the raw events records into the intermediate events table.
Import cell
As in all Nodebooks run the import cell to get the packages and functions needed throughout the notebook. This cell can be run without any edits.
User input
This cell requires input from you. This information will be used to get the raw events CSV and to create a new raw table in the database.
c_events_table = 'c_events_YYYY_mm'- Within the quotes, please add your custom table suffix, which you have just loaded in either
detections-1orevents-1.
- Within the quotes, please add your custom table suffix, which you have just loaded in either
schema = 'collectioncode'- Please edit to include the relevant project code, in lowercase, between the quotes.
Database Connection
You will have to edit one section: engine = get_engine()
- Within the open brackets you need to open quotations and paste the path to your database
.kdbxfile which contains your login credentials. - On MacOS computers, you can usually find and copy the path to your database
.kdbxfile by right-clicking on the file and holding down the “option” key. On Windows, we recommend using the installed software Path Copy Copy, so you can copy a unix-style path by right-clicking. - The path should look like
engine = get_engine('C:/Users/username/Desktop/Auth files/database_conn_string.kdbx').
Once you have added your information, you can run the cell. Successful login is indicated with the following output:
Auth password:········
Connection Notes: None
Database connection established
Connection Type:postgresql Host:db.for.your.org Database:your_db_name User:your_node_admin Node:Node
Verify table format
You will then verify that the c_events events table you put in exists and then verify that it meets the required format specifications.
The Nodebook will indicate the success of the table verification with a message such as this:
Checking table name format... OK
Checking if schema collectioncode exists... OK!
Checking collectioncode schema for c_events_YYYY_mm table... OK!
collectioncode.c_events_YYYY_mm table found.
If there are any errors in this section, please contact OTN.
Load to Events table
If nothing fails verification, you can move to the loading cell.
The Nodebook will indicate the success of the processing with a message such as this:
Checking for the collectioncode.events table... OK!
Loading events... OK!
Loaded XX rows into collectioncode.events table.
Task list checkpoint
In GitLab, these tasks can be completed at this stage:
- [ ] - NAME load raw events to events table ("events-2" notebook)
detections - 2 - c_table into detections_yyyy
This Nodebook takes the raw detection data from detections-1 and moves it into the intermediate detections_yyyy tables (separated by year).
Import cells and Database Connections
As in all Nodebooks run the import cell to get the packages and functions needed throughout the notebook. This cell can be run without any edits.
The second cell will set your database connection. You will have to edit one section: engine = get_engine()
- Within the open brackets you need to open quotations and paste the path to your database
.kdbxfile which contains your login credentials. - On MacOS computers, you can usually find and copy the path to your database
.kdbxfile by right-clicking on the file and holding down the “option” key. On Windows, we recommend using the installed software Path Copy Copy, so you can copy a unix-style path by right-clicking. - The path should look like
engine = get_engine('C:/Users/username/Desktop/Auth files/database_conn_string.kdbx').
Once you have added your information, you can run the cell. Successful login is indicated with the following output:
Auth password:········
Connection Notes: None
Database connection established
Connection Type:postgresql Host:db.for.your.org Database:your_db_name User:your_node_admin Node:Node
User Inputs
To load the to the detections_yyyy tables the Nodebook will require information about the current schema and the raw table that you created in detections-1.
c_table = 'c_detections_YYYY_mm'- Within the quotes, please add your custom table suffix, which you have just loaded in
detections-1
- Within the quotes, please add your custom table suffix, which you have just loaded in
schema = 'collectioncode'- Please edit to include the relevant project code, in lowercase, between the quotes.
The notebook will indicate success with the following message:
Checking table name format... OK
Checking if schema collectioncode exists... OK!
Checking collectioncode schema for c_detections_yyyy_mm table... OK!
collectioncode.c_detections_yyyy_mm table found.
Create Missing Tables
Detections tables are only created on an as-needed basis. These cells will detect any tables you are missing and create them based on the years covered in the raw detection table (c_table). This will check all tables such as detections_yyyy, sensor_match_yyyy and otn_detections_yyyy.
First the Nodebook will gather and print the missing tables. If there are none missing, the Nodebook will report that as well.
vemco: Match
You are missing the following tables:
[collectioncode.detections_YYYY, v2lbeiar.otn_detections_YYYY, v2lbeiar.sensor_match_YYYY]
Create these tables by passing the missing_tables variable into the create_detection_tables function.
If you proceed in the Nodebook, there is a “creation”`” cell which will add these tables to the project schema in the database. Success will be indicated with the following message:
Creating table collectioncode.detections_YYYY... OK
Creating table collectioncode.otn_detections_YYYY... OK
Creating table collectioncode.sensor_match_YYYY... OK
Create Detection Sequence
Before loading detections, a detection sequence is created. The sequence is used to populate the det_key column. The det_key value is an unique ID for that detection to help ensure there are no duplicates. If a sequence is required, you will see this output:
creating sequence v2lbeiar.detections_seq... OK
No further action is needed.
Load to Detections_YYYY
Duplicate detections are then checked for and will not be inserted into the detections_yyyy tables.
If no duplicates are found you will see:
No duplicates found. All of the detections will be loaded into the detections_yyyy table(s).
If duplicates are found you will see a bar chart showing the number of detections per year which either have already been loaded, or are new and will be loaded this time. You will have to investigate if the results are not what you expected.
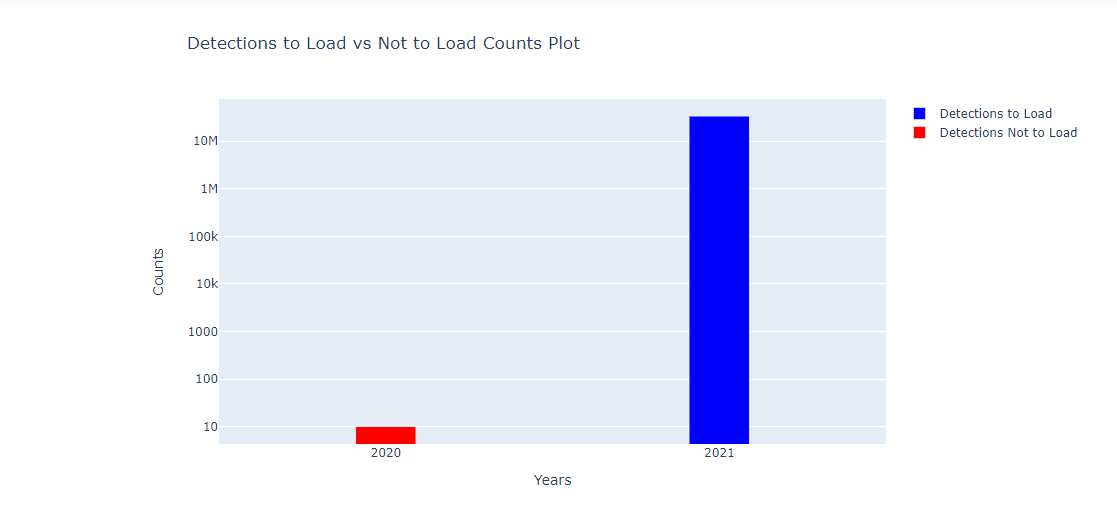
Note: Please contact OTN Data Centre if the X‑axis includes detections associated with incorrect years (such as 1970 or dates in the future).
After all this, the raw detection records are ready to be loaded into the detections_yyyy tables. The notebook will indicate success with the following message:
Inserting records from collectioncode.c_detections_YYYY_mm into collectioncode.detections_2018... OK
Added XXXXX rows.
Inserting records from collectioncode.c_detections_YYYY_mm into collectioncode.detections_2019... OK
Added XXXXX rows.
Inserting records from collectioncode.c_detections_YYYY_mm into collectioncode.detections_2020... OK
Added XXXXX rows.
Inserting records from collectioncode.c_detections_YYYY_mm into collectioncode.detections_2021... OK
Added XXXXX rows.
You must note which years have been loaded! In the example above, this would be 2018, 2019, 2020, and 2021.
Task list checkpoint
In GitLab, these tasks can be completed at this stage:
- [ ] - NAME load to detections_yyyy ("detections-2" notebook) **(put detection years that were loaded here)**
Ensure you paste the affected tables (ex: 2019, 2020) into the indicated section before you check the box.
Verify Detections YYYY Tables
This cell will now complete the quality control checks on the detections_yyyy tables. This is to ensure the nodebook loaded the records correctly.
First, you will need to list all of the years that were affected by the previous loading step, so the Nodebook knows which tables need to be verified.
The format will look like this:
`years = ['YYYY','YYYY','YYYY', 'YYYY']`
If left blank, the Nodebook will check all the years, which may take a long time for some projects.
Run this cell, then you can verify in the next cell.
The output will have useful information:
- Were all the detections loaded?
- Are the serial numbers formatted correctly?
- Are the models formatted correctly?
- Are there duplicate detections?
- What sensors will need to be loaded?
The Nodebook will indicate the sheet had passed quality control by adding a ✔️green checkmark beside each section.
If there are any errors contact OTN for next steps.
Task list checkpoint
In GitLab, this task can be completed at this stage:
- [ ] - NAME verify detections_yyyy (looking for duplicates) ("detections-2" notebook)
Load sensors_match Tables by Year
For the last part of this Nodebook you will need to load the to the sensor_match_YYYY tables. This loads detections with sensor information into a project’s sensor_match_yyyy tables. Later, these tables will aid in matching vendor specifications to resolve sensor tag values.
Output will appear like this:
Inserting records from collectioncode.detections_YYYY INTO sensor_match_YYYY... OK
Added XXX rows.
Inserting records from collectioncode.detections_YYYY INTO sensor_match_YYYY... OK
Added XXX rows.
You must note which years have been loaded! In the example above, this would be 2019 and 2021.
Task list checkpoint
In GitLab, these tasks can be completed at this stage:
- [ ] - NAME load to sensor_match_yyyy ("detections-2" notebook) **(put sensor years that were loaded here)**
Ensure you paste the affected tables (ex: 2019, 2020) into the Issue.
detections - 2b - timedrift calculations
This Nodebook calculates time drift factors and applies the corrections to the detections_yyyy tables, in a field called corrected_time. OTN’s Data Manager toolbox (the Nodebooks) corrects for timedrift between each initialization and offload of a receiver. If a receiver is offloaded several times in one data file, time correction does not occur linearly from start to end, but between each download, to ensure the most accurate correction. If there is only one download in a data file then the time correction in the VUE software will match the time correction performed by OTN.
Import cells and Database connections
As in all Nodebooks run the import cell to get the packages and functions needed throughout the notebook. This cell can be run without any edits.
The second cell will set your database connection. You will have to edit one section: engine = get_engine()
- Within the open brackets you need to open quotations and paste the path to your database
.kdbxfile which contains your login credentials. - On MacOS computers, you can usually find and copy the path to your database
.kdbxfile by right-clicking on the file and holding down the “option” key. On Windows, we recommend using the installed software Path Copy Copy, so you can copy a unix-style path by right-clicking. - The path should look like
engine = get_engine('C:/Users/username/Desktop/Auth files/database_conn_string.kdbx').
Once you have added your information, you can run the cell. Successful login is indicated with the following output:
Auth password:········
Connection Notes: None
Database connection established
Connection Type:postgresql Host:db.for.your.org Database:your_db_name User:your_node_admin Node:Node
User Inputs
To load the to the detections_yyyy tables the notebook will require the name of the current schema. Please edit schema = 'collectioncode' to include the relevant project code, in lowercase, between the quotes.
Calculating Time Drift Factors
create_tbl_time_drift_factors. This function will create the time_drift_factors table in the schema if it doesn’t exist.
The next step is to run check_time_drifts which gives a display of the time drift factor values that will be added to the time_drift_factors table given an events table. At this stage, you should review for any erroneous/large timedrifts.
If everything looks good, you may proceed to the next cell which adds new time drift factors to the time_drift_factors table from the events file. A success message will appear:
Adding XXX records to collectioncode.time_drift_factors table from collectioncode.events... OK!
You will then see a cell to create missing views. This creates the time drift “views” which the database will use to calculate drift values for both the detections_yyyy and sensor_match_yyyy tables.
Correcting Time Drift
Finally, we are ready to update the times in both the detections_yyyy and sensor_match_yyyy tables with corrected time values using the vw_time_drift_cor database view.
The Nodebook should identify all of the years that were affected by detections-2 loading steps, so the notebook knows which tables need to be corrected.
Once the timedrift calculation is done (indicated by ✔️green checkmarks).
Note If a connection drop (or other interruption) occurs while updating the detections_yyyy and sensor_match_yyyy tables, make a note of the year and receiver where the failure occurred. Then, uncomment and run the code cell. This will display a dropdown list of raw events tables, a list of receivers, and a list of years.
-
Select the raw events table that was used to load the time drift factors.
-
Select one or more receivers and years to apply the time drift factors.
For example the failure point was at VR2Tx-480583 – detections_2021:
You will need to run the resume update twice to complete the process.
-
- Select
VR2Tx-480583and all receivers below it, select 2021 and cleck Update button
- Select
-
- Select all receivers in the list, select 2022 and all years below it, and cleck Update button
Task list checkpoint
In GitLab, this task can be completed at this stage:
- [ ] - NAME timedrift correction for affected detection and sensor years ("detections-2b" notebook)
Verify Detections After Time Drift Calculations
After running the above cells you will then verify the time drift corrections on the detections_yyyy and sensor_match_yyyy tables.
The output will have useful information:
- Are there any erroneous timedrift values?
- Did the time correction cause detections to need moving to another
yyyytable? If so, select the “move detections” button. - Are the receiver models formatted correctly?
The Nodebook will indicate the sheet had passed quality control by adding a ✔️green checkmark beside each section.
If there are any errors contact OTN for next steps.
Task list checkpoint
In GitLab, this task can be completed at this stage:
- [ ] - NAME verify timedrift corrections ("detections-2b" notebook)
detections - 3 - detections_yyyy into otn_detections
The detections - 3 Nodebook moves the detections from detections_yyyy and sensor_match_yyyy tables into the final otn_detections_yyyy tables. This will join the detections records to their associated deployment records, providing geographic context to each detection. If there is no metadata for a specific detection (that is, no receiver record to match with) it will not be promoted to otn_detections_yyyy.
Import cells and Database connections
As in all Nodebooks run the import cell to get the packages and functions needed throughout the notebook. This cell can be run without any edits.
The second cell will set your database connection. You will have to edit one section: engine = get_engine()
- Within the open brackets you need to open quotations and paste the path to your database
.kdbxfile which contains your login credentials. - On MacOS computers, you can usually find and copy the path to your database
.kdbxfile by right-clicking on the file and holding down the “option” key. On Windows, we recommend using the installed software Path Copy Copy, so you can copy a unix-style path by right-clicking. - The path should look like
engine = get_engine('C:/Users/username/Desktop/Auth files/database_conn_string.kdbx').
Once you have added your information, you can run the cell. Successful login is indicated with the following output:
Auth password:········
Connection Notes: None
Database connection established
Connection Type:postgresql Host:db.for.your.org Database:your_db_name User:your_node_admin Node:Node
User Inputs
To load the to the detections_yyyy tables the Nodebook will require the current schema name. Please edit schema = 'collectioncode' to include the relevant project code, in lowercase, between the quotes.
Before moving on from this you will need to confirm 2 things:
- Confirm that NO Push is currently ongoing
- confirm
rcvr_locationsfor this schema have been verified.
If a Push is ongoing, or if verification has not yet occurred, you must wait for it to be completed before processing beyond this point.
Task list checkpoint
In GitLab, this task can be completed at this stage:
- [ ] - NAME manually check for open, unverified receiver metadata, **STOP** if it exists! **(put GitLab issue number here)**
Creating detection views and loading to otn_detections
Once you are clear to continue loading you can run create_detection_views. This function, as its name implies, will create database views for detection data.
Output will look like:
Creating view collectioncode.vw_detections_YYYY... OK
Creating view collectioncode.vw_sentinel_YYYY... OK
Creating view collectioncode.vw_detections_YYYY... OK
These are then used to run the function in the next cell load_into_otn_detections_new, which loads the detections from those views into otn_detections. You will be asked to select all relevant tables here, with a dropdown menu and checkboxes.
You must select all years that were impacted by detections_yyyy or sensor_match_yyyy loading steps. Then click the Load Detections button to begin loading. The Nodebook will show a status bar indicating its progress.
Task list checkpoint
In GitLab, this task can be completed at this stage:
- [ ] - NAME load to otn_detections_yyyy ("detections-3" notebook) **(put affected years here)**
Verify OTN Detections
After running your needed cells you will then verify otn_detections_yyyy detections.
The output will have useful information:
- Are all the sensors loaded to the
sensor_matchtables? Compare the counts betweendetections_yyyyandsensor_match_yyyyprovided. - Are all the detections loaded from
detections_yyyytootn_detections_yyyy? Compare the counts provided. If there is a mismatch, we will get more details in thedetections-3bNodebook. - Is the formatting for the dates correct?
- Is the formatting for the_geom correct?
- Are there detections without receivers? If so, we will get more details in the
detections-3bNodebook. - Are there receivers without detections? If so, we will get more details in the
detections-3cNodebook.
The notebook will indicate the sheet had passed quality control by adding a ✔️green checkmark beside each section.
If there are any errors contact OTN for next steps.
Task list checkpoint
In GitLab, this task can be completed at this stage:
- [ ] - NAME verify otn_detections_yyyy ("detections-3" notebook)
Check and Load Sentinel Records
Are there any sentinel detections identified? If so, select the Load Sentinel Detections for YYYY button. This will move the detections into their own tables so they do not confuse our animal detection numbers and can be used for Sentinel analysis.
You must select all years that were impacted by detections_yyyy or sensor_match_yyyy loading steps.
Task list checkpoint
In GitLab, this task can be completed at this stage:
- [ ] - NAME load sentinel records ("detections-3" notebook)
detections - 3b - missing_metadata_check
This Nodebook checks for detections that have not been inserted into otn_detections_yyyy, which will indicate missing receiver metadata.
The user will be able to set a threshold for the minimum number of detections to look at (default is 100). It will also separate animal detections from transceiver detections in a graph. At the end, it will show a SQL command to run to display the missing metadata in table format.
Import cells and Database connections
As in all Nodebooks run the import cell to get the packages and functions needed throughout the notebook. This cell can be run without any edits.
The second cell will set your database connection. You will have to edit one section: engine = get_engine()
- Within the open brackets you need to open quotations and paste the path to your database
.kdbxfile which contains your login credentials. - On MacOS computers, you can usually find and copy the path to your database
.kdbxfile by right-clicking on the file and holding down the “option” key. On Windows, we recommend using the installed software Path Copy Copy, so you can copy a unix-style path by right-clicking. - The path should look like
engine = get_engine('C:/Users/username/Desktop/Auth files/database_conn_string.kdbx').
Once you have added your information, you can run the cell. Successful login is indicated with the following output:
Auth password:········
Connection Notes: None
Database connection established
Connection Type:postgresql Host:db.for.your.org Database:your_db_name User:your_node_admin Node:Node
User Inputs
Information regarding the tables we want to check against is required.
schema = 'collectioncode'- Edit to include the relevant project code, in lowercase, between the quotes.
years = []- A comma-separated list of detection table years for detections_yyyy, should be in form
[yyyy]or a list such as[yyyy,yyyy,'early']
- A comma-separated list of detection table years for detections_yyyy, should be in form
Once you have edited these values, you can run the cell. You should see the following success message:
All tables exist!
Check for Missing Metadata in Detections_yyyy
This step will perform the check for missing metadata in detections_yyyy and display results for each record where the number of excluded detections is greater than the specified threshold.
First: enter your threshold. Formatted like: threshold = 100. Then you may run the cell.
The output will include useful information:
- Which receiver is missing detections from
otn_detections_yyyy? - How many are missing?
- What type of detections are missing? Transceiver, animal tags, or test tags.
- What are the date-ranges of these missing detections? These dates can be used to determine the period for which we are missing metadata.
- Other notes: is this date range before known deployments? After know deployments? Between known deployments?
There will be a visualization of the missing metadata for each instance where the number of missing detections is over the threshold.
Any instance with missing detections (greater than the threshold) should be identified, and the results pasted into a new GitLab Issue. The format will look like:
VR2W-123456
	missing XX detections (0 transceiver tags, XX animal tags, 0 test tags) (before deployments) (YYYY-MM-DD HH:MM:SS to YYYY-MM-DD HH:MM:SS)

VR2W-567891
	missing XX detections (0 transceiver tags, XX animal tags, 0 test tags) (before deployments) (YYYY-MM-DD HH:MM:SS to YYYY-MM-DD HH:MM:SS)
There are also two cells at the end that allow you create reports for researchers in CSV or HTML format.
This new GitLab ticket will require investigation to determine the cause for the missing metadata. The researcher will likely need to be contacted.
- Are these “test” detections from on the boat or in the lab and we are not missing real metadata?
- Is there a serial number typo in the metadata and it is not missing?
- Are the deployment dates for the receiver wrong, and need to be fixed?
You can continue with data loading and then return to your Missing Metadata ticket for investigation.
Task list checkpoint
In GitLab, this task can be completed at this stage:
- [ ] - NAME check for missing receiver metadata ("detections-3b" notebook)
detections - 3c - missing_vrl_check
This Nodebook will check for missing data files in the database by comparing the rcvr_locations and events tables. For any receiver deployments that are missing events, it will check if there are detections during that time period for that receiver.
Import cells and Database connections
As in all Nodebooks run the import cell to get the packages and functions needed throughout the notebook. This cell can be run without any edits.
The second cell will set your database connection. You will have to edit one section: engine = get_engine()
- Within the open brackets you need to open quotations and paste the path to your database
.kdbxfile which contains your login credentials. - On MacOS computers, you can usually find and copy the path to your database
.kdbxfile by right-clicking on the file and holding down the “option” key. On Windows, we recommend using the installed software Path Copy Copy, so you can copy a unix-style path by right-clicking. - The path should look like
engine = get_engine('C:/Users/username/Desktop/Auth files/database_conn_string.kdbx').
Once you have added your information, you can run the cell. Successful login is indicated with the following output:
Auth password:········
Connection Notes: None
Database connection established
Connection Type:postgresql Host:db.for.your.org Database:your_db_name User:your_node_admin Node:Node
User Inputs
To run the missing VRL check, the Nodebook will require the current schema name. Please edit schema = 'collectioncode' to include the relevant project code, in lowercase, between the quotes.
There are also optional fields:
start_year = YYYY: With this andend_year, you may select a time range (in years) to limit the receivers to only ones that where active at some point during the time range.end_year = YYYY: With this andstart_year, you may select a time range (in years) to limit the receivers to only ones that where active at some point during the time range.skip_events = False: By changing to True, this will skip the events check and go right to checking if there are detections for each period. Only skip the events check if you know there won’t be any events, the detections check takes longer than the event check.
Once you have edited the values, you can run the cell. You should see the following success message:
Checking if collectioncode schema exists...
OK
Checking For Missing Data Files
The next cell will begin scanning the project’s schema to identify if there are any missing data files. If there are no missing files, you will see this output:
Checking if all deployment periods have events...
X/X
Checking if deployment periods missing events have detections...
⭐ All deployment periods had events! Skipping detection check. ⭐
If the Nodebook has detection missing file, you will see this output:
Checking if all deployment periods have events...
XXX/XXX
Checking if deployment periods missing events have detections...
XX/XX
Displaying Missing Data Files
Now the Nodebook will begin plotting a Gantt chart, displaying the periods of deployment for which the database is missing data files. There are some optional customizations you can try:
split_plots = False: you can set to True if you would like multiple, smaller plots createdrcvrs_per_split = 20: if you are splitting the plots, how many receiver deployments should be depicted on each plot?
Running the cell will save your configuration options. The next cell creates the chart(s).
The plot will have useful information:
- the receiver (x axis)
- the date range (y axis)
- the state of the data for that date-range
- all detections and events present
- missing events, detections present
- missing some events
- missing ALL events
- hovering over a deployment period with give details regarding the date range
Exporting Results
After investigating the Gantt chart, a CSV export can be created to send to the researcher.
First, you must select which types of records you’d like to export from this list:
- all detections and events present
- missing events, detections present
- missing some events (recommended)
- missing ALL events (recommended)
Then, the next cell will print the relevant dataframe, with an option below to Save Dataframe. Type the intended filename and filetype into the File or Dataframe Name box (ex. missing_vrls_collectioncode.csv) and press Save Dataframe. The file should now be available in your ipython-utilities folder for dissemination. Please track this information in a new GitLab ticket.
This new GitLab ticket will require investigation to determine the cause for the missing data. The researcher will likely need to be contacted.
- Are these “broken” receivers from which data could not be downloaded? Check the comments for clues.
- Is there a typo in the receiver serial number and we are expecting a VRL that doesn’t exist?
- Are the deployment dates wrong and we are expecting a VRL that doesn’t exist?
- Can the researcher send us the missing VRL?
You can continue with data loading and then return to your Missing Data File ticket for investigation.
Task list checkpoint
In GitLab, this task can be completed at this stage:
- [ ] - NAME check for missing data records ("detections-3c" notebook)
events - 3 - create download records
This Nodebook will promote the events records from the intermediate events table to the final moorings records. Only use this Nodebook after adding the receiver records to the moorings table as this process is dependant on receiver records.
Find- Event & Detection Table (schema.events & schema.detections_YYYY)
- These are intermediate tables which contain all events in this project across all years and detections in certain years.
- For example, if a researcher want to know all spatial temperature data for a certain type of receiver in his project schema, they could use the query: ```sql select   rcv.otn_array, rcv.station_name, e.datetime as date, e.receiver, e."data", e.description, rcv.rcv_serial_no,   rcv.deploy_date, rcv.recover_date, rcv.recover_ind, rcv.dep_lat, rcv.dep_long, rcv.the_geom, rcv.catalognumber  from schema.events e  left join schema.rcvr_locations rcv  on model.f_end(e.receiver,'-') = model.f_end(rcv.rcv_serial_no) where   strpos(e.receiver, 'VR4') = 1 and e.description = 'Temperature'  ```
- As another example, if we want to check how many distinct transmitter are detected by a receiver 123456 in a project schema during 2023-11-10 to 2024-05-29, we could use the query: ```sql SELECT DISTINCT transmitter FROM schema.detections_2023 WHERE receiver ILIKE '%123456%'   AND datetime > '2023-11-10 00:00:00'   AND datetime < '2024-05-29 18:30:00' UNION SELECT DISTINCT transmitter FROM sjrbl.detections_2024 WHERE receiver ILIKE '%123456%'   AND datetime > '2023-11-10 00:00:00'   AND datetime < '2024-05-29 18:30:00' ```
Import cells and Database connections
As in all Nodebooks run the import cell to get the packages and functions needed throughout the notebook. This cell can be run without any edits.
The second cell will set your database connection. You will have to edit one section: engine = get_engine()
- Within the open brackets you need to open quotations and paste the path to your database
.kdbxfile which contains your login credentials. - On MacOS computers, you can usually find and copy the path to your database
.kdbxfile by right-clicking on the file and holding down the “option” key. On Windows, we recommend using the installed software Path Copy Copy, so you can copy a unix-style path by right-clicking. - The path should look like
engine = get_engine('C:/Users/username/Desktop/Auth files/database_conn_string.kdbx').
Once you have added your information, you can run the cell. Successful login is indicated with the following output:
Auth password:········
Connection Notes: None
Database connection established
Connection Type:postgresql Host:db.for.your.org Database:your_db_name User:your_node_admin Node:Node
User Inputs
Information regarding the tables we want to check against is required. Please complete schema = 'collectioncode', edited to include the relevant project code, in lowercase, between the quotes.
Once you have edited the value, you can run the cell.
Detecting Download Records
The next cell will scan the events table looking for data download events, and attempt to match them to their corresponding receiver deployment.
You should see output like this:
Found XXX download records to add to the moorings table
The next cell will print out all the identified download records, in a dataframe for you to view.
Loading Download Records
Before moving on from this you will need to confirm 2 things:
- Confirm that NO Push is currently ongoing
- Confirm
rcvr_locationsfor this schema have been verified.
If a Push is ongoing, or if verification has not yet occurred, you must wait for it to be completed before processing beyond this point.
If everything is OK, you can run the cell. The Nodebook will indicate success with a message like:
Added XXX records to the moorings table
Task list checkpoint
In GitLab, this task can be completed at this stage:
- [ ] - NAME load download records ("events-3" notebook)
Verify Download Records
This cell will have useful information:
- Are the instrument models formatted correctly?
- Are receiver serial numbers formatted correctly?
- Are there any other outstanding download records which haven’t been loaded?
The Nodebook will indicate the table has passed verification by the presence of ✔️green checkmarks.
If there are any errors, contact OTN for next steps.
Task list checkpoint
In GitLab, this task can be completed at this stage:
- [ ] - NAME verify download records ("events-3" notebook)
events-4 - process receiver configuration
This Nodebook will process the receiver configurations (such as MAP code) from the events table and load them into the schema’s receiver_config table. This is a new initiative by OTN to document and store this information, to provide better feedback to researchers regarding the detectability of their tag programming through time and space.
There are many cells in this Nodebook that display information but no action is needed from the Node Manager.
Import cells and Database connections
As in all Nodebooks run the import cell to get the packages and functions needed throughout the notebook. This cell can be run without any edits.
The second cell will set your database connection. You will have to edit one section: engine = get_engine()
- Within the open brackets you need to open quotations and paste the path to your database
.kdbxfile which contains your login credentials. - On MacOS computers, you can usually find and copy the path to your database
.kdbxfile by right-clicking on the file and holding down the “option” key. On Windows, we recommend using the installed software Path Copy Copy, so you can copy a unix-style path by right-clicking. - The path should look like
engine = get_engine('C:/Users/username/Desktop/Auth files/database_conn_string.kdbx').
Once you have added your information, you can run the cell. Successful login is indicated with the following output:
Auth password:········
Connection Notes: None
Database connection established
Connection Type:postgresql Host:db.for.your.org Database:your_db_name User:your_node_admin Node:Node
User Inputs
Information regarding the tables we want to check against is required. Please complete schema = 'collectioncode', edited to include the relevant project code, in lowercase, between the quotes.
Once you have edited the value, you can run the cell.
Get Receiver Configuration
Using the receiver deployment records, and the information found in the events table, this cell will identify any important configuration information for each deployment. A dataframe will be displayed.
The following cell (“Process receiver config”) will extrapolate further to populate all the required columns from the receiver_config table. A dataframe will be displayed.
Processed Configuration
Run this to see the rows that were successfully processed from the events table. These will be sorted in the next step into (1) duplicates, (2) updates, and (3) new configurations. Of the latter two, you will be able to select which ones you want to load into the database.
Incomplete Configuration
Run this cell to see any rows that could not be properly populated with data, i.e, a missing frequency or a missing map code. This will usually happen as a result of a map code that could not be correctly processed. These rows will not be loaded and will have to be fixed in the events table if you want the configuration to show up in the receiver_config table.
Sort Configuration
All processed configurations are sorted into (1) duplicates, (2) updates, and (3) new configurations. Of the latter two, you will be able to select which ones you want to load into the database in future cells.
Duplicates
No action needed - These rows have already been loaded, and there are no substantial updates to be made.
Updates
Action needed - These rows have incoming configuration from the events table that represent updates to what is already in the table for a given catalognumber at a given frequency. Example: a new version of VDAT exported more events information, and we would like to ensure this new informatiuon is added to existing records in the events table.
Select the rows using the checkboxes that you want to make updates to, then run the next cell to make the changes.
You should see the following success message, followed by a dataframe:
XX modifications made to receiver config table.
New Confirguration
These rows are not already in the receiver configuration table.
Select the rows using the checkboxes that you want to add to the database, then run the next cell to make the changes.
You should see the following success message, followed by a dataframe:
XX modifications made to receiver config table.
Task list checkpoint
In GitLab, this task can be completed at this stage:
- [ ] - NAME process receiver configuration ("events-4" notebook)
Final Steps
The remaining steps in the GitLab Checklist are completed outside the Nodebooks.
First: you should access the Repository folder in your browser and ensure the raw detections are posted in the Data and Metadata folder.
Finally, the Issue can be passed off to an OTN-analyst for final verification in the database.
Key Points
Its important to handle errors when they come up as they can have implications on detections
OTN finishes off detections Issues by running Matching and sensor tag processing
Moving Platform: Mission Metadata, Telemetry and Detection Loading
Overview
Teaching: 150 min
Exercises: 0 minQuestions
What are considered moving platforms. What are the use cases?
How do I load moving platform metadata, telemetry data, and detections into the Database?
Objectives
Understand the workflow for moving platform workflow in the OTN system
Learn how to use the
MoversnotebooksKnown issues and shooting tips
Here is the issue checklist in the OTN Gitlab Moving Platforms template, for reference:
Moving platform
- [ ] - NAME load raw metadata file (`movers-1` notebook)**(:fish: table name: c_moving_platform_missions_yyyy)**
- [ ] - NAME load raw telemetry files (`movers-2` notebook) **(:fish: table name: c_moving_platform_telemetry_yyyy**)
- [ ] - NAME create telemetry table from raw table (`movers-2` notebook) **(:fish: table name: moving_platform_telemetry_yyyy**)
- [ ] - NAME combine mission metadata with telemetry (`movers-2` notebook) **(:fish: table name: moving_platform_mission_telemetry_yyyy)**
- [ ] - NAME load to raw detections (`detections-1` notebook) **(:fish: table name: c_detections_yyyy)**
- [ ] - NAME verify raw detections table (`detections-1` notebook)
- [ ] - NAME load raw events (`events-1` notebook) **(:fish: table name: c_events_yyyy )**
- [ ] - NAME load raw events to events table (`events-2` notebook)
- [ ] - NAME load to detections_yyyy_movers (`movers-2` notebook) **(:fish: put affected years here)**
- [ ] - NAME delete self detections (`movers-3` notebook)
- [ ] - NAME timedrift correction for affected detection (`movers-3` notebook)
- [ ] - NAME verify timedrift corrections (`movers-3` notebook)
- [ ] - NAME verify detections_yyyy_movers (looking for duplicates) (`movers-3` notebook)
- [ ] - NAME load to sensor match (`movers-3` notebook) **(:fish: put affected years here)**
- [ ] - NAME load formatted telemetry tables (`movers-4` notebook) **(:fish: put affected years here)**
- [ ] - NAME load reduced telemetry tables (`movers-4` notebook) **(:fish: put affected years here)**
- [ ] - NAME load glider as receiver tables (`movers-4` notebook) **(:fish: put affected years here)**
- [ ] - NAME load into vw_detections_yyyy_movers (`movers-4` notebook) **(:fish: put affected years here)**
- [ ] - NAME load view detections into otn_detections_yyyy (`movers-4` notebook) **(:fish: put affected years here)**
- [ ] - NAME verify otn_detections_yyyy (`movers-4` notebook)
- [ ] - NAME create mission and receiver records in moorings (`movers-4` notebook)
- [ ] - NAME load download records (`events-3` notebook)
- [ ] - NAME verify download records (`events-3` notebook)
- [ ] - NAME process receiver configuration (`events-4` notebook)
- [ ] - NAME label issue with *'Verify'*
- [ ] - NAME pass issue to analyst for final steps
- [ ] - NAME match tags to animals (`detections-4` notebook)
- [ ] - NAME update detection extract table

metadata: **(put metadata repository link here)**

data: **(put data repository link here)**

telemetry: **(put telemetry repository link here)**
Loading Mission Metadata
Moving platform mission metadata should be reported to the Node in the template provided here: Moving Platforms Metadata. This spreadsheet file will contain one or more missions (rows) of the moving platform: identifiers, instruments used, and deployment/recovery times.
- Quality control the
MOVING PLATFORMS METADATAspreadsheet. If any modification save revised version as_QCed.xlsx
1.1 Visually check for any missing information and inconsistant or formatting issues in the essential columns (in dark-green backgroup color)? Column names and example data are shown as below:
- PLATFORM_ID: e.g.
OTN-Gl-1. - OTN_MISSION_ID: e.g.
OTN-Gl-1-20231003T1456(Note: otn_mission_id is an internal unique identifier which can be constructed asplatform_id + deploy_date_time). Recommend this format to comply with OTN and also match theDataset IDof IOOS US Glider DAC ERDDAP Datasets - INS_MODEL_NO: e.g.
VMT - INS_SERIAL_NO: e.g.
130000 - DEPLOY_DATE_TIME: e.g.
2023-10-03T14:56:00 - DEPLOY_LAT: e.g.
16.7428 - DEPLOY_LONG: e.g.
-24.7889 - RECOVER_DATE_TIME: e.g.
2023-12-03T12:00:00 - RECOVERED: (y/n/l)
- RECOVER_LAT: e.g.
16.9251 - RECOVER_LONG: e.g.
-25.4713 - DATA_DOWNLOADED: (y/n)
- DOWNLOAD_DATE_TIME: e.g.
2024-06-11T00:00:00 - FILENAME: e.g.
VMT_130000_20240616_133100.vrl(Note: prefer original downloads).
1.2 Optional but nice to have columns:
- TRANSMITTER and TRANSMIT_MODEL to reduce self-detections.
- Run through the
movers - 1 - Load Mission MetadataNodebook to load the spreadsheet into themission_table. See steps here:
User Input
Cell three requires input from you. This information will be used to get the raw mission CSV and to be able to create a new raw mission table in the database.
schema: ‘collectioncode’- Please edit to include the relevant project code, in lowercase, between the quotes.
table_suffix: e.g.2024_03- should be the same as in themovers - 1 - Load Mission MetadataNodebook.- Within the quotes, please add your custom table suffix. We recommend using
year_monthor similar, to indicate the most-recently downloaded instrument.
- Within the quotes, please add your custom table suffix. We recommend using
mission_file: ‘/path/to/mission_file’- paste a filepath to the relevant XLSX file. The filepath will be added between the provided quotation marks.
- Check off the step and record the
mission_tablename in the Gitlab ticket.
- [ ] - NAME load raw metadata file (movers-1 notebook)**(:fish: table name: c_moving_platform_missions_yyyy)**
Loading Telemetry Data
- Visually check if there is any missing information or inconsistent formatting in the four essential columns in each submitted telemetry file. Column names and example data are shown as below:
- Timestamp: e.g.
2023-12-13T13:10:12(Note: the column name may be different) - lat: e.g.
28.33517(Note: the column name may be different) - lon: e.g.
-80.33734833(Note: the column name may be different) - PLATFORM_ID: e.g.
OTN-GL-1(Note: the column name may be different. Ensure the values match themission_table.platform_idin the Loading Mission Metadata step) - OTN_MISSION_ID: e.g.
OTN-GL-1-20231003T1456(Note: this column needs to be added in a spreadsheet application. And populate the values to match the values in themission_table.otn_mission_idin the Loading Mission Metadata step)
- Timestamp: e.g.
- Launch the
movers - 2 - Load telemetryNodebook
User Input
Cell three requires input from you. This information will be used to get the telemetry CSV and to be able to create a new raw telemetry table in the database.
table_suffix: e.g.2024_03- Within the quotes, please add your custom table suffix. We recommend using
year_monthor similar.
- Within the quotes, please add your custom table suffix. We recommend using
schema: ‘collectioncode’- Please edit to include the relevant project code, in lowercase, between the quotes.
telemetry_file: ‘/path/to/telem_file’- Paste a filepath to the relevant CSV file. The filepath will be added between the provided quotation marks.
- Note: if multiple telemetry files are submitted use the
Optional: Combine telemetry files from multiple missions/platformssection to combine them.
-
Run the
Prepare the telemetry file to be uploadedcell to map the spreadsheet comlumns to Database columns. -
Run the
verify_telemetry_fileandUpload the telemetry file to raw tablecells to load the telemetry data (.xlsx or .csv) file into theraw_telemetrytable. -
Check off the step and record the
c_moving_platform_telemetryname in the Gitlab ticket.
- [ ] - NAME load raw telemetry files (movers-2 notebook) **(:fish: table name: c_moving_platform_telemetry_yyyy**)
-
Run the
Create the telemtry table for joining to missionsandverify_telemetry_tablecell to create and loadtelemetrytable (e.g. moving_platform_telemetry_2024_03). -
Check off the step and record the
moving_platform_telemetryname in the Gitlab ticket.
- [ ] - NAME create telemetry table from raw table (movers-2 notebook) **(:fish: table name: moving_platform_telemetry_yyyy**)
-
Run the
movers - 2 - Load telemetrynotebook:verify_missions_table,create_joined_table, andverify_telemetry_tablecells to create the moving_platform_mission_telemetry table: -
Check off the step and record the
moving_platform_mission_telemetryname in the Gitlab ticket.
- [ ] - NAME combine mission metadata with telemetry (movers-2 notebook) **(:fish: table name: moving_platform_mission_telemetry_yyyy)**
Loading Raw Detections and Events
These detailed steps and explanations are the same as https://ocean-tracking-network.github.io/node-manager-training/10_Detections/index.html Convert to CSV section, detections - 1 - load csv detections section, events - 1 - load events into c_events_yyyy section and events - 2 - move c_events into events table section. Please use the above Detection Loading process as reference.
- The related detections may now be processed. Detection data should be reported to the Node as a collection of raw, unedited files. These can be in the form of a zipped folder of
.VRLs, a database from Thelma Biotel or any other raw data product from any manufacturer.
Visual Inspection
Once the files are received from a researcher, the Data Manager should first complete a visual check for formatting and accuracy.
Things to visually check:
- Do the files appear edited? Look for
_editedin file name. - Is the file format the same as expected for that manufacturer? Ex.
.vrlfor Innovasea - not.csvorrldformats.
Convert to CSV
Once the raw files are obtained, the data must often be converted to .csv format by the Node Manager. There are several ways this can be done, depending on the manufacturer.
For Innovasea
- VUE (Obsolete, prefer Fathom Connect unless receiver unsupported)
- Open a new
database - Import all the
VRLfiles provided - Select
export detectionsand choose the location you want to save the file - Select
export eventsand choose the location you want to save the file
- Open a new
- Fathom Connect App
- Choose “export data”
- Select the relevant files and import into the Fathom Connect application
- Export all data types, and choose the location you want to save the files
convert - Fathom (vdat) Export - VRL to CSVNodebook- This will use the
vdat.exeexecutable to export from VRL/VDAT to CSV - Instructions for this Nodebook are in the
Detectionslesson.
- This will use the
For Thelma Biotel
- Use the
ComPortsoftware to open the.tbdbfile and export as CSV
For Lotek
- Exporting to CSV is more complicated, please reach out to OTN for specific steps for a given instrument model
For all other manufacturers, contact OTN staff to get specifics on the detection data loading workflow.
detections - 1 - load csv detections
Detections-1 loads CSV detections files into a new database table. If detections were exported using Fathom or the convert - Fathom (vdat) Export - VRL to CSV Nodebook, the receiver events records will also be loaded at this stage. This is because these applications combine the detections and events data in one CSV file.
Import cells and Database Connections
As in all Nodebooks, run the import cell to get the packages and functions needed throughout the notebook. This cell can be run without any edits.
The second cell will set your database connection. You will have to edit one section: engine = get_engine()
- Within the open brackets you need to open quotations and paste the path to your database
.kdbxfile which contains your login credentials. - On MacOS computers, you can usually find and copy the path to your database
.kdbxfile by right-clicking on the file and holding down the “option” key. On Windows, we recommend using the installed software Path Copy Copy, so you can copy a unix-style path by right-clicking. - The path should look like
engine = get_engine('C:/Users/username/Desktop/Auth files/database_conn_string.kdbx').
Once you have added your information, you can run the cell. Successful login is indicated with the following output:
Auth password:········
Connection Notes: None
Database connection established
Connection Type:postgresql Host:db.for.your.org Database:your_db_name User:your_node_admin Node:Node
User Input
Cell three requires input from you. This information will be used to get the raw detections CSV and to be able to create a new raw table in the database.
file_or_folder_path = r'C:/Users/path/to/detections_CSVs/'- Paste a filepath to the relevant CSV file(s). The filepath will be added between the provided quotation marks.
- This can be a path to a single CSV file, or a folder of multiple CSVs.
table_suffix = 'YYYY_mm'- Within the quotes, please add your custom table suffix. We recommend using the year and month (i.e,
YYYY_MM) or similar, to indicate the most-recently downloaded instrument.
- Within the quotes, please add your custom table suffix. We recommend using the year and month (i.e,
schema = 'collectioncode'- Please edit to include the relevant project code, in lowercase, between the quotes.
There are also some optional inputs:
load_detections: A true or false value using the table suffix you supplied.stacked: This is for Fathom exports only and refers to how they should be parsed.
Once you have added your information, you can run the cell.
Verify Detection File and Load to Raw Table
Next, the Nodebook will review and verify the detection file(s) format, and report any error. Upon successful verification, you can then run the cell below which will attempt to load the detections into a new raw table.
The Nodebook will indicate the success of the table-creation with a message such as this:
Reading fathom files...
Loading Files...
X/X
Task list checkpoint
In GitLab, this task can be completed at this stage:
- [ ] - NAME load to raw detections ("detections-1" notebook) **(:fish: table name: c_detections_yyyy)**
Ensure you paste the table name (ex: c_detections_YYYY_mm) into the indicated section before you check the box.
Verify Raw Detection Table
This cell will now complete the Quality Control checks of the raw table. This is to ensure the Nodebook loaded the records correctly from the CSVs.
The output will have useful information:
- Are there any duplicates?
- Are the serial numbers formatted correctly?
- Are the models formatted correctly?
The Nodebook will indicate the sheet had passed quality control by adding a ✔️green checkmark beside each section.
If there are any errors, contact OTN for next steps.
Task list checkpoint
In GitLab, these tasks can be completed at this stage:
- [ ] - NAME verify raw detections table ('detections-1' notebook)
events - 1 - load events into c_events_yyyy
Events-1 is responsible for loading receiver events files into raw tables. This is only relevant for CSVs that were NOT exported using Fathom or the convert - Fathom (vdat) Export - VRL to CSV Nodebook.
Import cell
As in all Nodebooks run the import cell to get the packages and functions needed throughout the notebook. This cell can be run without any edits.
User Inputs
Cell two requires input from you. This information will be used to get the raw events CSV and to be able to create a new raw table in the database.
filepath = r'C:/Users/path/to/events.csv'- Paste a filepath to the relevant CSV file. The filepath will be added between the provided quotation marks.
table_name = 'c_events_YYYY_mm'- Within the quotes, please add your custom table suffix. We recommend using the year and month (i.e,
YYYY_MM) or similar, to indicate the most-recently downloaded instrument.
- Within the quotes, please add your custom table suffix. We recommend using the year and month (i.e,
schema = 'collectioncode'- Please edit to include the relevant project code, in lowercase, between the quotes.
There are also some optional inputs:
file_encoding: How the file is encoded. ISO-8859-1 is the default encoding used in VUE’s event export.
Once you have added your information, you can run the cell.
Verifying the events file
Before attempting to load the event files to a raw table the Nodebook will verify the file to make sure there are no major issues. This will be done by running the Verify Events File cell. If there are no errors, you will be able to continue.
The Nodebook will indicate the success of the file verification with a message such as this:
Reading file 'events.csv' as CSV.
Verifying the file.
Format: VUE 2.6+
Mandatory Columns: OK
date_and_time datetime:OK
Initialization(s): XX
Data Upload(s): XX
Reset(s): XX
Database Connection
You will have to edit one section: engine = get_engine()
- Within the open brackets you need to open quotations and paste the path to your database
.kdbxfile which contains your login credentials. - On MacOS computers, you can usually find and copy the path to your database
.kdbxfile by right-clicking on the file and holding down the “option” key. On Windows, we recommend using the installed software Path Copy Copy, so you can copy a unix-style path by right-clicking. - The path should look like
engine = get_engine('C:/Users/username/Desktop/Auth files/database_conn_string.kdbx').
Once you have added your information, you can run the cell. Successful login is indicated with the following output:
Auth password:········
Connection Notes: None
Database connection established
Connection Type:postgresql Host:db.for.your.org Database:your_db_name User:your_node_admin Node:Node
Load the events file into the c_events_yyyy table
The second last cell loads the events file into a raw table. It depends on successful verification from the last step. Upon successful loading, you can dispose of the engine then move on to the next Nodebook.
The Nodebook will indicate the success of the table-creation with the following message:
File loaded with XXXXX records.
100%
Task list checkpoint
In GitLab, these tasks can be completed at this stage:
- [ ] - NAME load raw events (events-1 notebook) **(:fish: table name: c_events_yyyy )**
Ensure you paste the table name (ex: c_events_YYYY_mm) into the indicated section before you check the box.
events - 2 - move c_events into events table
This Nodebook will move the raw events records into the intermediate events table.
Import cell
As in all Nodebooks run the import cell to get the packages and functions needed throughout the notebook. This cell can be run without any edits.
User input
This cell requires input from you. This information will be used to get the raw events CSV and to create a new raw table in the database.
c_events_table = 'c_events_YYYY_mm'- Within the quotes, please add your custom table suffix, which you have just loaded in either
detections-1orevents-1.
- Within the quotes, please add your custom table suffix, which you have just loaded in either
schema = 'collectioncode'- Please edit to include the relevant project code, in lowercase, between the quotes.
Database Connection
You will have to edit one section: engine = get_engine()
- Within the open brackets you need to open quotations and paste the path to your database
.kdbxfile which contains your login credentials. - On MacOS computers, you can usually find and copy the path to your database
.kdbxfile by right-clicking on the file and holding down the “option” key. On Windows, we recommend using the installed software Path Copy Copy, so you can copy a unix-style path by right-clicking. - The path should look like
engine = get_engine('C:/Users/username/Desktop/Auth files/database_conn_string.kdbx').
Once you have added your information, you can run the cell. Successful login is indicated with the following output:
Auth password:········
Connection Notes: None
Database connection established
Connection Type:postgresql Host:db.for.your.org Database:your_db_name User:your_node_admin Node:Node
Verify table format
You will then verify that the c_events events table you put in exists and then verify that it meets the required format specifications.
The Nodebook will indicate the success of the table verification with a message such as this:
Checking table name format... OK
Checking if schema collectioncode exists... OK!
Checking collectioncode schema for c_events_YYYY_mm table... OK!
collectioncode.c_events_YYYY_mm table found.
If there are any errors in this section, please contact OTN.
Load to Events table
If nothing fails verification, you can move to the loading cell.
The Nodebook will indicate the success of the processing with a message such as this:
Checking for the collectioncode.events table... OK!
Loading events... OK!
Loaded XX rows into collectioncode.events table.
Task list checkpoint
In GitLab, these tasks can be completed at this stage:
- [ ] - NAME load raw events to events table ("events-2" notebook)
Loading Detections for Moving Platforms
- With the telemetry and mission table, we can now upload the raw detections and promote them to the detections_yyyy_movers tables.
- This Nodebook is analogous to
detections - 2 - c_table into detections_yyyyanddetections - 2b - timedrift calculations. The difference is it handles_moverstables.- Run
movers - 3 - Load DetectionsNodebook tillLoad raw dets into detections_yyyy_moverscell to populatedetections_yyyy_moverstables and load raw detections into them.
- Run
User Input
Cell three requires input from you. This information will be used to get the raw detections CSV and to be able to create a new raw table in the database.
table_suffix: e.g.2024_03- should be the same as in themovers - 1 - Load Mission MetadataNodebook.- Within the quotes, please add your custom table suffix. We recommend using
year_monthor similar.
- Within the quotes, please add your custom table suffix. We recommend using
schema: ‘collectioncode’- Please edit to include the relevant project code, in lowercase, between the quotes.
-
Run the
Load raw dets into detections_yyyy_moverscell and note the output. -
Check off the step and record affected years (which detections_yyyy_movers tables were updated) in the Gitlab ticket.
- [ ] - NAME load to detections_yyyy_movers (movers-2 notebook) **(:fish: put affected years here)**
- Note: if no detections were promoted into detections_yyyy_movers please assign the ticket to OTN for trouble shooting.
- Run the next six cells to load timedrift factors, adjustment detection datetime to detections_yyyy_movers and verify the timedrift corrections. Check off the steps in the Gitlab ticket.
- [ ] - NAME timedrift correction for affected detection (movers-3 notebook)
- [ ] - NAME verify timedrift corrections (movers-3 notebook)
- Run the next two cells to verify the detections_yyyy_movers tables. Check off the step in the Gitlab ticket.
- [ ] - NAME verify detections_yyyy_movers (looking for duplicates) (movers-3 notebook)
- Run the last cell to create and load sensor match tables for movers. Check off the step and record affected years in the Gitlab ticket.
- [ ] - NAME load to sensor match (movers-3 notebook) **(:fish: put affected years here)**
Loading OTN Detections
User Input
Cell three requires input from you. This information will be used to get the raw detections CSV and to be able to create a new raw table in the database.
table_suffix: e.g.2024_03- should be the same as in themovers - 1 - Load Mission Metadatanotebook.- Within the quotes, please add your custom table suffix. We recommend using
year_monthor similar.
- Within the quotes, please add your custom table suffix. We recommend using
schema: ‘collectioncode’- Please edit to include the relevant project code, in lowercase, between the quotes.
years: e.g.[2022, 2023]- Enter the affected years from
movers - 3 - Load Detections
- Enter the affected years from
- Run the
create_moving_platforms_full_telemetrycell to load to the formatted telemetry table. Check off the step and record the affected years in the Gitlab ticket.
- [ ] - NAME load formatted telemetry tables (movers-4 notebook) **(:fish: put affected years here)**
- Run the
create_reduced_telemetry_tablescell to load the reduced telemetry tables. Check off the step and record the affected years in the Gitlab ticket.
- [ ] - NAME load reduced telemetry tables (movers-4 notebook) **(:fish: put affected years here)**
- Run the
create_platform_as_receiver_tablescell to load the “glider as receiver” tables. Check off the step and record the affected years in the Gitlab ticket.
- [ ] - NAME load glider as receiver tables (movers-4 notebook) **(:fish: put affected years here)**
- Run the
create_detections_viewandload_view_into_otn_detscells to load view detections into otn_detections_yyyy tables. Check off the step and record the affected years in the Gitlab ticket.
- [ ] - NAME load into vw_detections_yyyy_movers (movers-4 notebook) **(:fish: put affected years here)**
- [ ] - NAME load view detections into otn_detections_yyyy (movers-4 notebook) **(:fish: put affected years here)**
- Note: if no detections were promoted into detections_yyyy_movers please assign the ticket to OTN for trouble shooting.
- Run the
verify_otn_detectionscell to verify theotn_detections_yyyytables. Check off the step in the Gitlab ticket.
- [ ] - NAME verify otn_detections_yyyy (movers-4 notebook)
- Run the
load_platforms_to_mooringscell to verify themooringstables. Check off the step in the Gitlab ticket.
- [ ] - NAME create mission and receiver records in moorings (movers-4 notebook)
events - 3 - create download records
This Nodebook will promote the events records from the intermediate events table to the final moorings records. Only use this Nodebook after adding the receiver records to the moorings table as this process is dependant on receiver records.
NOTE: as of November 2024 the below Nodebooks do no support the Movers data. This will be completed shortly.
Import cells and Database connections
As in all Nodebooks run the import cell to get the packages and functions needed throughout the notebook. This cell can be run without any edits.
The second cell will set your database connection. You will have to edit one section: engine = get_engine()
- Within the open brackets you need to open quotations and paste the path to your database
.kdbxfile which contains your login credentials. - On MacOS computers, you can usually find and copy the path to your database
.kdbxfile by right-clicking on the file and holding down the “option” key. On Windows, we recommend using the installed software Path Copy Copy, so you can copy a unix-style path by right-clicking. - The path should look like
engine = get_engine('C:/Users/username/Desktop/Auth files/database_conn_string.kdbx').
Once you have added your information, you can run the cell. Successful login is indicated with the following output:
Auth password:········
Connection Notes: None
Database connection established
Connection Type:postgresql Host:db.for.your.org Database:your_db_name User:your_node_admin Node:Node
User Inputs
Information regarding the tables we want to check against is required. Please complete schema = 'collectioncode', edited to include the relevant project code, in lowercase, between the quotes.
Once you have edited the value, you can run the cell.
Detecting Download Records
The next cell will scan the events table looking for data download events, and attempt to match them to their corresponding receiver deployment.
You should see output like this:
Found XXX download records to add to the moorings table
The next cell will print out all the identified download records, in a dataframe for you to view.
Loading Download Records
Before moving on from this you will need to confirm 2 things:
- Confirm that NO Push is currently ongoing
- Confirm
rcvr_locationsfor this schema have been verified.
If a Push is ongoing, or if verification has not yet occurred, you must wait for it to be completed before processing beyond this point.
If everything is OK, you can run the cell. The Nodebook will indicate success with a message like:
Added XXX records to the moorings table
Task list checkpoint
In GitLab, this task can be completed at this stage:
- [ ] - NAME load download records ("events-3" notebook)
Verify Download Records
This cell will have useful information:
- Are the instrument models formatted correctly?
- Are receiver serial numbers formatted correctly?
- Are there any other outstanding download records which haven’t been loaded?
The Nodebook will indicate the table has passed verification by the presence of ✔️green checkmarks.
If there are any errors, contact OTN for next steps.
Task list checkpoint
In GitLab, this task can be completed at this stage:
- [ ] - NAME verify download records ("events-3" notebook)
events-4 - process receiver configuration
This Nodebook will process the receiver configurations (such as MAP code) from the events table and load them into the schema’s receiver_config table. This is a new initiative by OTN to document and store this information, to provide better feedback to researchers regarding the detectability of their tag programming through time and space.
There are many cells in this Nodebook that display information but no action is needed from the Node Manager.
Import cells and Database connections
As in all Nodebooks run the import cell to get the packages and functions needed throughout the notebook. This cell can be run without any edits.
The second cell will set your database connection. You will have to edit one section: engine = get_engine()
- Within the open brackets you need to open quotations and paste the path to your database
.kdbxfile which contains your login credentials. - On MacOS computers, you can usually find and copy the path to your database
.kdbxfile by right-clicking on the file and holding down the “option” key. On Windows, we recommend using the installed software Path Copy Copy, so you can copy a unix-style path by right-clicking. - The path should look like
engine = get_engine('C:/Users/username/Desktop/Auth files/database_conn_string.kdbx').
Once you have added your information, you can run the cell. Successful login is indicated with the following output:
Auth password:········
Connection Notes: None
Database connection established
Connection Type:postgresql Host:db.for.your.org Database:your_db_name User:your_node_admin Node:Node
User Inputs
Information regarding the tables we want to check against is required. Please complete schema = 'collectioncode', edited to include the relevant project code, in lowercase, between the quotes.
Once you have edited the value, you can run the cell.
Get Receiver Configuration
Using the receiver deployment records, and the information found in the events table, this cell will identify any important configuration information for each deployment. A dataframe will be displayed.
The following cell (“Process receiver config”) will extrapolate further to populate all the required columns from the receiver_config table. A dataframe will be displayed.
Processed Configuration
Run this to see the rows that were successfully processed from the events table. These will be sorted in the next step into (1) duplicates, (2) updates, and (3) new configurations. Of the latter two, you will be able to select which ones you want to load into the database.
Incomplete Configuration
Run this cell to see any rows that could not be properly populated with data, i.e, a missing frequency or a missing map code. This will usually happen as a result of a map code that could not be correctly processed. These rows will not be loaded and will have to be fixed in the events table if you want the configuration to show up in the receiver_config table.
Sort Configuration
All processed configurations are sorted into (1) duplicates, (2) updates, and (3) new configurations. Of the latter two, you will be able to select which ones you want to load into the database in future cells.
Duplicates
No action needed - These rows have already been loaded, and there are no substantial updates to be made.
Updates
Action needed - These rows have incoming configuration from the events table that represent updates to what is already in the table for a given catalognumber at a given frequency. Example: a new version of VDAT exported more events information, and we would like to ensure this new informatiuon is added to existing records in the events table.
Select the rows using the checkboxes that you want to make updates to, then run the next cell to make the changes.
You should see the following success message, followed by a dataframe:
XX modifications made to receiver config table.
New Confirguration
These rows are not already in the receiver configuration table.
Select the rows using the checkboxes that you want to add to the database, then run the next cell to make the changes.
You should see the following success message, followed by a dataframe:
XX modifications made to receiver config table.
Task list checkpoint
In GitLab, this task can be completed at this stage:
- [ ] - NAME process receiver configuration ("events-4" notebook)
Final Steps
The remaining steps in the GitLab Checklist are completed outside the Nodebooks.
First: you should access the Repository folder in your browser and ensure the raw detections are posted in the Data and Metadata folder.
Finally, the Issue can be passed off to an OTN-analyst for final verification in the database.
Troubleshoot Tips and Resources
- To visualize detections along telemetries use:
movers - 2b - Compare detections to telemetryGantt Chart of Detections vs TelemetryMissing Telemetry Graph
Known issues and Limitations
events - 3 - create download recordsdoes not support moving platform as of Nov-2024.
Key Points
OTN supports processing of slocum and wave glider detections, detections from other mobile platforms (ship-board receivers, animal-mounted receivers, etc.), and active tracking (reference https://oceantrackingnetwork.org/gliders/).
OTN is able to match detections collected by moving platforms as long as geolocation data is provided.
mission metadata,telemetry dataanddetection datashould be submitted prior to the Moving platform data loading process.
Creating Repeatable Data Summaries and Visualizations
Overview
Teaching: 30 min
Exercises: 0 minQuestions
What reports and visualizations are provided to help me summarize the data held in my Database Node?
How do I create my own custom repeatable reports from the data held in my Database Node?
How do I share the reports I’ve created with other node managers?
Objectives
Learn about some of the tables in the aggregation schemas
discoveryandgeoserverLearn about the existing suite of reporting and visualization notebooks
Become comfortable with sharing the custom products you create
The data sources:
The discovery schema
The discovery schema of each node, as well as the OTN database’s own discovery schema, contains summarized data products that are meant to be quick shortcuts to analysis and reporting of popular data types. Here you can downsize the number of columns that accompany tag or receiver deployments, or bin up detections into easier-to-visualize bites. Simplified versions of these data types can also help you adhere to your Data Sharing Agreement with your user base, removing or generalizing the data according to what the community demands. The content of these tables is written by the discovery_process_reload.ipynb notebook, and the aggregation of the core discovery tables to the OTN database for aggregate reporting is performed by the discovery_process_pull_node_tables_to_mstr.ipynb notebook. OTN does this for the purpose of reporting to funders, and helping with discoverability of datasets by publishing project pages with receiver and tag release location data for each project. If there are data that you do not want to supply to OTN for publication, you do not have to run those parts of the discovery process. Those data summaries will not be created or harvested by OTN during the discovery process phase of the Data Push.
The geoserver schema
The geoserver schema is similar to the discovery schema but all data tables here correspond to layers that can be expressed via the OGC GeoServer data portal. This means they have pre-calculated the geometric and map projection data columns necessary for them to express themselves as geographic data points and paths. This data is often stored in a column called the_geom.
If you re-generate these tables for your Node using the populate_geoserver notebooks, they will then contain accurate data for your Node. Attaching a GeoServer instance to this database schema will allow you to express project, receiver deployment, and tag deployment information in many formats. OTN’s GeoServer instance can aggregate and re-format the GeoServer data into human and machine-readable formats for creating public maps and data products. As an example: the OTN Members Portal uses GeoServer to visualize project data, and the R package otndo uses the existence of a GeoServer with station histories to produce data summaries for individual researchers about the places and times their tags were detected outside their own arrays.
Installation
The installation steps for the Visuals and Reporting are similar to the installation steps for ipython-utilities:
- Determine the folder in which you wish to keep the Visuals and Reporting notebooks.
- Open your
terminalorcommand promptapp.- Type
cdthenspace. - You then need to get the filepath to the folder in which you wish to keep the Visuals and Reporting notebooks. You can either drag the folder into the
terminalorcommand promptapp or hitshift/optionwhile right clicking and selectcopy as pathfrom the menu. - Then paste the filepath in the
terminalorcommand promptand hitenter - In summary, you should type
cd /path/to/desired/folderbefore pressing enter.
- Type
- Create and activate the “visbooks” python enviornment. The creation process will only need to happen once.
- In your terminal, run the command
conda create -n visbooks python=3.9 - Activate the visbooks environment using
conda activate visbooks
- In your terminal, run the command
- You are now able to run commands in that folder. Now run:
git clone https://gitlab.oceantrack.org/otn-partner-nodes/visuals-and-reporting.git. This will get the latest version of the Visuals and Reporting notebooks from our GitLab - Navigate to the visuals-and-reporting subdirectory that was created by running
cd visuals-and-reporting. - Now to install all required python packages by running the following:
mamba env update -n visbooks -f environment.yml
To open and use the Visuals and Reporting Notebooks:
- MAC/WINDOWS: Open your terminal, and navigate to your visuals-and-reporting directory, using
cd /path/to/visuals-and-reporting. Then, run the commands:conda activate visbooksto activate the visbooks python environmentjupyter notebookto open the Nodebooks in a browser window.
- DO NOT CLOSE your terminal/CMD instance that opens! This will need to remain open in the background in order for the Nodebooks to be operational.
Some troubleshooting tips can be found in the ipython Nodebooks installation instructions: https://gitlab.oceantrack.org/otn-partner-nodes/ipython-utilities/-/wikis/New-Install-of-Ipython-Utilities
The visuals-and-reporting notebooks
Some products are built from things that nodes don’t make fully public, but are useful to summarize for funders or stakeholders, or to produce simplified visualizations meant to promote your Network. The visuals-and-reporting notebooks repository is a collection of popular workflows for producing these sorts of products.
Database and Network-wide reports
Example: Active Tags and IUCN Status
This creates a summary report of Tag Life, Tags, Detections, Stations. Tailored for OTN’s reporting requirements to CFI.
Example: Generate Receiver Map
This creates a map to show receivers from Nodes. Tailored for OTN’s reporting requirements and data policy.
Project-level summaries
Example: Receiver Project Report
This notebook generates a summary report for receiver operators to describe what animals have been seen and when. Tailored for OTN’s reporting requirements and data policy.
Tag-oriented summaries
Example: Private: Tag Check and Summarize
Scenario: You want to know whether any of the detections you just downloaded are part of your Database already. Use this notebook to search tags, tag specs, and existing detections that are unmatched to find matches to a set of tag IDs that you specify. This will not do the checking that actually loading and matching the detection data would do for you, so sharing this output is not recommended, but it gives a sense of the connectivity of a detection dataset to the Database.
User-facing summaries: otndo
Mike O’Brien’s summarization and visualization function can be run by any client and uses a detection extract as a data source. Referencing the OTN GeoServer, it will produce a list of collaborators and projects that have contributed to detctions in that supplied dataset, and provide a before/after timepoint to show the end user what detections have been added by the latest Data Push.
Examples at Mike’s otndo documentation page.
Adding new notebooks to visuals-and-reporting
If you would like to see new features or workflows added to the visuals-and-reporting repository for all to use, you can issue a merge request against the repository, or work with OTN programmer staff to build and design data structures and workflows that fulfill your reporting needs. Use the existing discovery and geoserver data objects or you can also design new ones for your node.
Example: Cross-node Detections chord plot
Using the detection_pre_summary Discovery table, we can see which detection events were mapped between different Nodes, and visualize these inter-Node interactions using a chord plot. Here we have created a few caveats to avoid representing false detections on the plot, only taking detection events with >1 detection, and excluding some of the more fantastic inter-ocean matches.
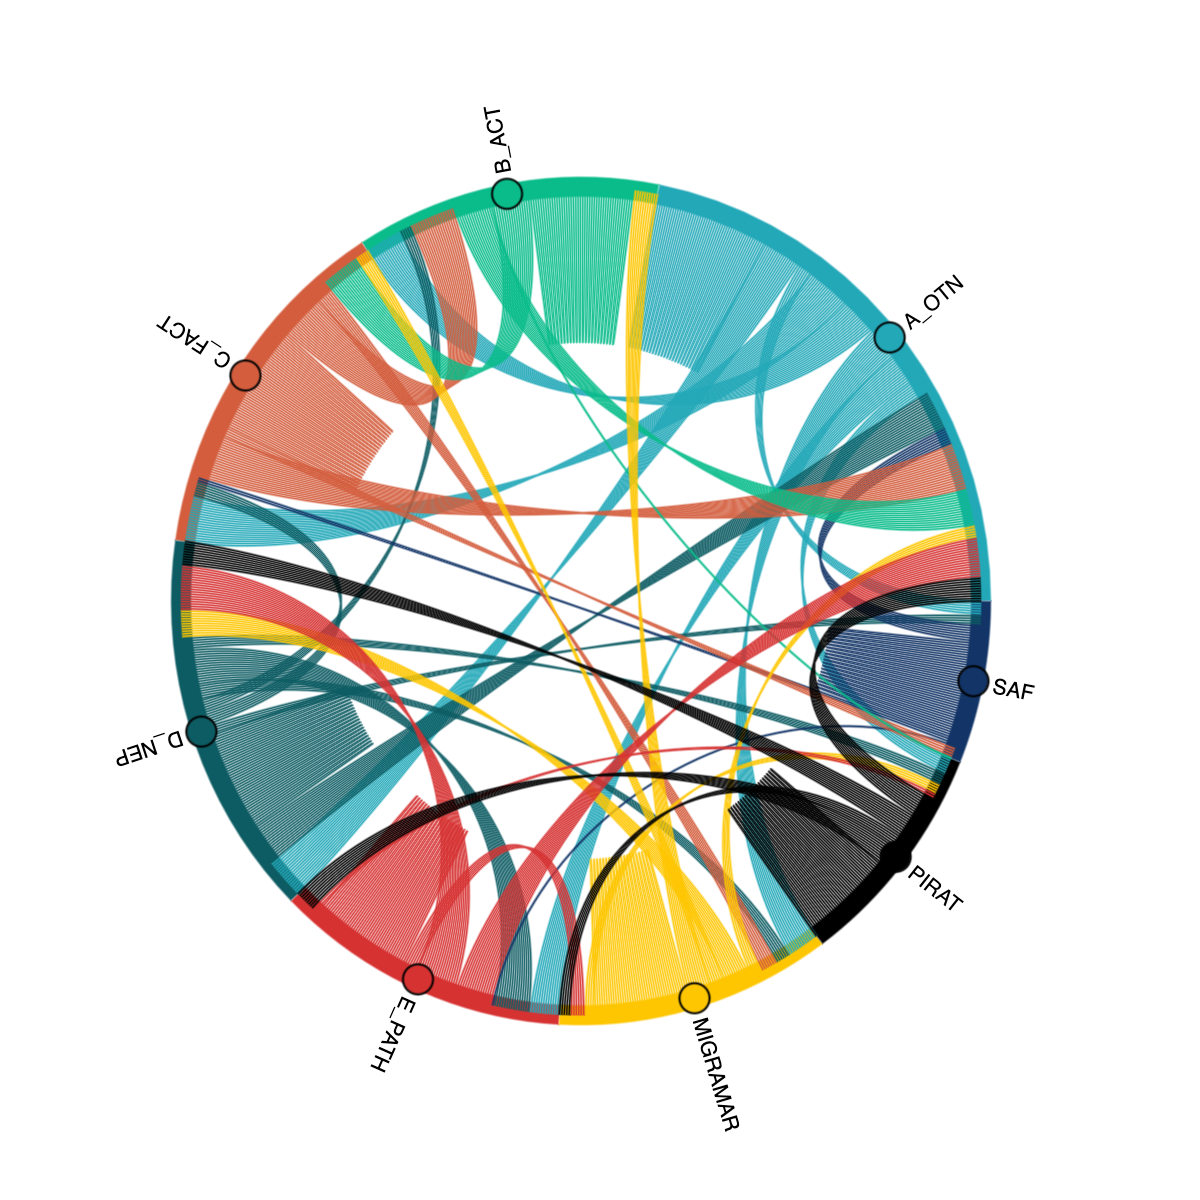
Key Points
Often, funders and communities want to see aggregations, Big Numbers, or visualizations of the data collected by the Database Node.
Notebooks in the
visuals-and-reportingrepository (OTN GitLab Link) help create simple, standard outputs that may answer the needs of the communities.The suite of notebooks can easily be extended by any node manager.
Anything OTN or node managers develop or co-develop can be shared with everyone via a pull request on GitLab.
Database Fix Notebooks
Overview
Teaching: 15 min
Exercises: 0 minQuestions
What should I do if the database values require a change?
Objectives
Learn about Database Fix Notebooks that are useful for changes to the database
General Description
During the process of loading data it is possible to uncover errors with previously-loaded datasets. OTN is constantly improving our QA/QC tools, which means we are identifying and correcting more and more historical errors.
Generally, there a few ways Node Managers will identify errors:
- By using the Verification cells in the Nodebooks
- When new QA/QC updates are released for the Nodebooks
- When a researcher identifies an error explicitly
- When a researcher submits data that does not match previously-loaded records
In the latter case, full comparison between the records is required, followed by a discussion with the researcher to identify if the previously-loaded records or the new records are correct. Often, the outcome is that the data in the DB needs correction.
These corrections can be done using the Database Fix Notebooks. These are the tools we have built so far to correct commonly identified errors.
This suite of notebooks, however, should only be used as a last option. If an error is identified by verification checks, human eyes and critical thinking must be used to check if the Database Fix Notebooks are required and, depending on the type of fix, researcher permission often needs to be obtained.
flowchart LR
    A(( )) --> B(Make Gitlab ticket with </br>information about database </br>fix)
    style A fill:#00FF00,stroke:#00FF00,stroke-width:4px
    style B fill:#0000ff,color:#ffffff
    B --> C{Does it have all </br>information needed?}
    style C fill:#000000,color:#ffffff
    C -- No --> D[Update Gitlab ticket]
    style D fill:#0000ff,color:#ffffff
    D --> C

    C -- Yes --> E[Check if nodebook </br>created for fix]
    style E fill:#ffffff,color:#000000
    E --> F{Does notebook exist?}
    style F fill:#000000,color:#ffffff
    F -- No --> G[Create feature issue for </br>notebook creation and do fix </br>manually]
    style G fill:#ffffff,color:#000000
    G --> H(( ))
    style H fill:#FF0000,stroke:#FF0000
    F -- Yes --> I(Run changes through </br>existing notebook)
    style I fill:#ffffff,color:#000000

    subgraph Nodebook
    I --> J{Do verification </br>pass with changes?}
    style J fill:#000000,color:#ffffff
    J -- Yes --> K(Make changes in database)
    style K fill:#F4C430
    K --> L(( ))
    style L fill:#FF0000,stroke:#FF0000
    J -- No --> M(Return a message </br>explaining </br>verification error)
    style M fill:#F4C430
    M --> N(( ))
    style N fill:#FF0000,stroke:#FF0000
    end
Installation
The installation steps for the Database Fix Notebooks are similar to the installation steps for ipython-utilities:
- Determine the folder in which you wish to keep the Database Fix Notebooks.
- Open your
terminalorcommand promptapp.- Type
cdthenspace. - You then need to get the filepath to the folder in which you wish to keep the Database Fix Notebooks. You can either drag the folder into the
terminalorcommand promptapp or hitshift/optionwhile right clicking and selectcopy as pathfrom the menu. - Then paste the filepath in the
terminalorcommand promptand hitenter - In summary, you should type
cd /path/to/desired/folderbefore pressing enter.
- Type
- Create and activate the “dbfixnotebook” python enviornment. The creation process will only need to happen once.
- In your terminal, run the command
conda create -n dbfixnotebook python=3.9 - Activate the dbfixnotebook environment using
conda activate dbfixnotebook
- In your terminal, run the command
- You are now able to run commands in that folder. Now run:
git clone https://gitlab.oceantrack.org/otn-partner-nodes/database-fix-notebooks.git. This will get the latest version Database Fix Notebooks from our GitLab - Navigate to the database-fix-notebooks subdirectory that was created by running
cd database-fix-notebooks. - Now to install all required python packages by running the following:
mamba env update -n dbfixnotebook -f environment.yml
To open and use the Database Fix Notebooks:
- MAC/WINDOWS: Open your terminal, and navigate to your database-fix-notebooks directory, using
cd /path/to/database-fix-notebooks. Then, run the commands:conda activate dbfixnotebookto activate the dbfixnotebook python environmentjupyter notebook --config="nb_config.py" "0. Home.ipynb"to open the Nodebooks in a browser window.
- DO NOT CLOSE your terminal/CMD instance that opens! This will need to remain open in the background in order for the Nodebooks to be operational.
Some troubleshooting tips can be found in the ipython Nodebooks installation instructions: https://gitlab.oceantrack.org/otn-partner-nodes/ipython-utilities/-/wikis/New-Install-of-Ipython-Utilities
Gitlab KDBX integration
An exciting feature of the Database Fix Notebooks is that if you add a Gitlab token to your kdbx file, the notebook will automatically comment the output from the notebook directly into the specified Gitlab issue. Otherwise, you will have to copy and paste the displayed results manualyl into the comments (as directed by the notebook).
To integrate the Gitlab token into your kdbx file, please use the instructions found at the bottom of the AUTH - Create and Update notebook in ipython-utilities.
Issue Creation
The first step when you have confirmed an incorrect dataqbase value is to create a new Gitlab Issue with the DB Fix Issue checklist template.
Here is the Issue checklist, for reference:
# **DB Fix Issue**

## Related gitlab issue:
- **[paste link to issue]**

## CSV of information needed for each record that needs fixing (look at `0. Home` notebook for column headers):
- **[link file here]**

## Task list
- [ ] NAME label issue `DB Fix`
- [ ] NAME create a CSV of changes
- [ ] NAME assign to @diniangela to make the change
- [ ] Angela make database change
There are a few helpful explanation notebooks inside this suite of Database Fix tools. You should always start by accessing both of these in order to identify next steps.
- 0. Home: This notebook will provide a brief explanation of what each notebook does, as well as helpful hints to show what is needed to run the notebook.
- 0. Which notebook should I use: This notebook has a form which will help node managers determine which Database Fix Notebook is appropriate for their change. It shows a list of the types of metadata we offer (project, tag, deployment, and detection) and, based on the selection, shows a list of columns from the raw metadata sheets. Based on the raw metadata column selection, it will display a result of which notebook to use.
Spreadsheet Creation
Some of the Database Fix Notebooks require the user to provide a spreadsheet of the changes as input. This requirement will be specified in the top description of each notebook, or the description on 0. Home.ipynb.
The required columns will be shown in the description as well. Once input, if there are missing required columns, the notebook will display an error identifiying which columns are missing.
The spreadsheet should be created and added to the created Gitlab issue, either in the description or in a comment.
Examples
Once you know which notebook to use and have created the spreadsheet (if needed), you can open the correct Database Fix Notebook. This notebook will consist of a single cell to run.
The notebooks have similar formats so four examples will be demonstrated below.
Example 1: Changing a receiver serial
Let’s say for the first example, a researcher has emailed saying that they made a typo in the receiver metadata and that serial 87654321 should actually be 12345678 for receivers ‘CODE-87654321-2020-03-10’ and ‘CODE-87654321-2024-09-09’ in project CODE.
The first step is to create a Gitlab issue with the relevant information titled ‘CODE Change receiver serial’.
The next step would be to figure out which notebook to use to make this change. Running the first cell in 0. Which notebook should I use gives the following results:

You can then click the link to go to the Change receiver serials notebook. In this notebook, there is a description telling you that the spreadsheet should have the columns ‘receiver_catalognumber’ and ‘correct_serial’ so you create the following spreadsheet:
| receiver_catalognumber | correct_serial |
|---|---|
| CODE-87654321-2020-03-10 | 12345678 |
| CODE-87654321-2024-09-09 | 12345678 |
Once this spreadsheet has been created, you can run the single cell in the notebook, which will prompt you for your authorization with a ‘Select File’ button:
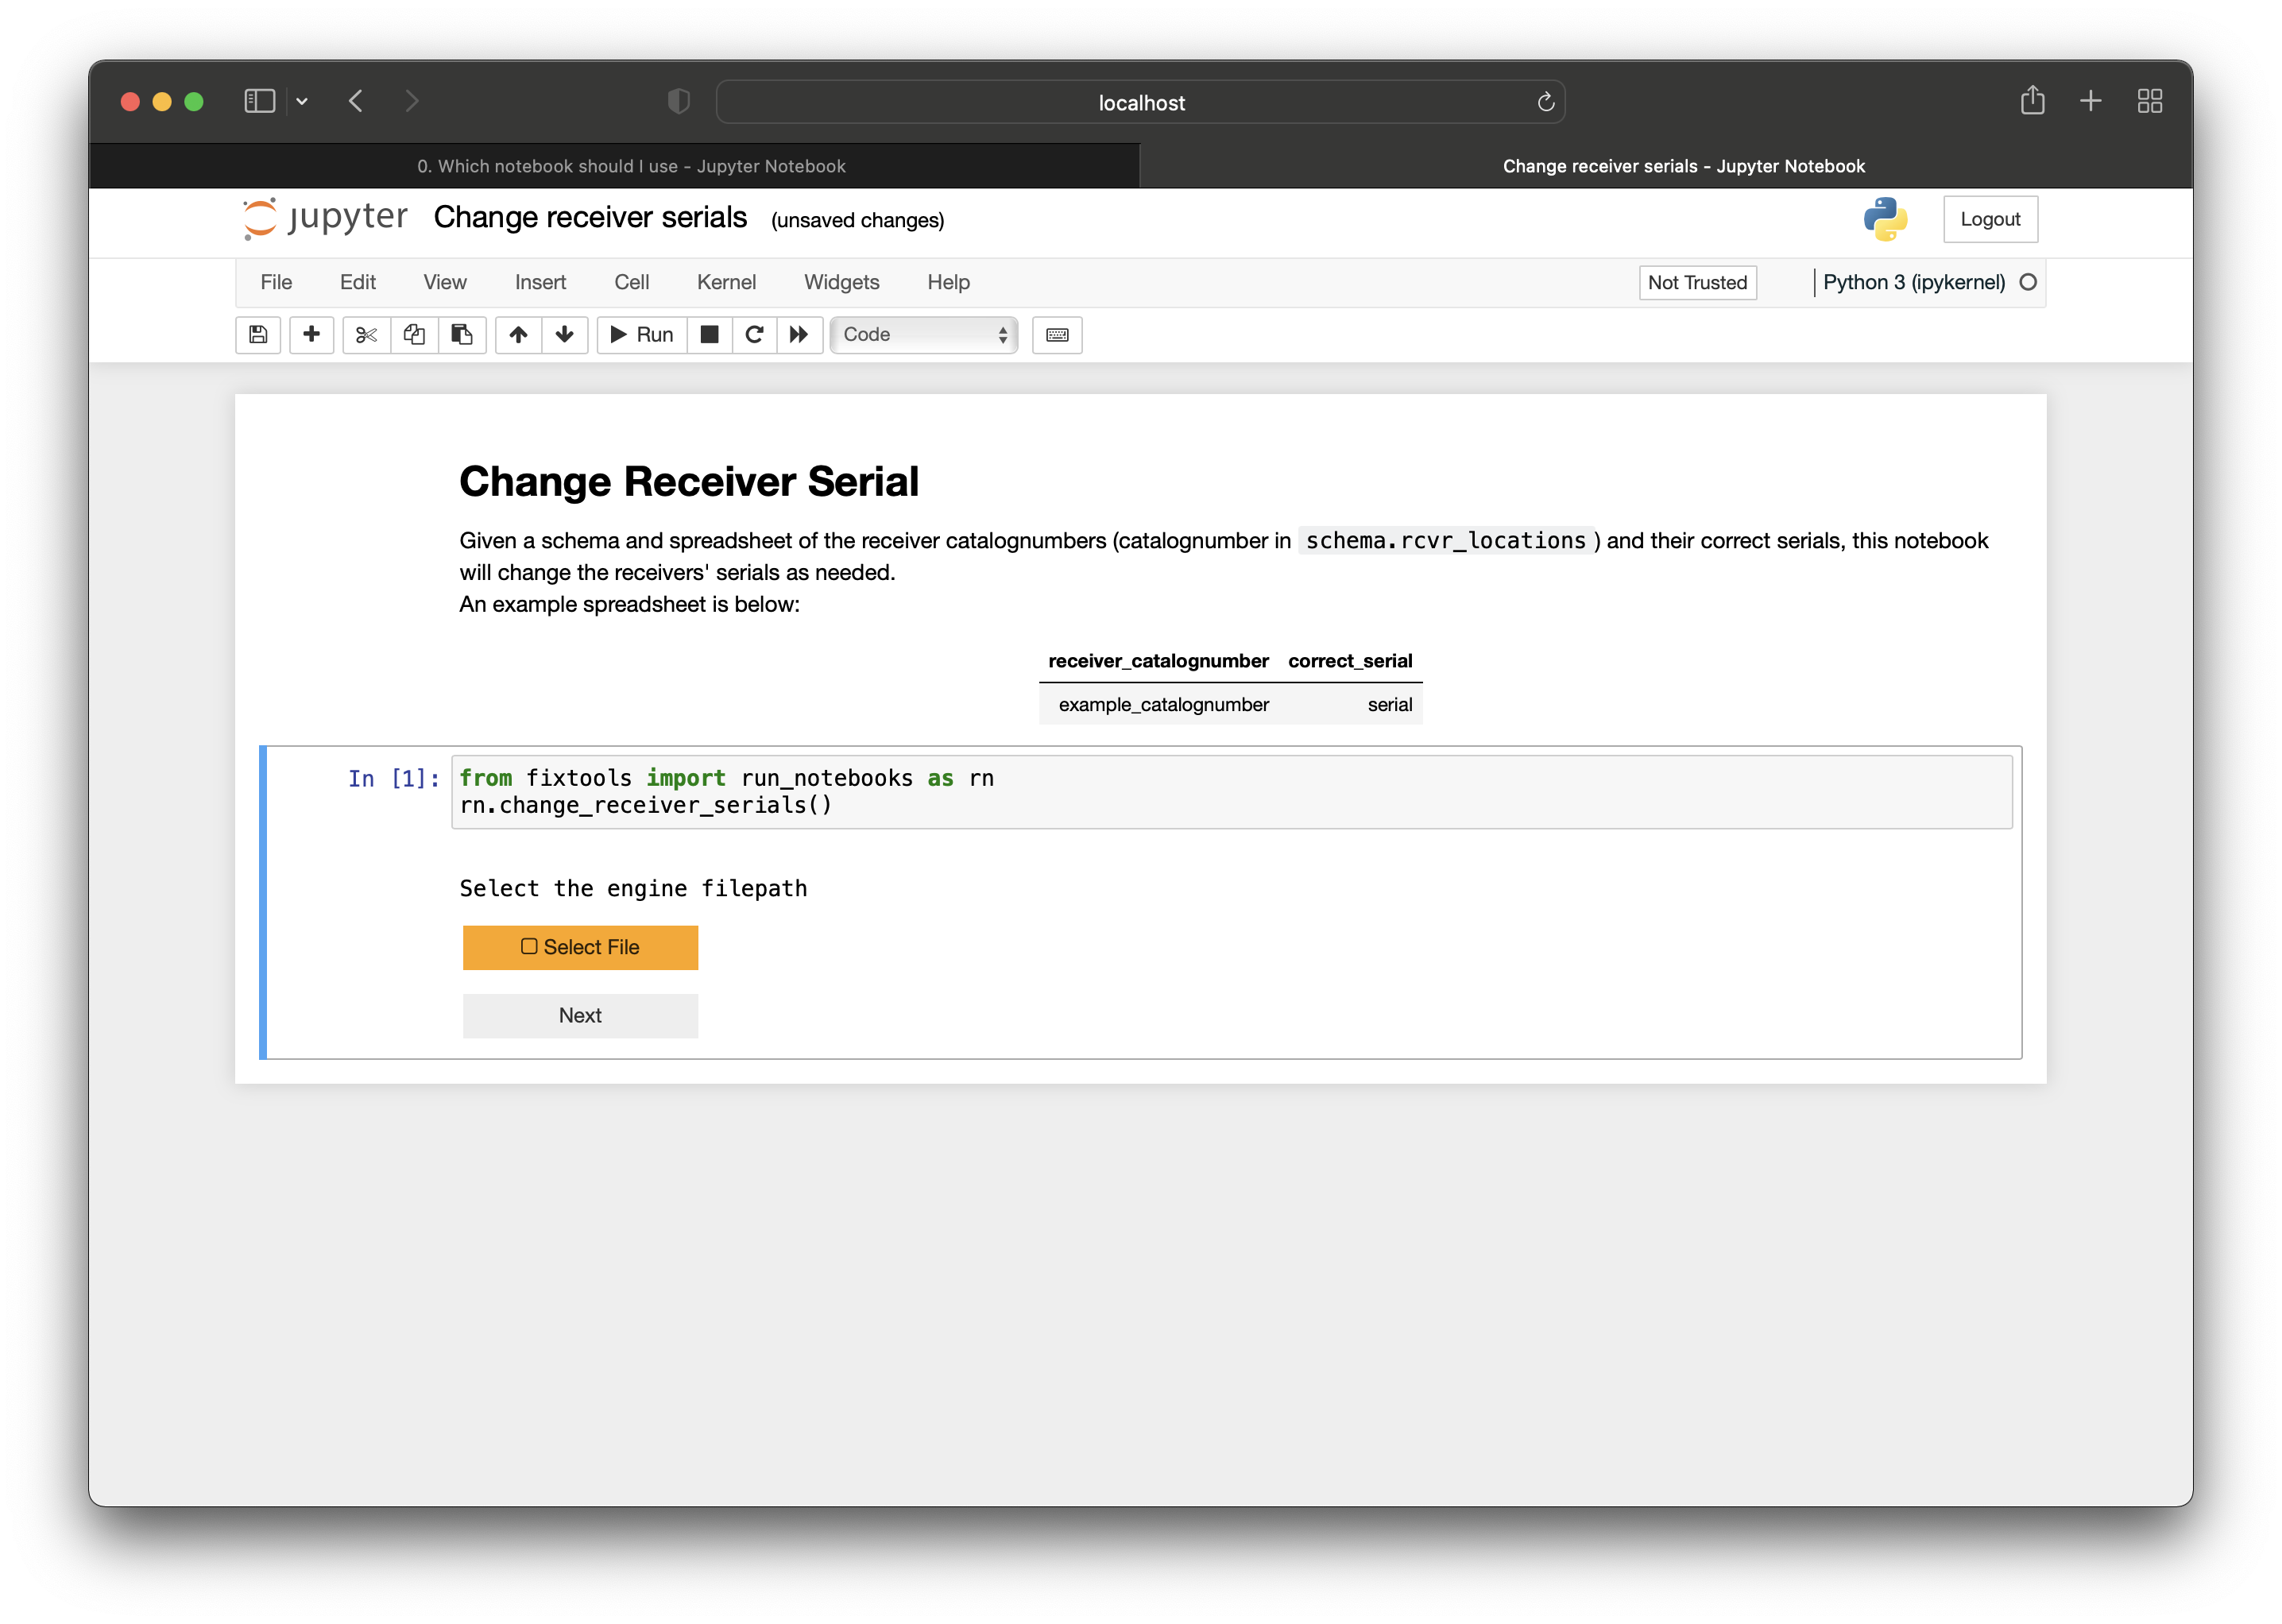
which will open your file explorer to select the file containing your authorization.
Once you press the ‘Next’ button after selecting the authorization file and enter your password for kdbx, text fields will appear for you to fill in with relevant information:
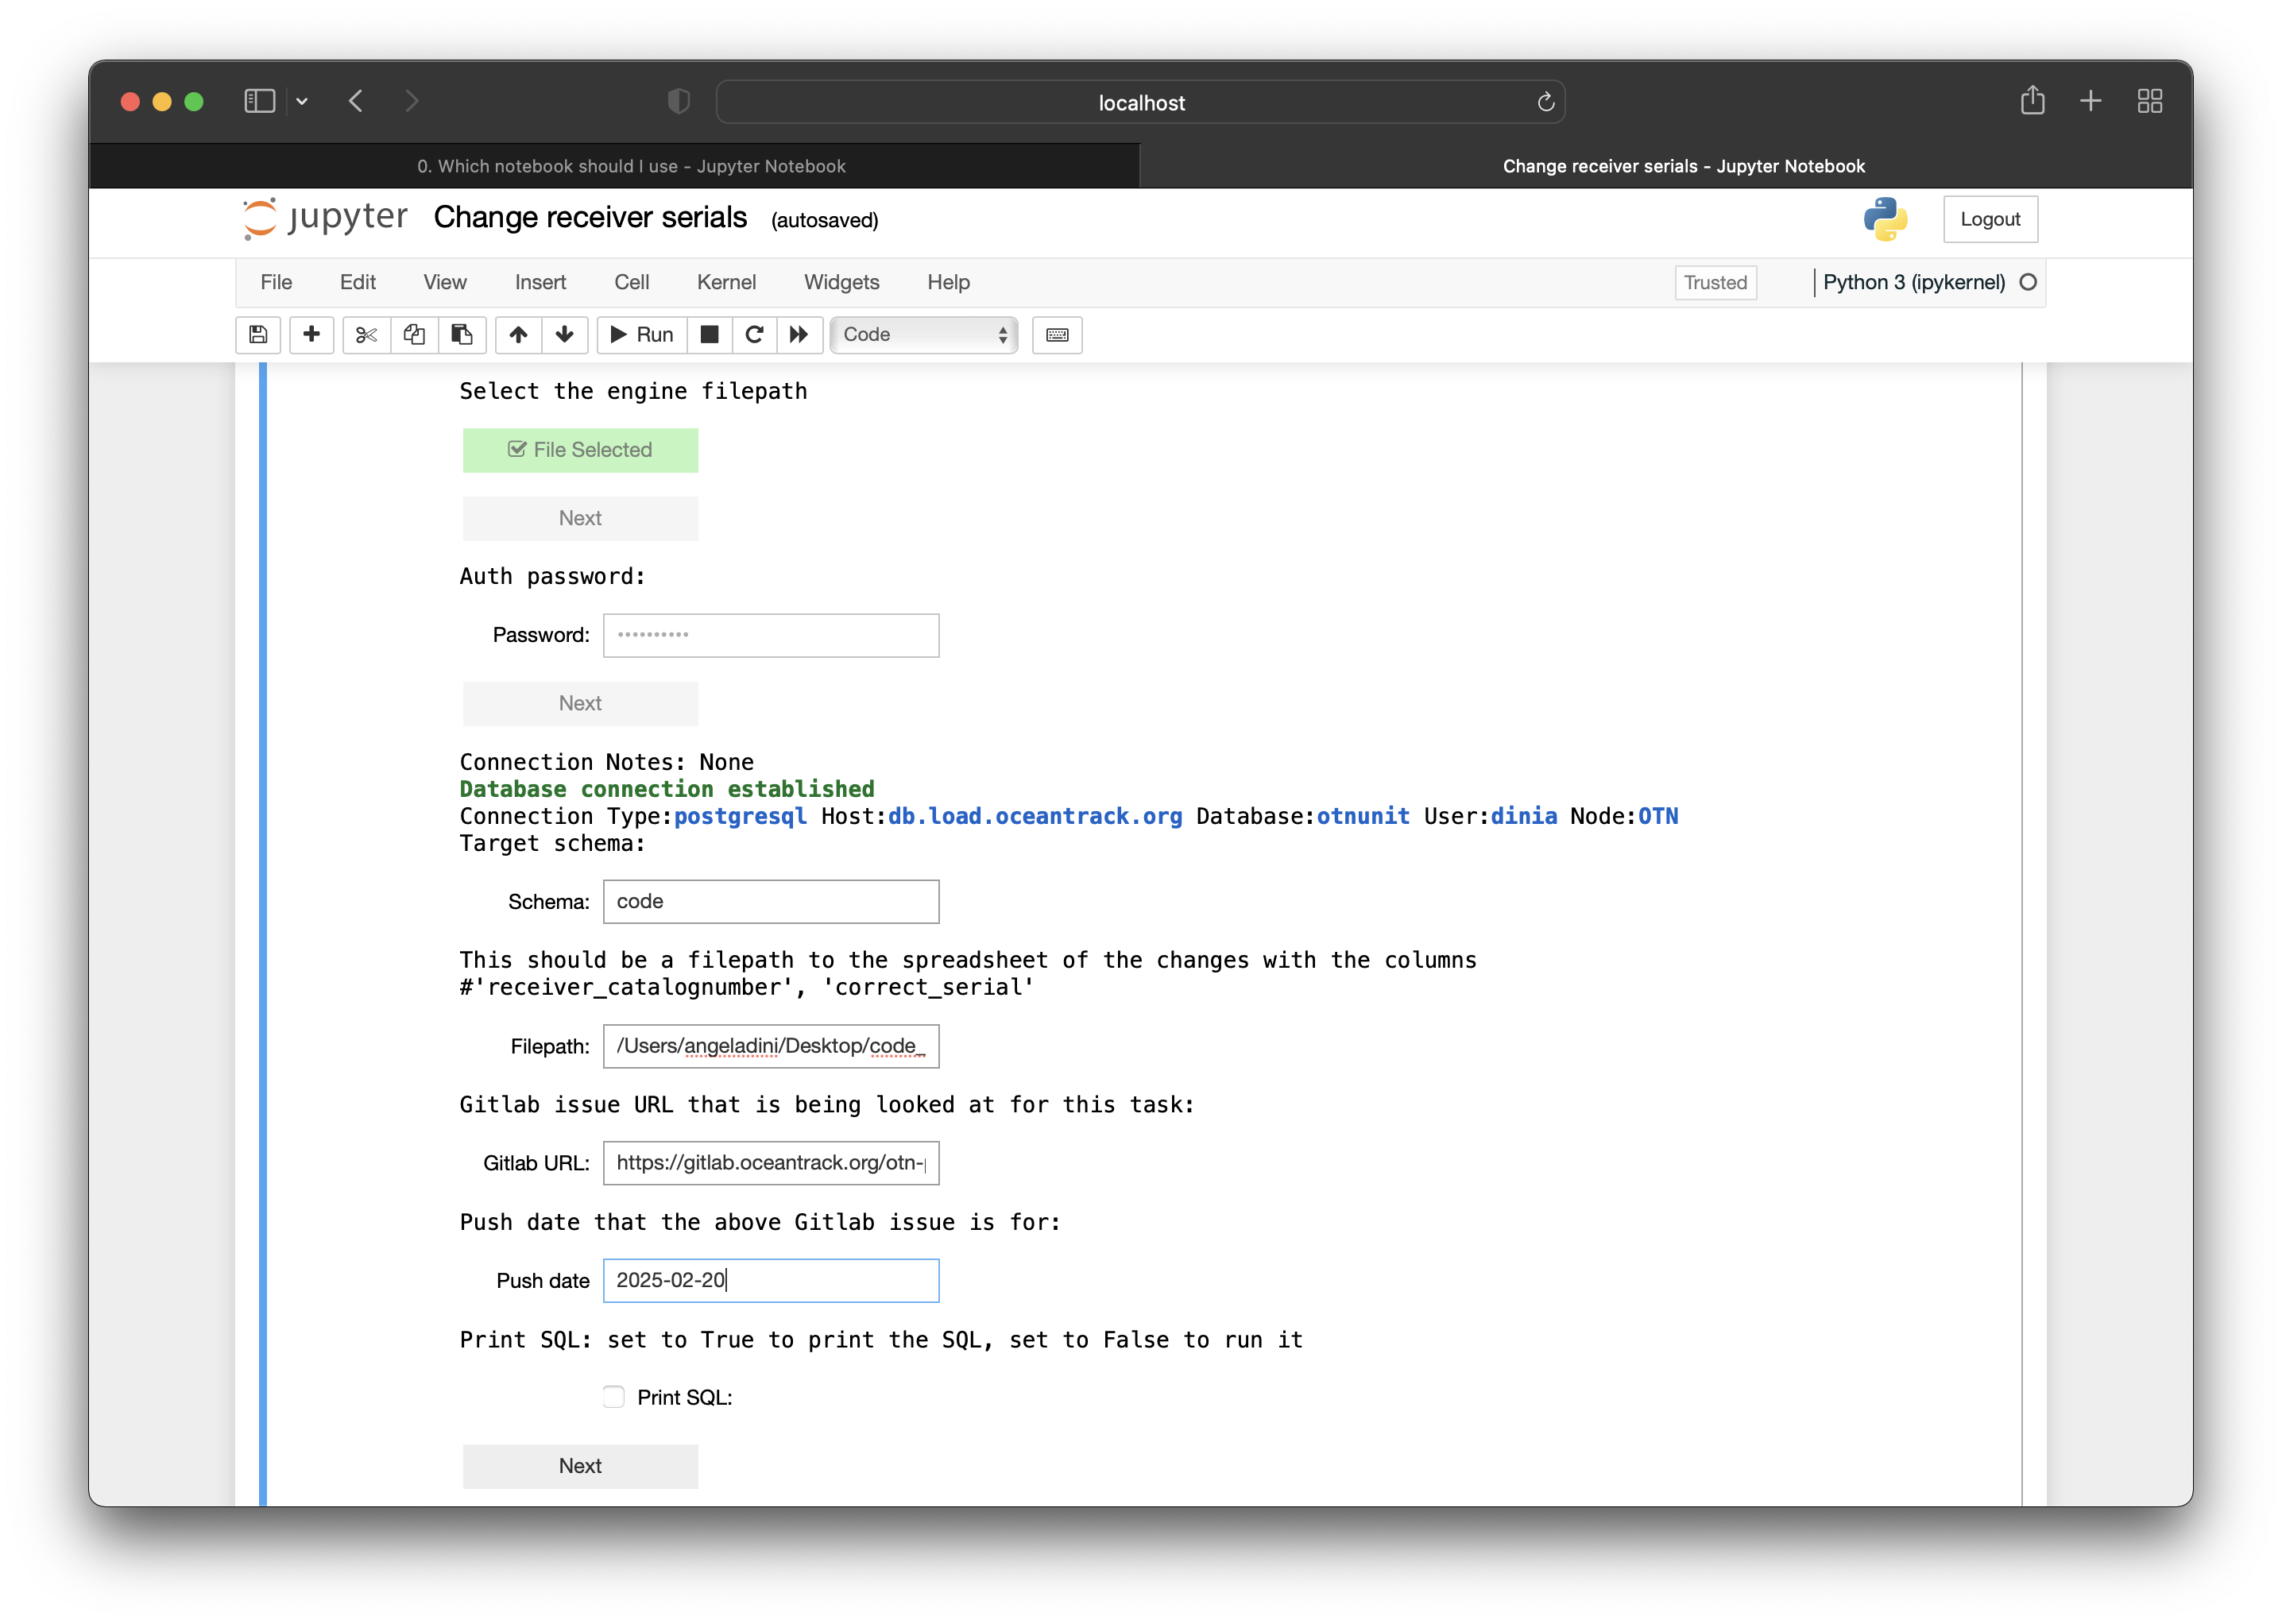
Once you press ‘Next’ after filling in the relevant information, the backend code will perform verifications on the changes to make sure, e.g. that no resulting overlapping receivers occur after the change. If this is the case, the change will not occur and an error message will be displayed showing why the change was not made.
If the verifications pass, the notebook will display the updates it will be doing and display an ‘Update’ button for you to press once you have verified that the notebook is making the correct changes.
⭐ IMPORTANT ⭐ Please double check the update steps to ensure the notebook is performing accurately.
Once ‘Update’ is pressed, the notebook will display a success message describing the successful change.
If you have a gitlab token authorization associated with your kdbx, as mentioned above, the notebook will automatically comment the updates and success message in the created Gitlab ticket. Otherwise, it will tell you to copy and paste the update list and success message.
Example 2: Changing tag end date
Let’s say for the second example, a researcher has emailed saying that they had forgotten to add the harvest date ‘2024-09-09 10:00:00’ to tag ‘A69-1303-12345’ on animal ‘CODE-Jane’, which was released on ‘2024-01-01 13:00:00’, which should be used instead of the estimated tag life ‘365 days’.
The first step is to create a Gitlab issue with the relevant information titled ‘CODE Change tag end date with harvest date’ or something with relevant information.
The next step would be to figure out which notebook to use to make this change. Running the first cell in 0. Which notebook should I use gives the following results:
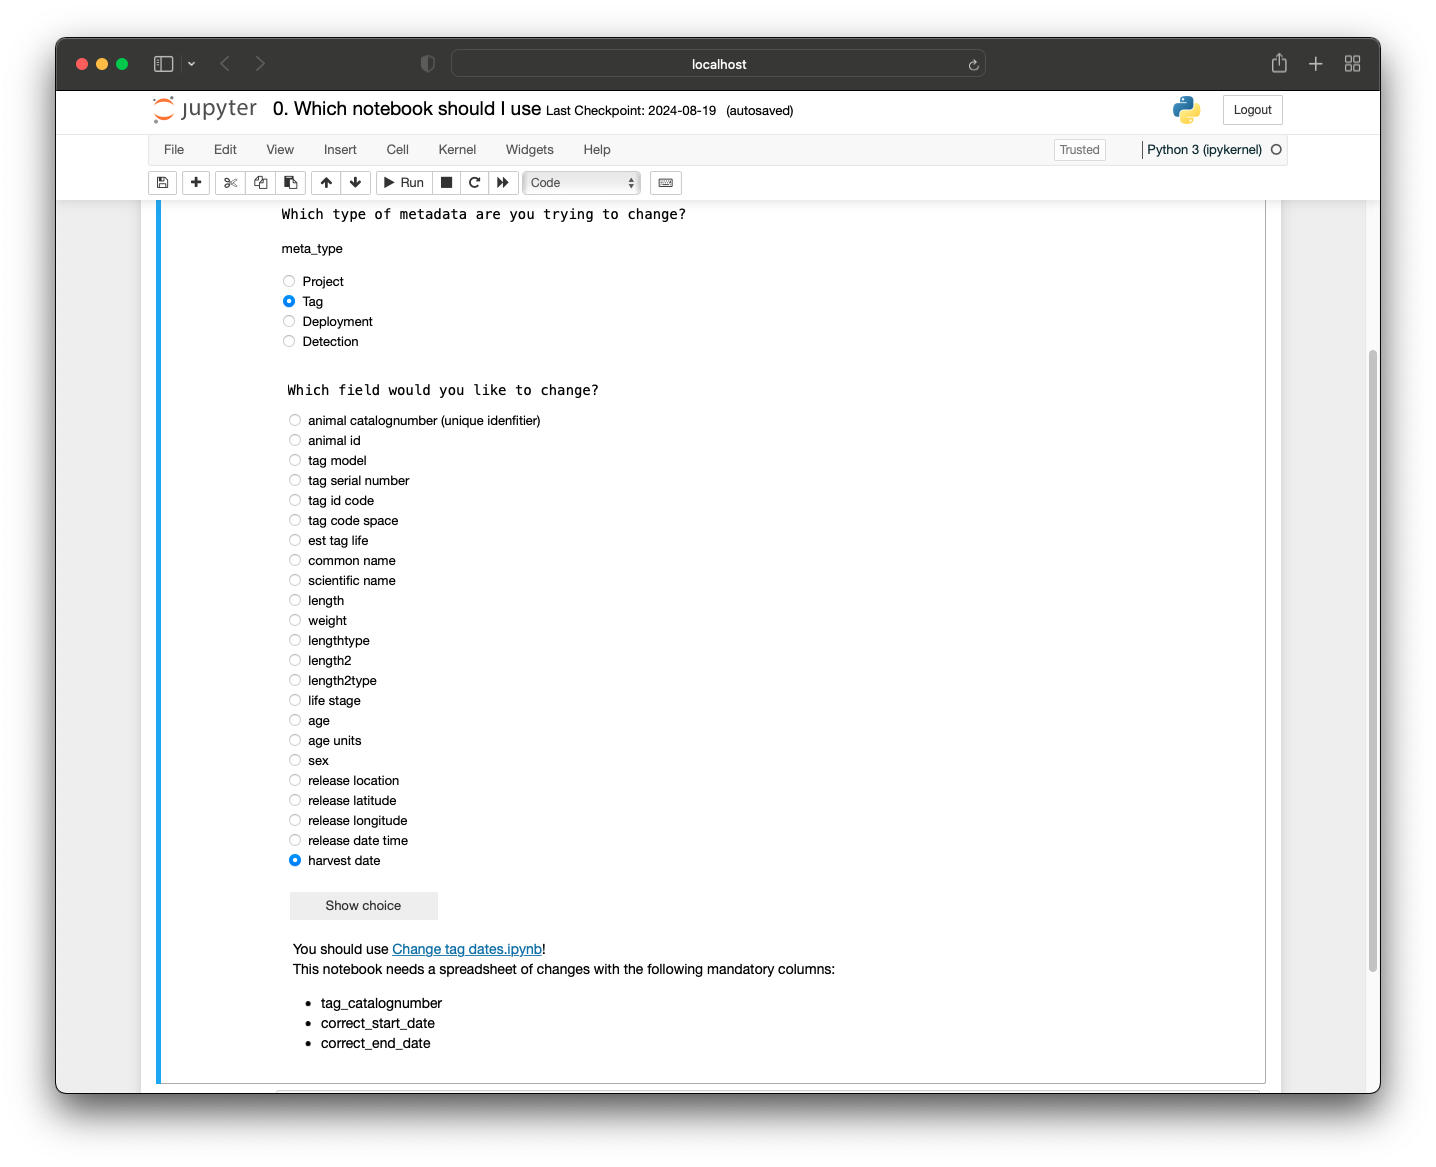
You can then click the link to go to the Change tag dates notebook. In this notebook, there is a description telling you that the spreadsheet should have the columns ‘tag_catalognumber’, ‘correct_start_date’, and ‘correct_end_date’ so you create the following spreadsheet:
| tag_catalognumber | correct_start_date | correct_end_date |
|---|---|---|
| A69-1303-12345 | 2024-01-01 13:00:00 | 2024-09-09 10:00:00 |
Once this spreadsheet has been created, you can run the single cell in the notebook, which will prompt you for your authorization with a ‘Select File’ button:
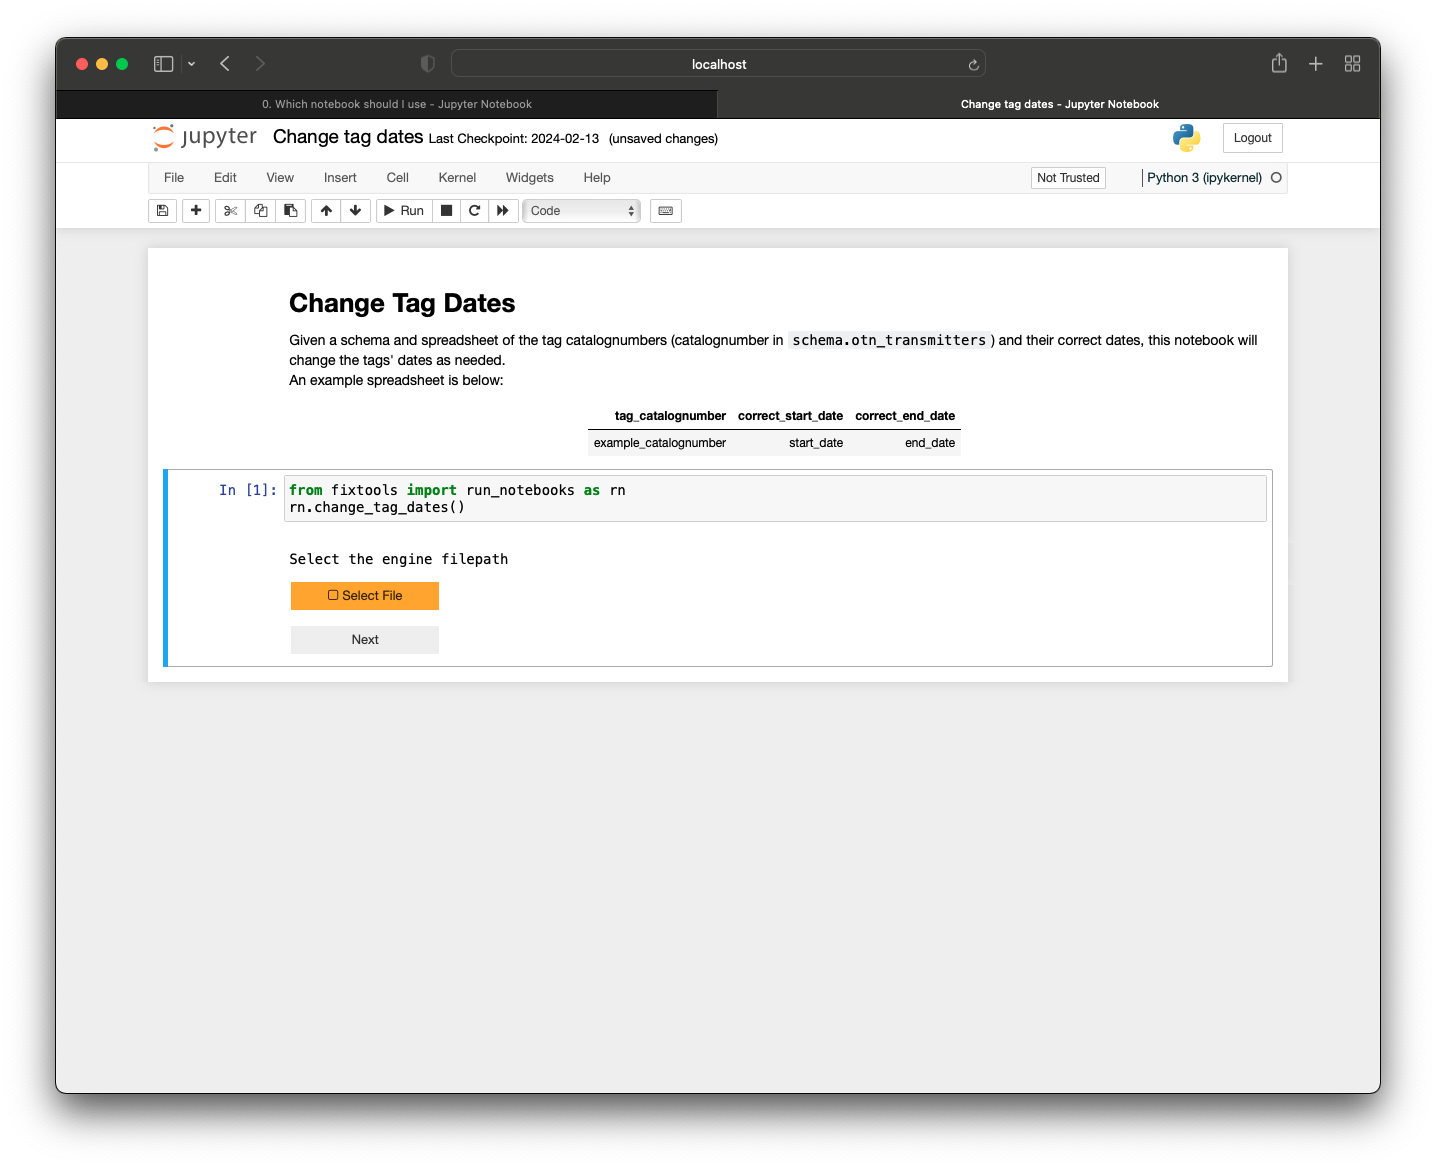
which will open your file explorer to select the file containing your authorization.
Once you press the ‘Next’ button after selecting the authorization file and enter your password for kdbx, text fields will appear for you to fill in with relevant information:
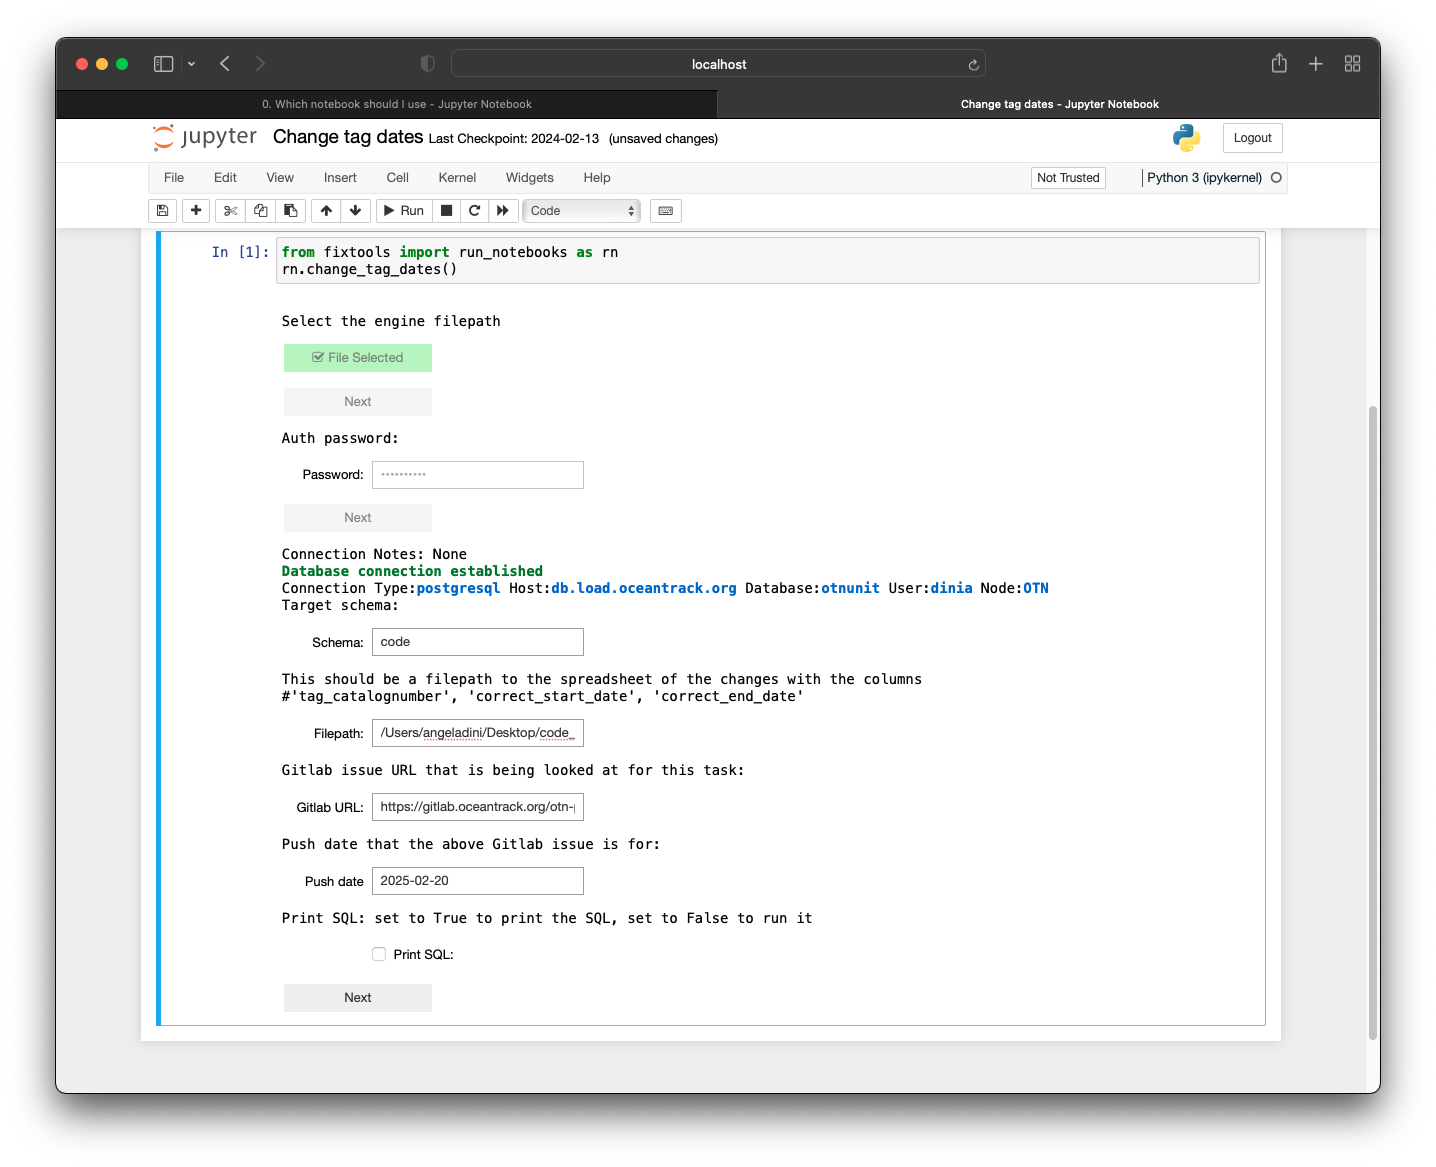
Once you press ‘Next’ after filling in the relevant information, the backend code will perform verifications on the changes to make sure, e.g. that no resulting overlapping tags occur after the change. If this is the case, the change will not occur and an error message will be displayed showing why the change was not made.
If the verifications pass, the notebook will display the updates it will be doing and display an ‘Update’ button for you to press once you have verified that the notebook is making the correct changes.
⭐ IMPORTANT ⭐ Please double check the update steps to ensure the notebook is performing accurately.
Once ‘Update’ is pressed, the notebook will display a success message describing the successful change.
If you have a gitlab token authorization associated with your kdbx, as mentioned above, the notebook will automatically comment the updates and success message in the created Gitlab ticket. Otherwise, it will tell you to copy and paste the update list and success message.
Example 3: Fixing the_geom
Let’s say for the third example, you are verifying tag metadata for project ‘NSBS’ and an error comes up from ipython-utilities saying that the_geom is incorrect and the instructions direct you to the ‘fix the_geom’ Database Fix Notebook.
The first step is to create a Gitlab issue with the relevant information titled ‘NSBS fix the_geom’.
You can then open the Fix the_geom notebook as the ipython-utilities nodebook will direct you. In this notebook, there is a description that does not have a spreadsheet so no spreadsheet is needed.
You can run the single cell in the notebook, which will prompt you for your authorization with a ‘Select File’ button:
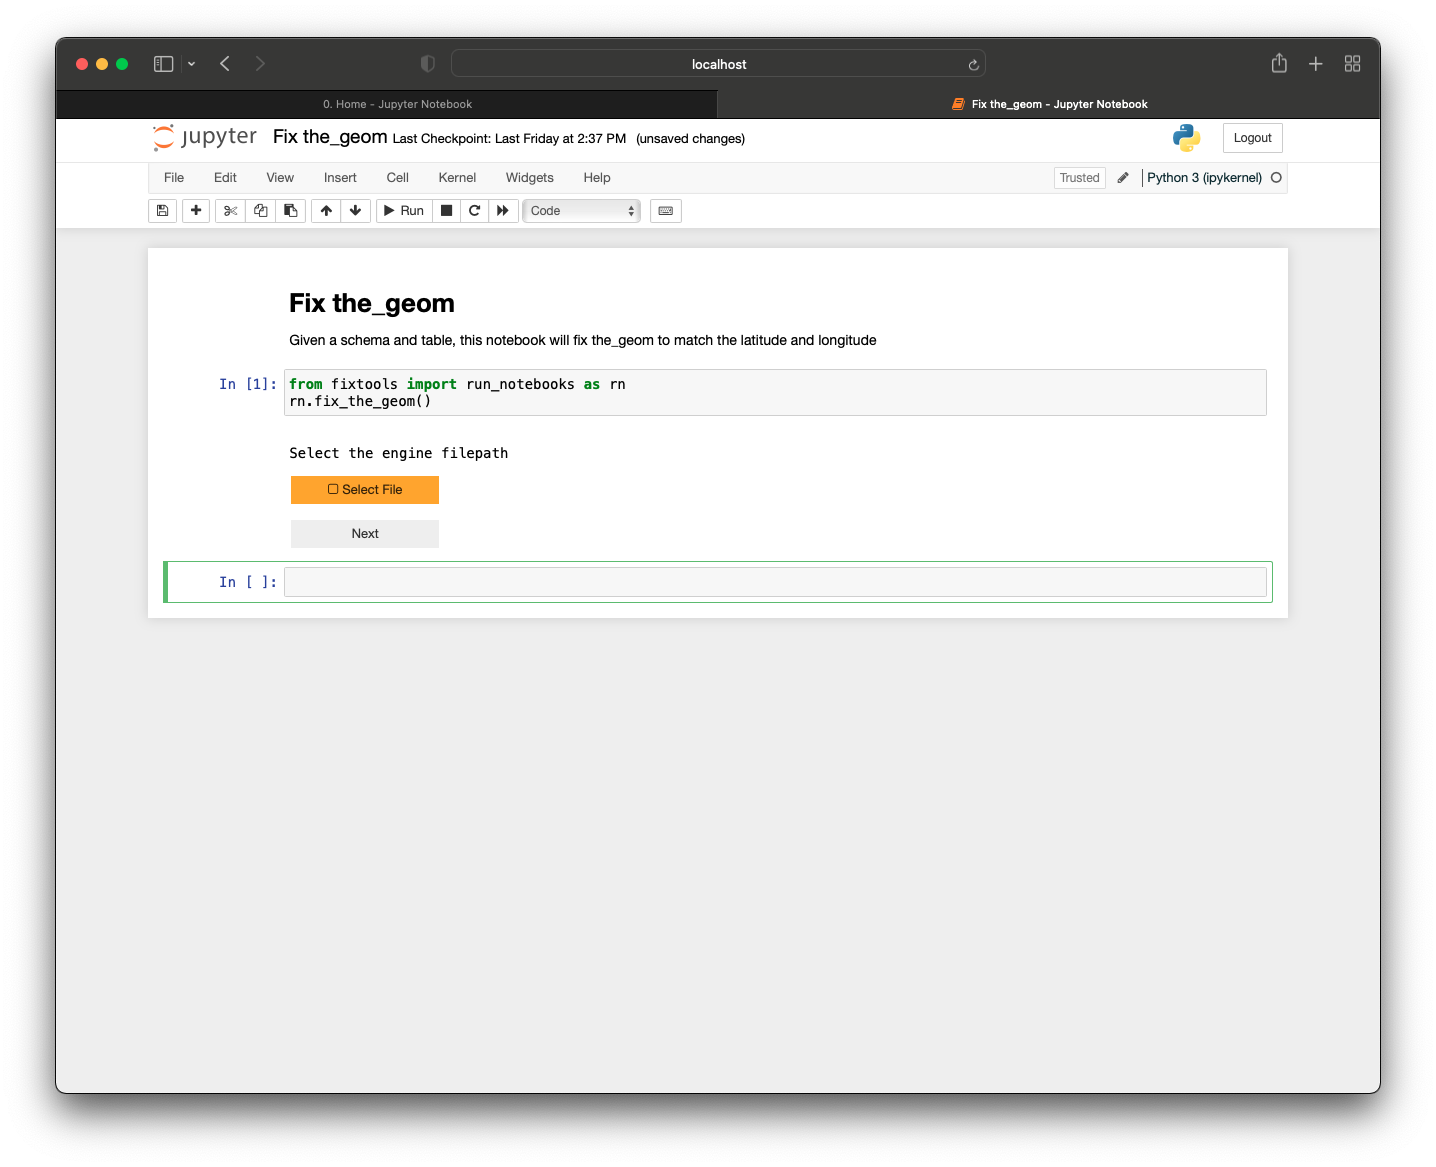
which will open your file explorer to select the file containing your authorization.
Once you press the ‘Next’ button after selecting the authorization file and enter your password for kdbx, text fields will appear for you to fill in with relevant information:
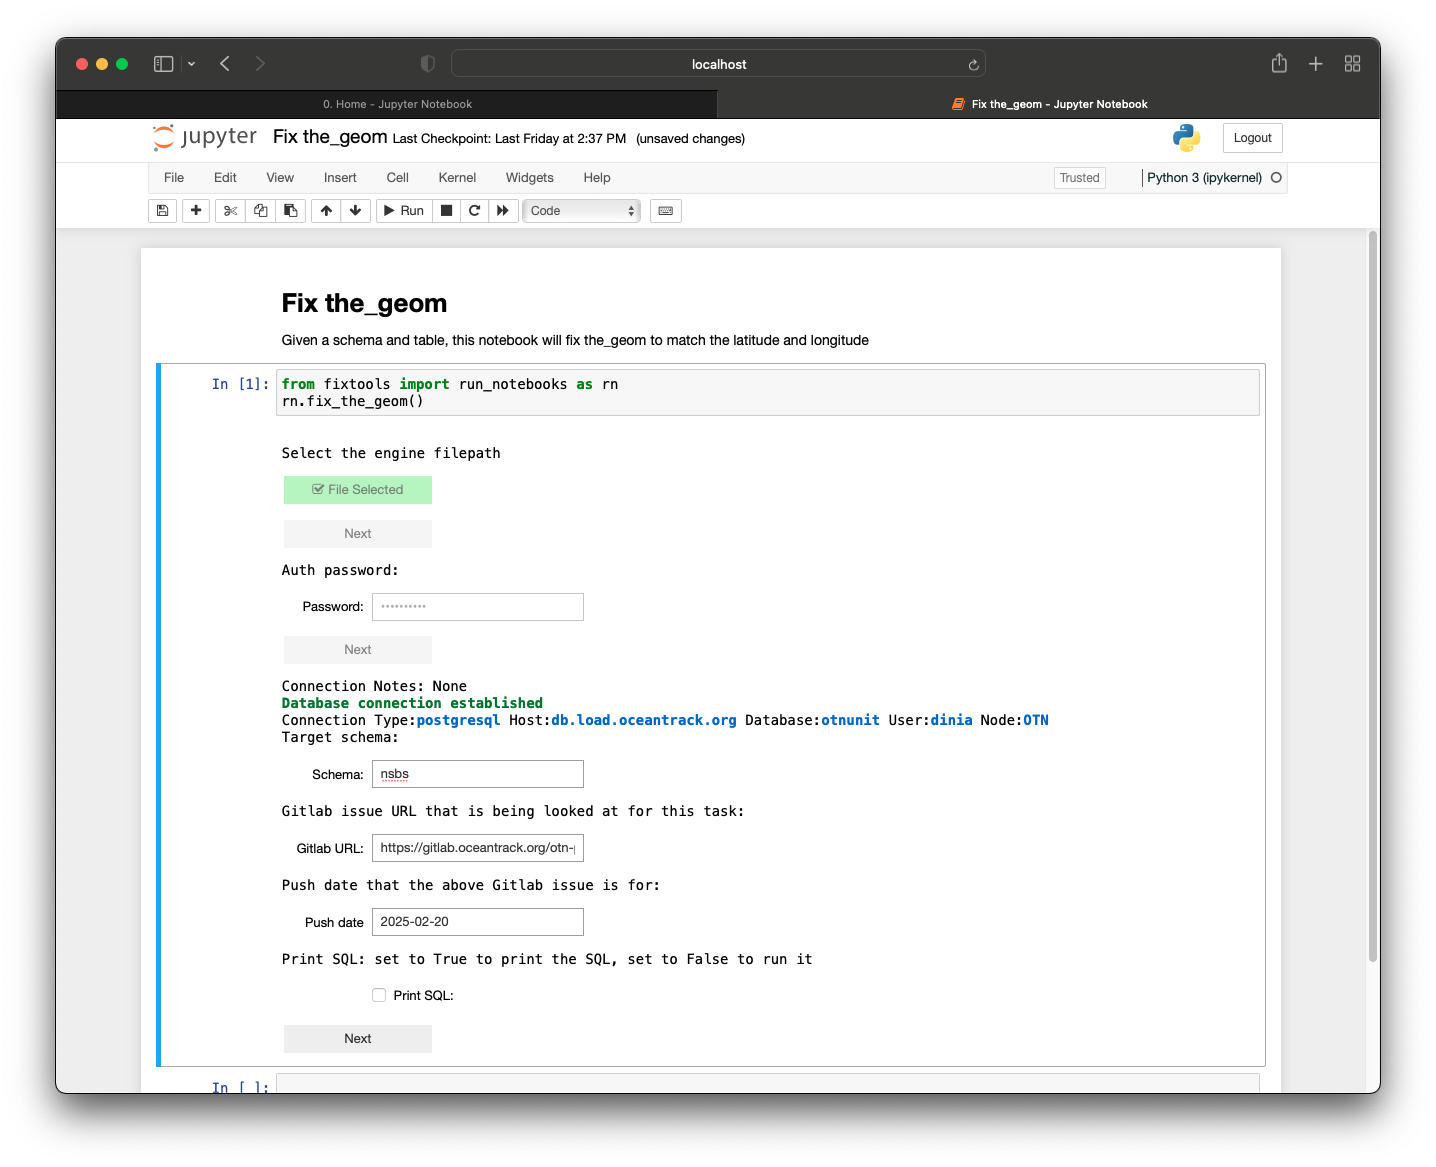
Once you press ‘Next’ after filling in the relevant information, more user input will be shown for you to pick the relevant table. Since this was for nsbs.otn_transmitters, you can choose ‘otn_transmitters’ from the drop-down:
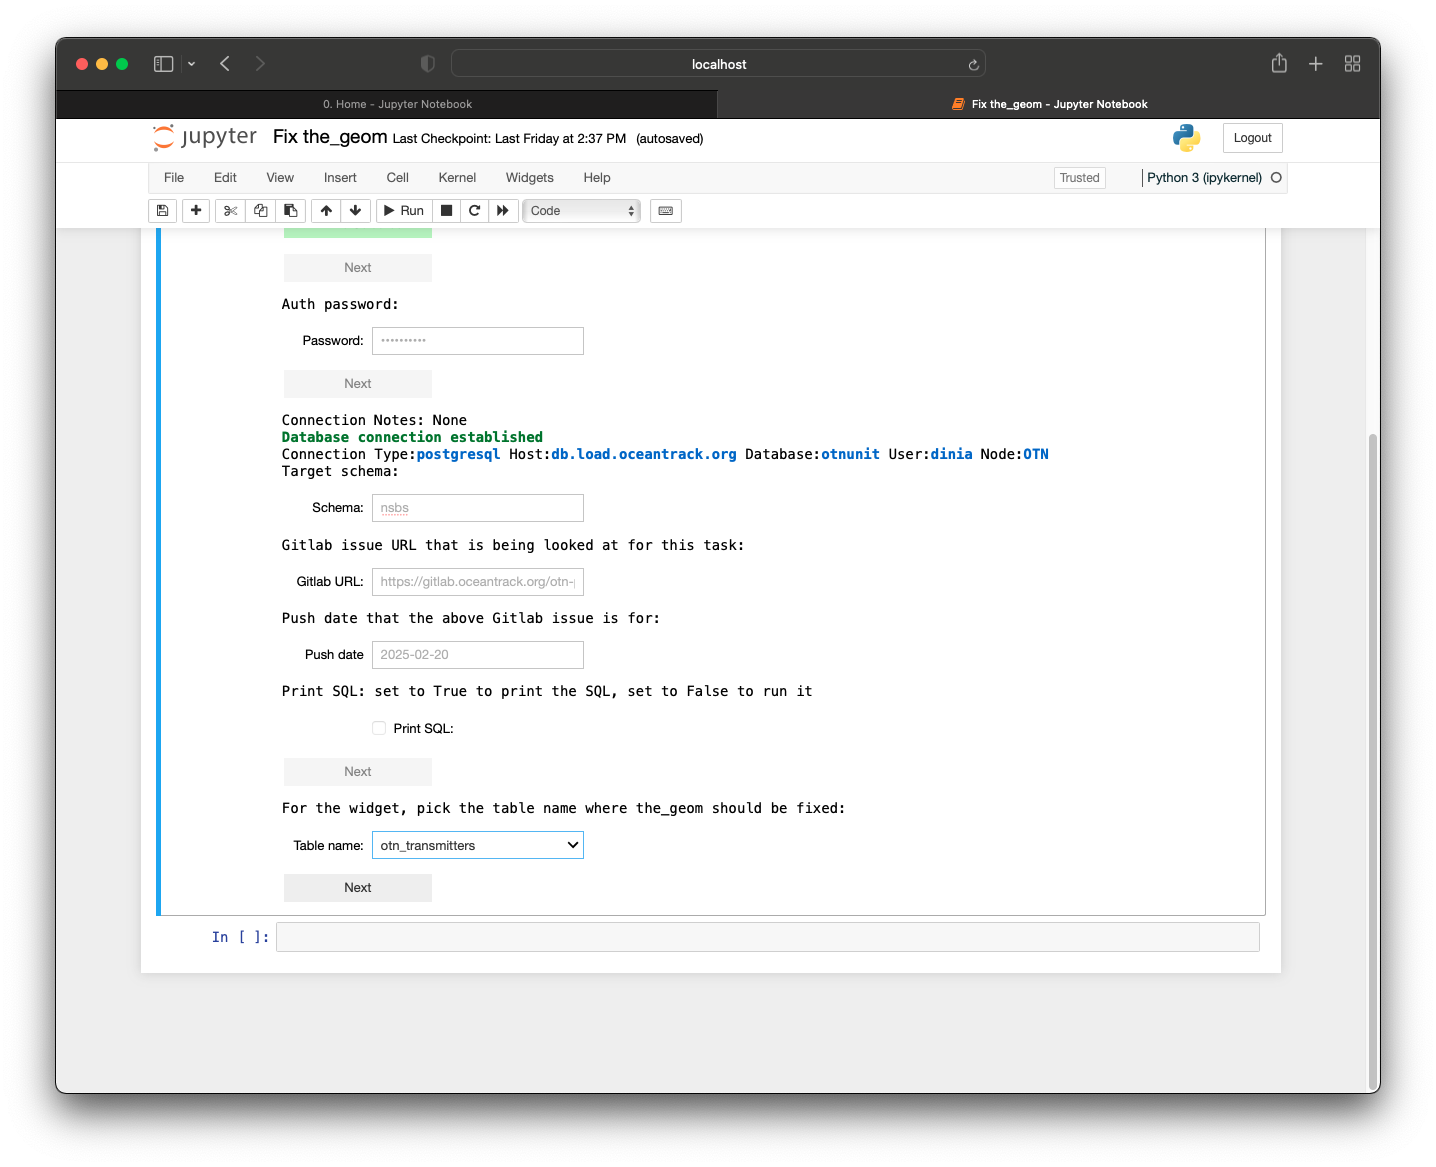
Once you press ‘Next’ after filling in the relevant information, the backend code will perform verifications on the changes to make sure no errors will result from the change. If this is the case, the change will not occur and an error message will be displayed showing why the change was not made.
If the verifications pass, the notebook will display the updates it will be doing and display an ‘Update’ button for you to press once you have verified that the notebook is making the correct changes.
⭐ IMPORTANT ⭐ Please double check the update steps to ensure the notebook is performing accurately.
Once ‘Update’ is pressed, the notebook will display a success message describing the successful change.
If you have a gitlab token authorization associated with your kdbx, as mentioned above, the notebook will automatically comment the updates and success message in the created Gitlab ticket. Otherwise, it will tell you to copy and paste the update list and success message.
Example 4: Fixing duplicate downloads
Let’s say for the fourth example, you are verifying event data and an error pops up from ipython-utilites saying that there are duplicate downloads and the instructions direct you to the ‘fix duplicate downloads’ Database Fix Notebook.
The first step would be to create a Gitlab issue with the collection code and linking the detections Gitlab issue that you were working on when this error popped up.
After this, you would open up the ‘Fix duplicate downloads’ notebook in database-fix-notebooks, notice there’s no spreadsheet needed, and run the single cell.
This prompts you for your engine with a ‘Select File’ button:
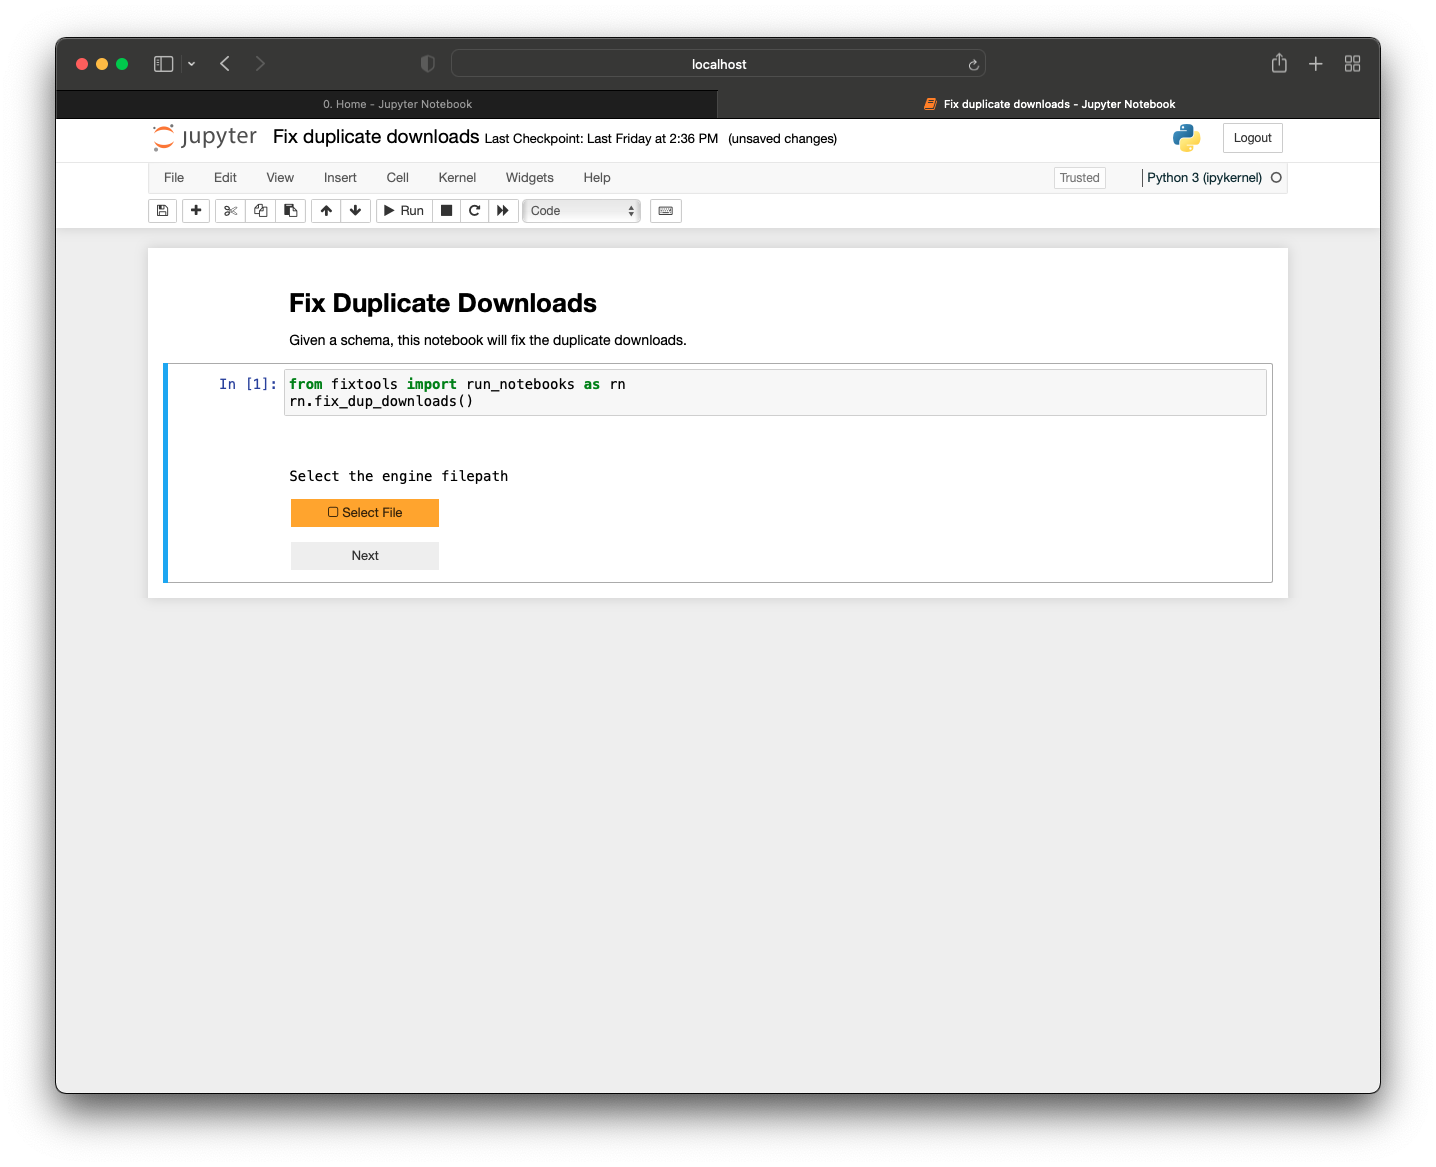
Once you click this, your file explorer opens up and you can search for your kdbx (with the Gitlab token). Once you have selected this, the dialog box closes and a ‘Next’ button appears. Pressing next will make text fields appear for you to fill in with the relevant information. Once you press ‘Next’ after filling in the relevant information, you will be shown information about the duplicate downloads, some guidelines, and the option to select which download(s) to delete.
This will appear in two formats: a selectable table and a drop-down.
The selectable table will appear when there are less than ten duplicate download groups:
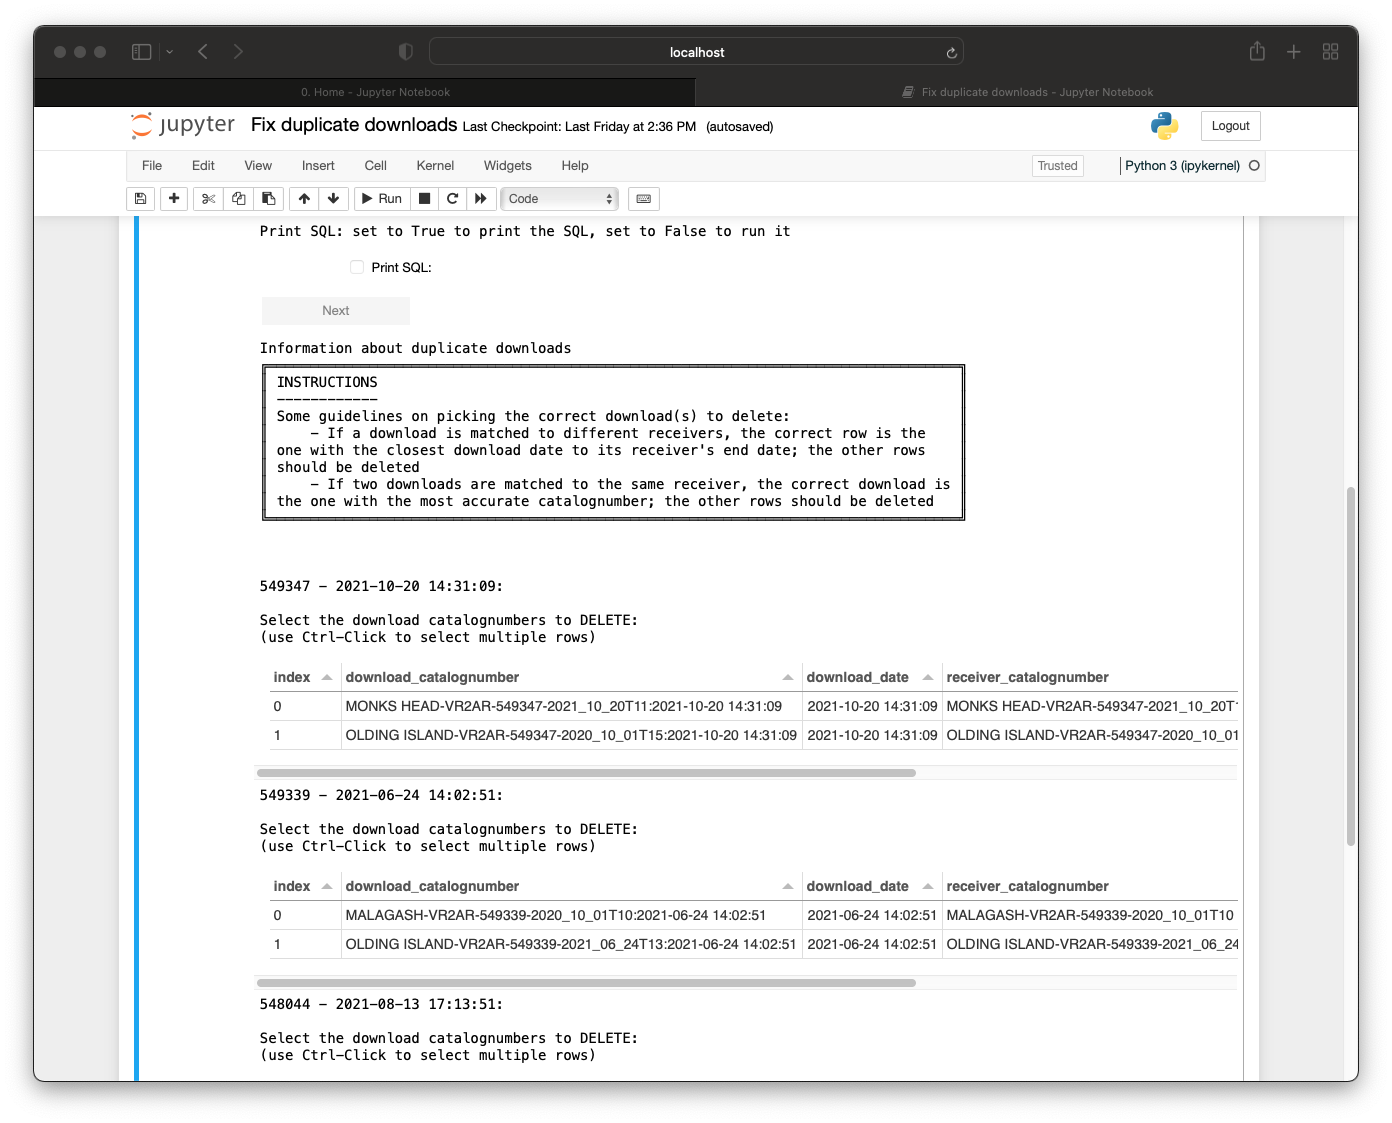
The drop-down will appear if there are ten or more duplicate download groups:
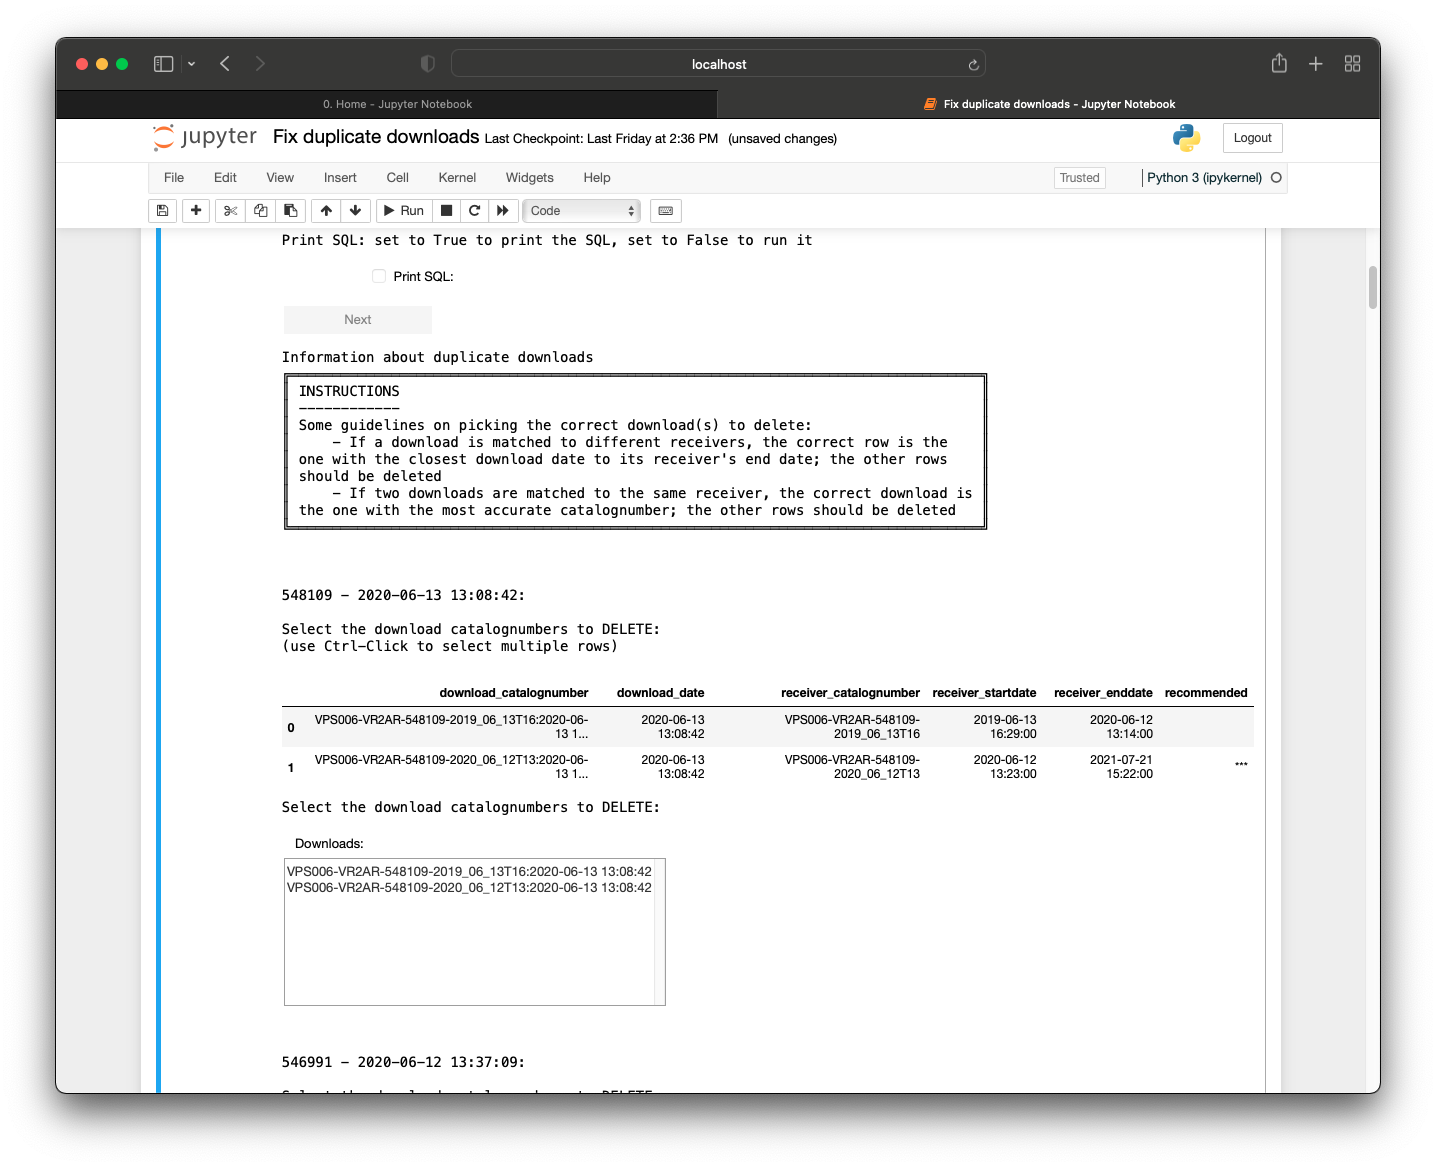
The logic of both options will work the same but differ in the way to select the download(s) to delete. For the selectable table, you can click or Control-click on the rows on the actual table. For the drop-down, you can click or Control-click on the catalognumber(s) in the drop-down.
⭐ IMPORTANT ⭐ Make sure the catalognumber(s) in the drop-down you select matches the catalognumber(s) in the table.
For each duplicate download group, you can check which download(s) are incorrect and should be deleted. You can do this using the guidance in the instructions in the notebook.
- If the downloads are matched to different receivers, the correct download matching is the one with the closest download date to its receiver’s end date and the other rows should be deleted.
- If they are matched to the same receiver, the correct download is the one with the most accurate catalognumber. This could be of the format
{receiver_catalognumber}-{download_date}. The other rows should be deleted.
In the displayed table, there is a ‘***’ in the ‘recommended’ column which shows which rows the notebook recommends to delete but sometimes it can be inaccurate so we recommend human eyes on it to double check that it is the one(s) you intend to delete.
For example, if the download table shows:
| download_catalognumber | download_date | receiver_catalognumber | receiver_startdate | receiver_enddate | recommended |
|---|---|---|---|---|---|
| CODE-VR2W-123456-2019_06_13T16:2020-06-13 13:10:00 | 2020-06-13 13:10:00 | CODE-VR2W-123456-2019_06_13T16 | 2019-06-13 16:30:00 | 2020-06-12 13:15:00 | |
| CODE-VR2W-123456-2020_06_12T13:2020-06-13 13:10:00 | 2020-06-13 13:10:00 | CODE-VR2W-123456-2020_06_12T13 | 2020-06-12 13:20:00 | 2021-07-21 15:20:00 | *** |
The correct download to delete would be the second row, because in the first one, the download date (2020-06-13 13:10:00) is closer to the receiver end date (2020-06-12 13:15:00) than the receiver end date in the second row (2021-07-21 15:20:00). Therefore, the download catalognumber CODE-VR2W-123456-2020_06_12T13:2020-06-13 13:10:00 should be selected as the one to delete.
If the download table shows:
| download_catalognumber | download_date | receiver_catalognumber | receiver_startdate | receiver_enddate | recommended |
|---|---|---|---|---|---|
| Station-123456-download | 2024-09-09 10:10:00 | CODE-VR2W-123456-2019_06_13T16 | 2019-06-13 16:30:00 | 2020-06-12 13:15:00 | *** |
| CODE-VR2W-123456-2019_06_13T16:2024-09-09 10:10:00 | 2024-09-09 10:10:00 | CODE-VR2W-123456-2019_06_13T16 | 2019-06-13 16:30:00 | 2020-06-12 13:15:00 |
The first row should be deleted since the downloads are matched to the same receiver deployment but the download catalognumber is not in the expected format ({receiver_catalognumber}-{download_date}).
Once the proper downloads to delete are selected by the user, the notebook will display the updates it will be doing and display an ‘Update’ button for you to press once you have verified that the notebook is making the correct changes.
⭐ IMPORTANT ⭐ Please double check the update steps to ensure the notebook is performing accurately.

Once ‘Update’ is pressed, the notebook will display a success message describing the successful change.
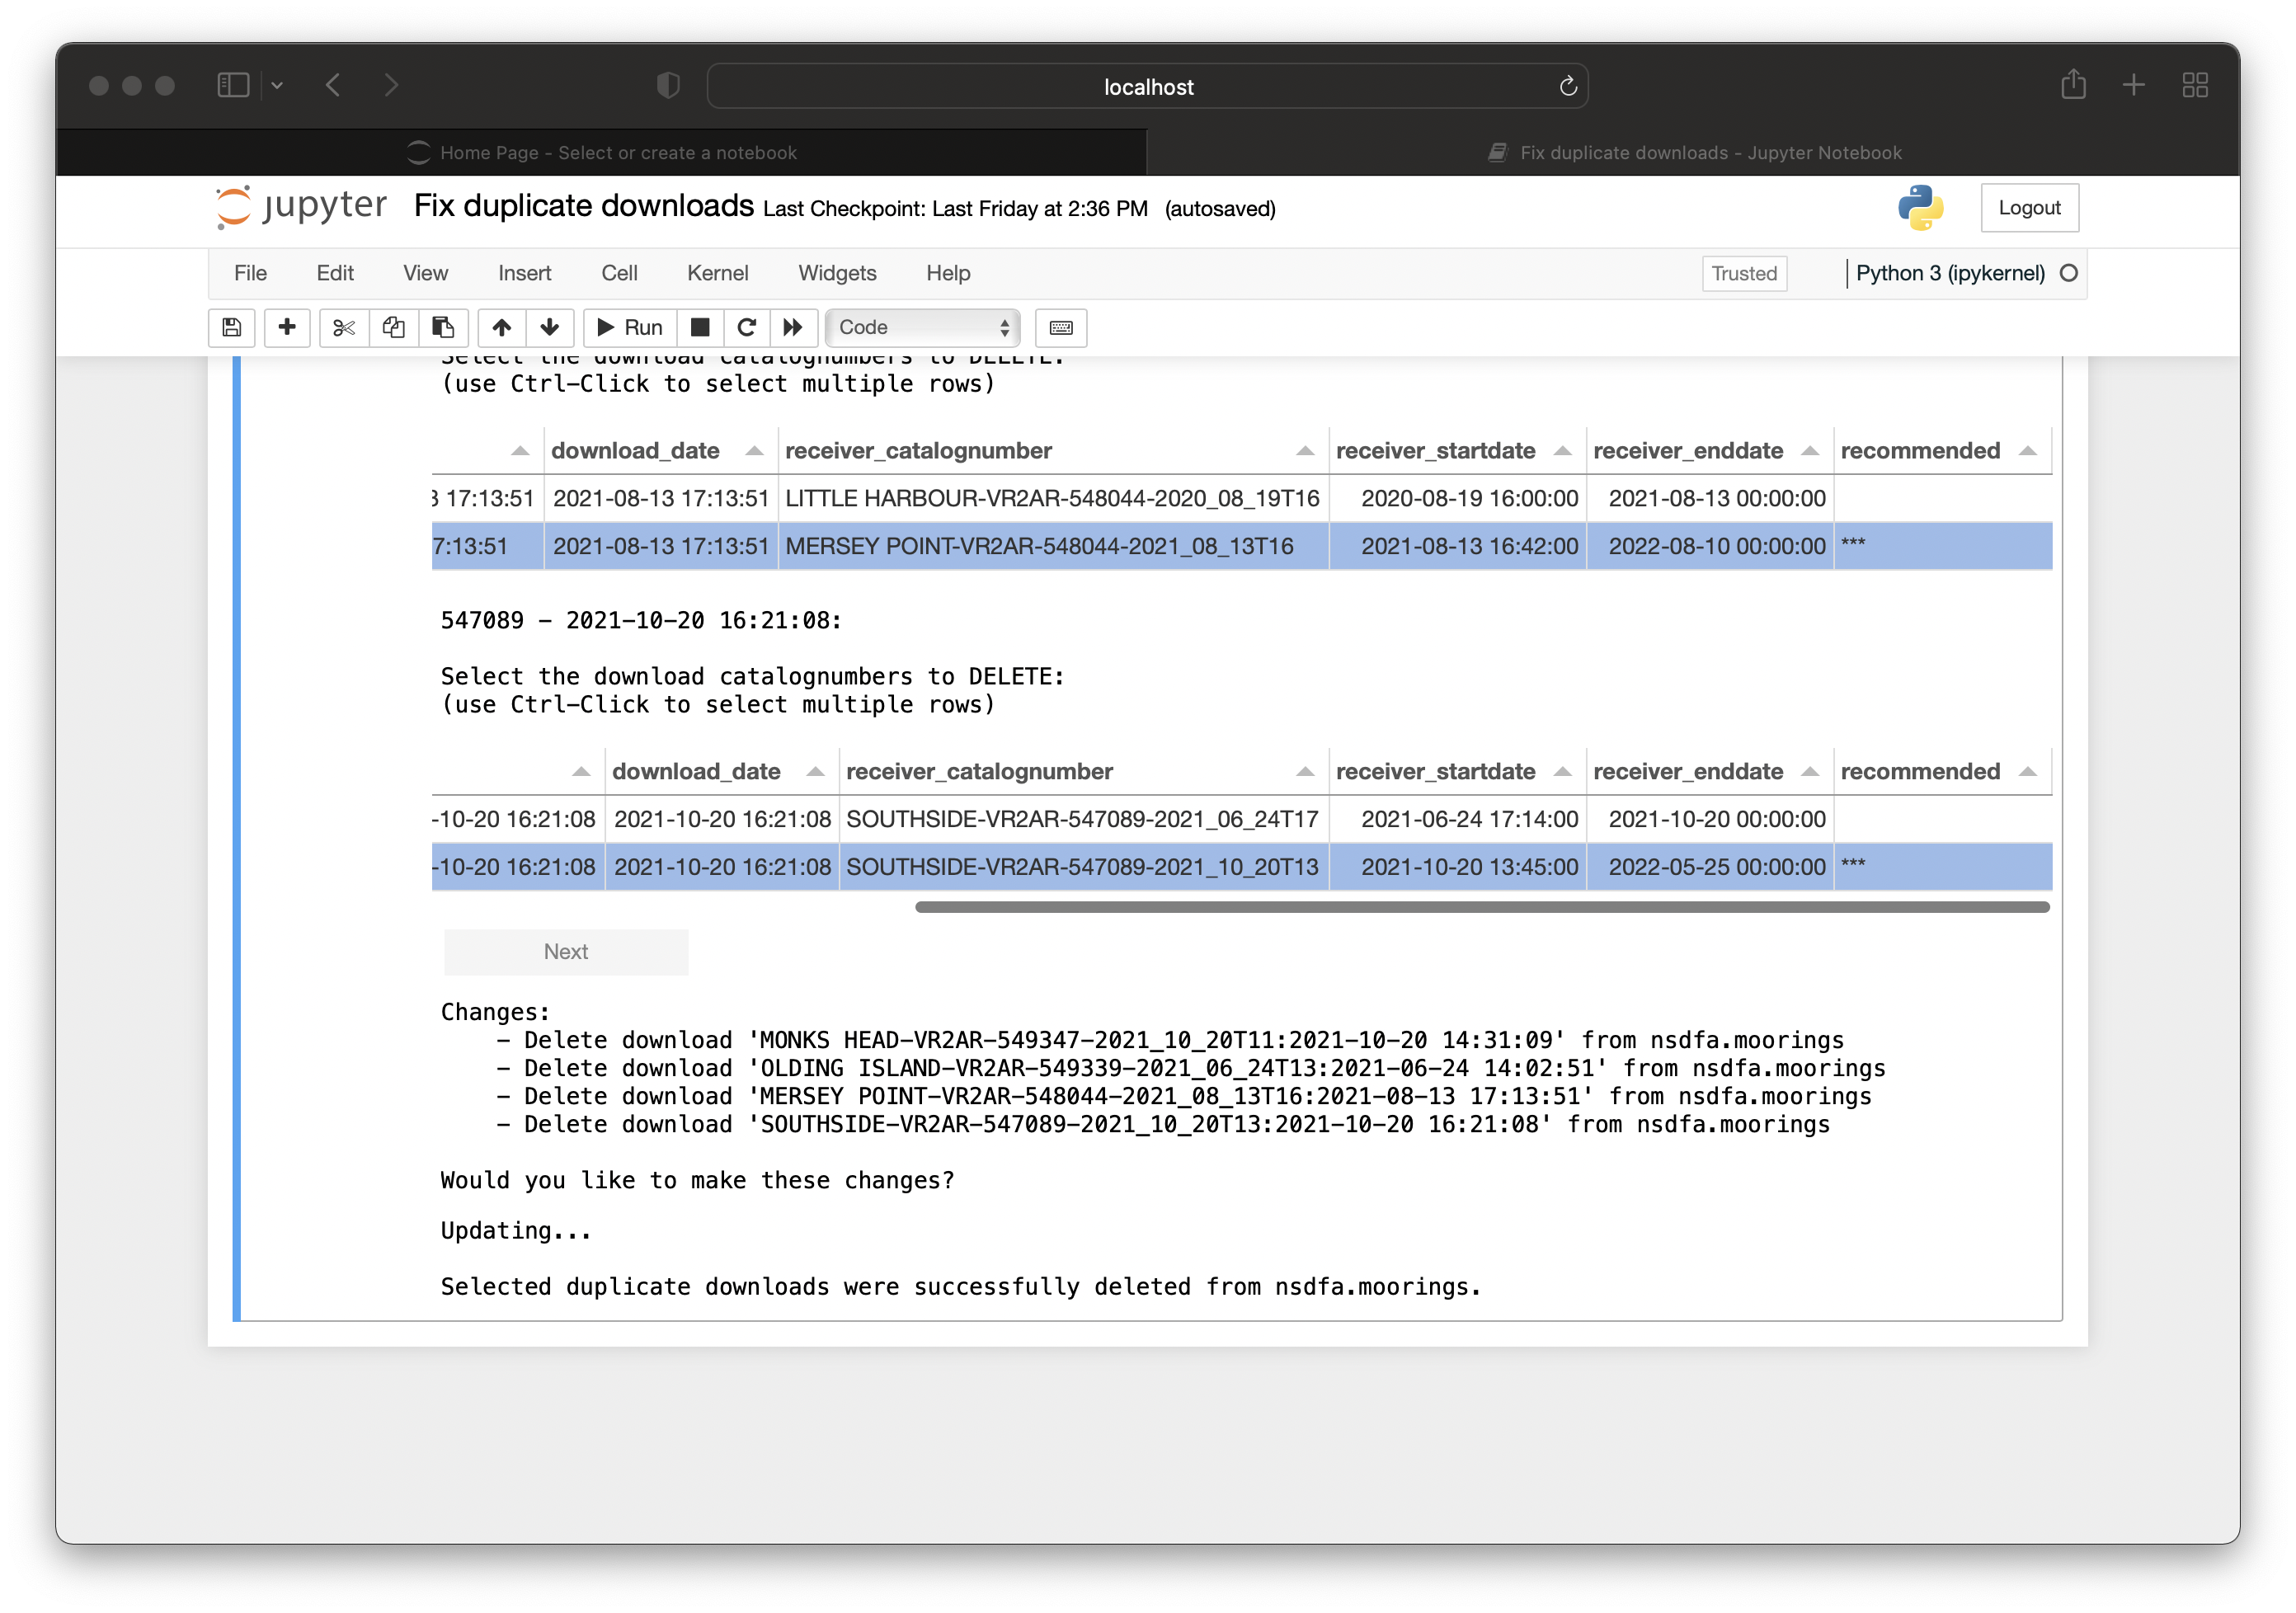
General Information - Cross-Node Executions
If your .kdbx file includes a GitLab Access Token, as mentioned above, the Nodebook will automatically comment all updates and success messages in the created Gitlab ticket. Otherwise, you must copy and paste this information into the Issue manually.
For Nodebooks that require updates to the databases of other nodes:
- If you have a GitLab Access Token: the Nodebook will provide the SQL needed to update other nodes and will automatically add a ‘Cross-node executions’ label to the Gitlab Issue.
- If you do not have a GitLab Access Token: the Nodebook will provide the SQL needed to update other nodes. Please add a ‘Cross-node executions’ label onto the Issue manually.
A text box to enter a super-user authorization to automatically run the SQL on the other node will be displayed:
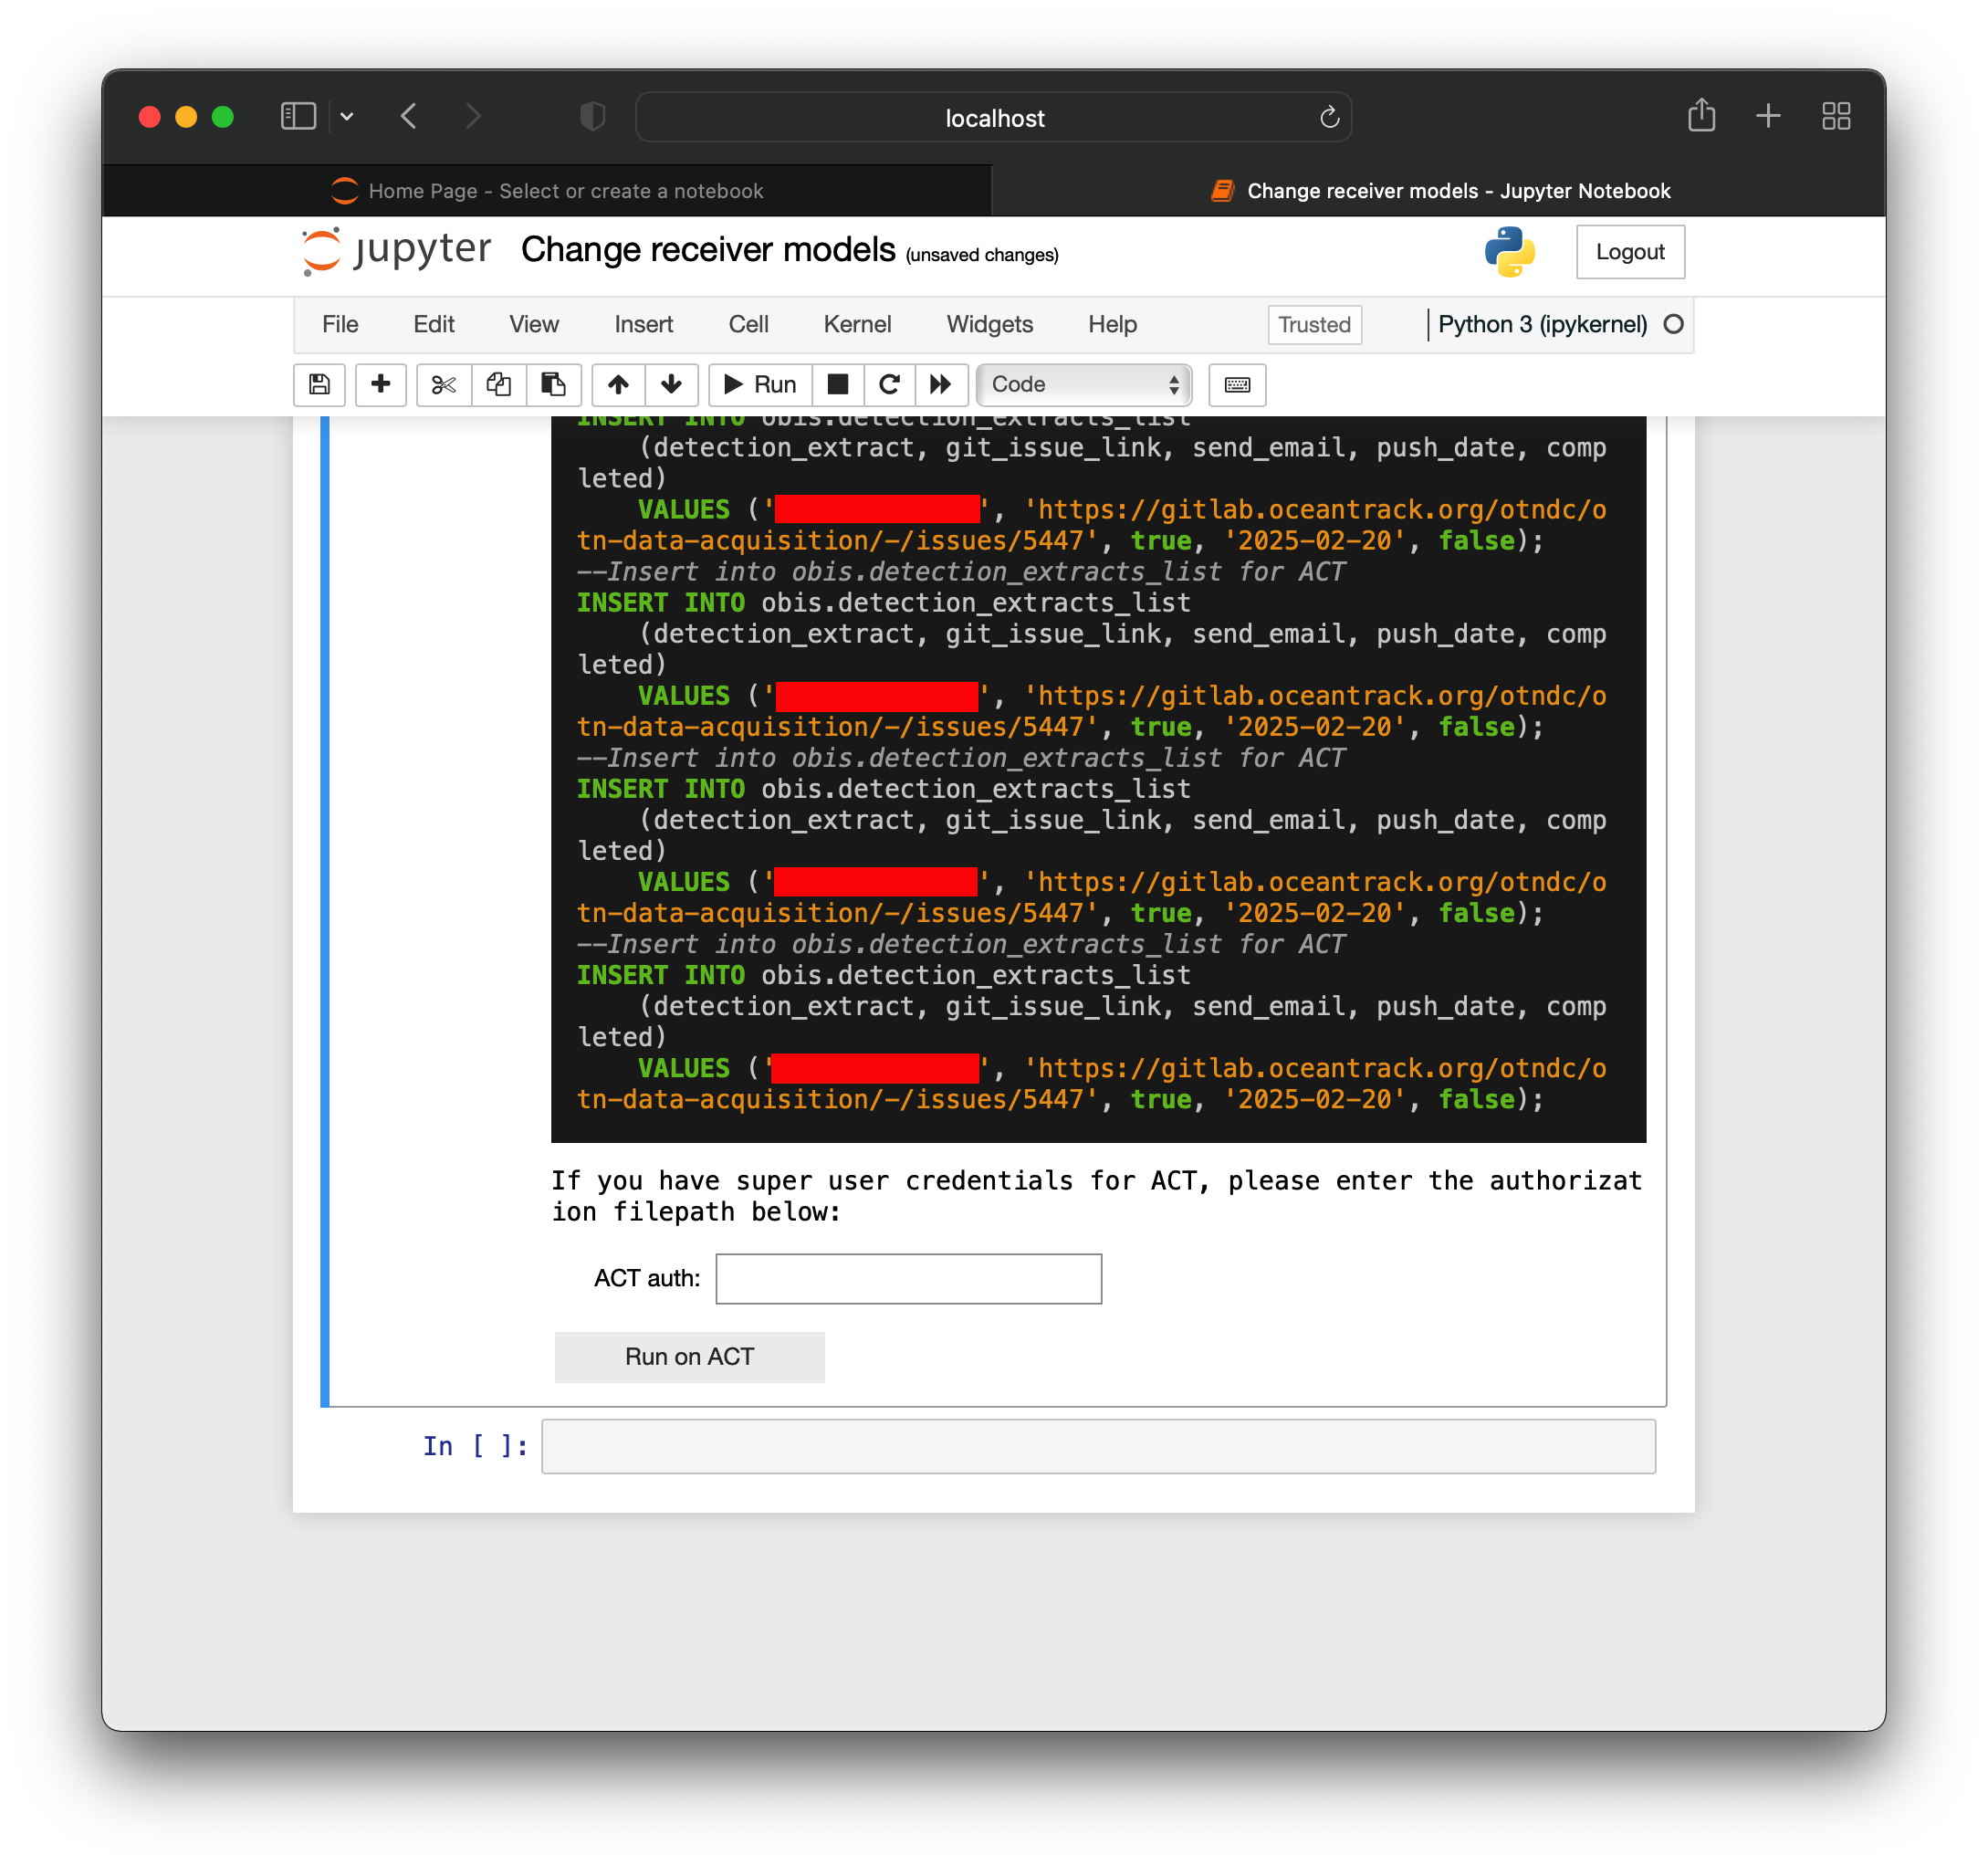
If you have a super-user authorization for the other Node (ie; you are the Data Manager for multiple Nodes, or are OTN staff):
- You may enter the filepath of the super-user authorization in the above text box and will receive a success message, which will run the SQL on the other Node.
- Please remove the ‘Cross-node executions’ label from the Issue once completed
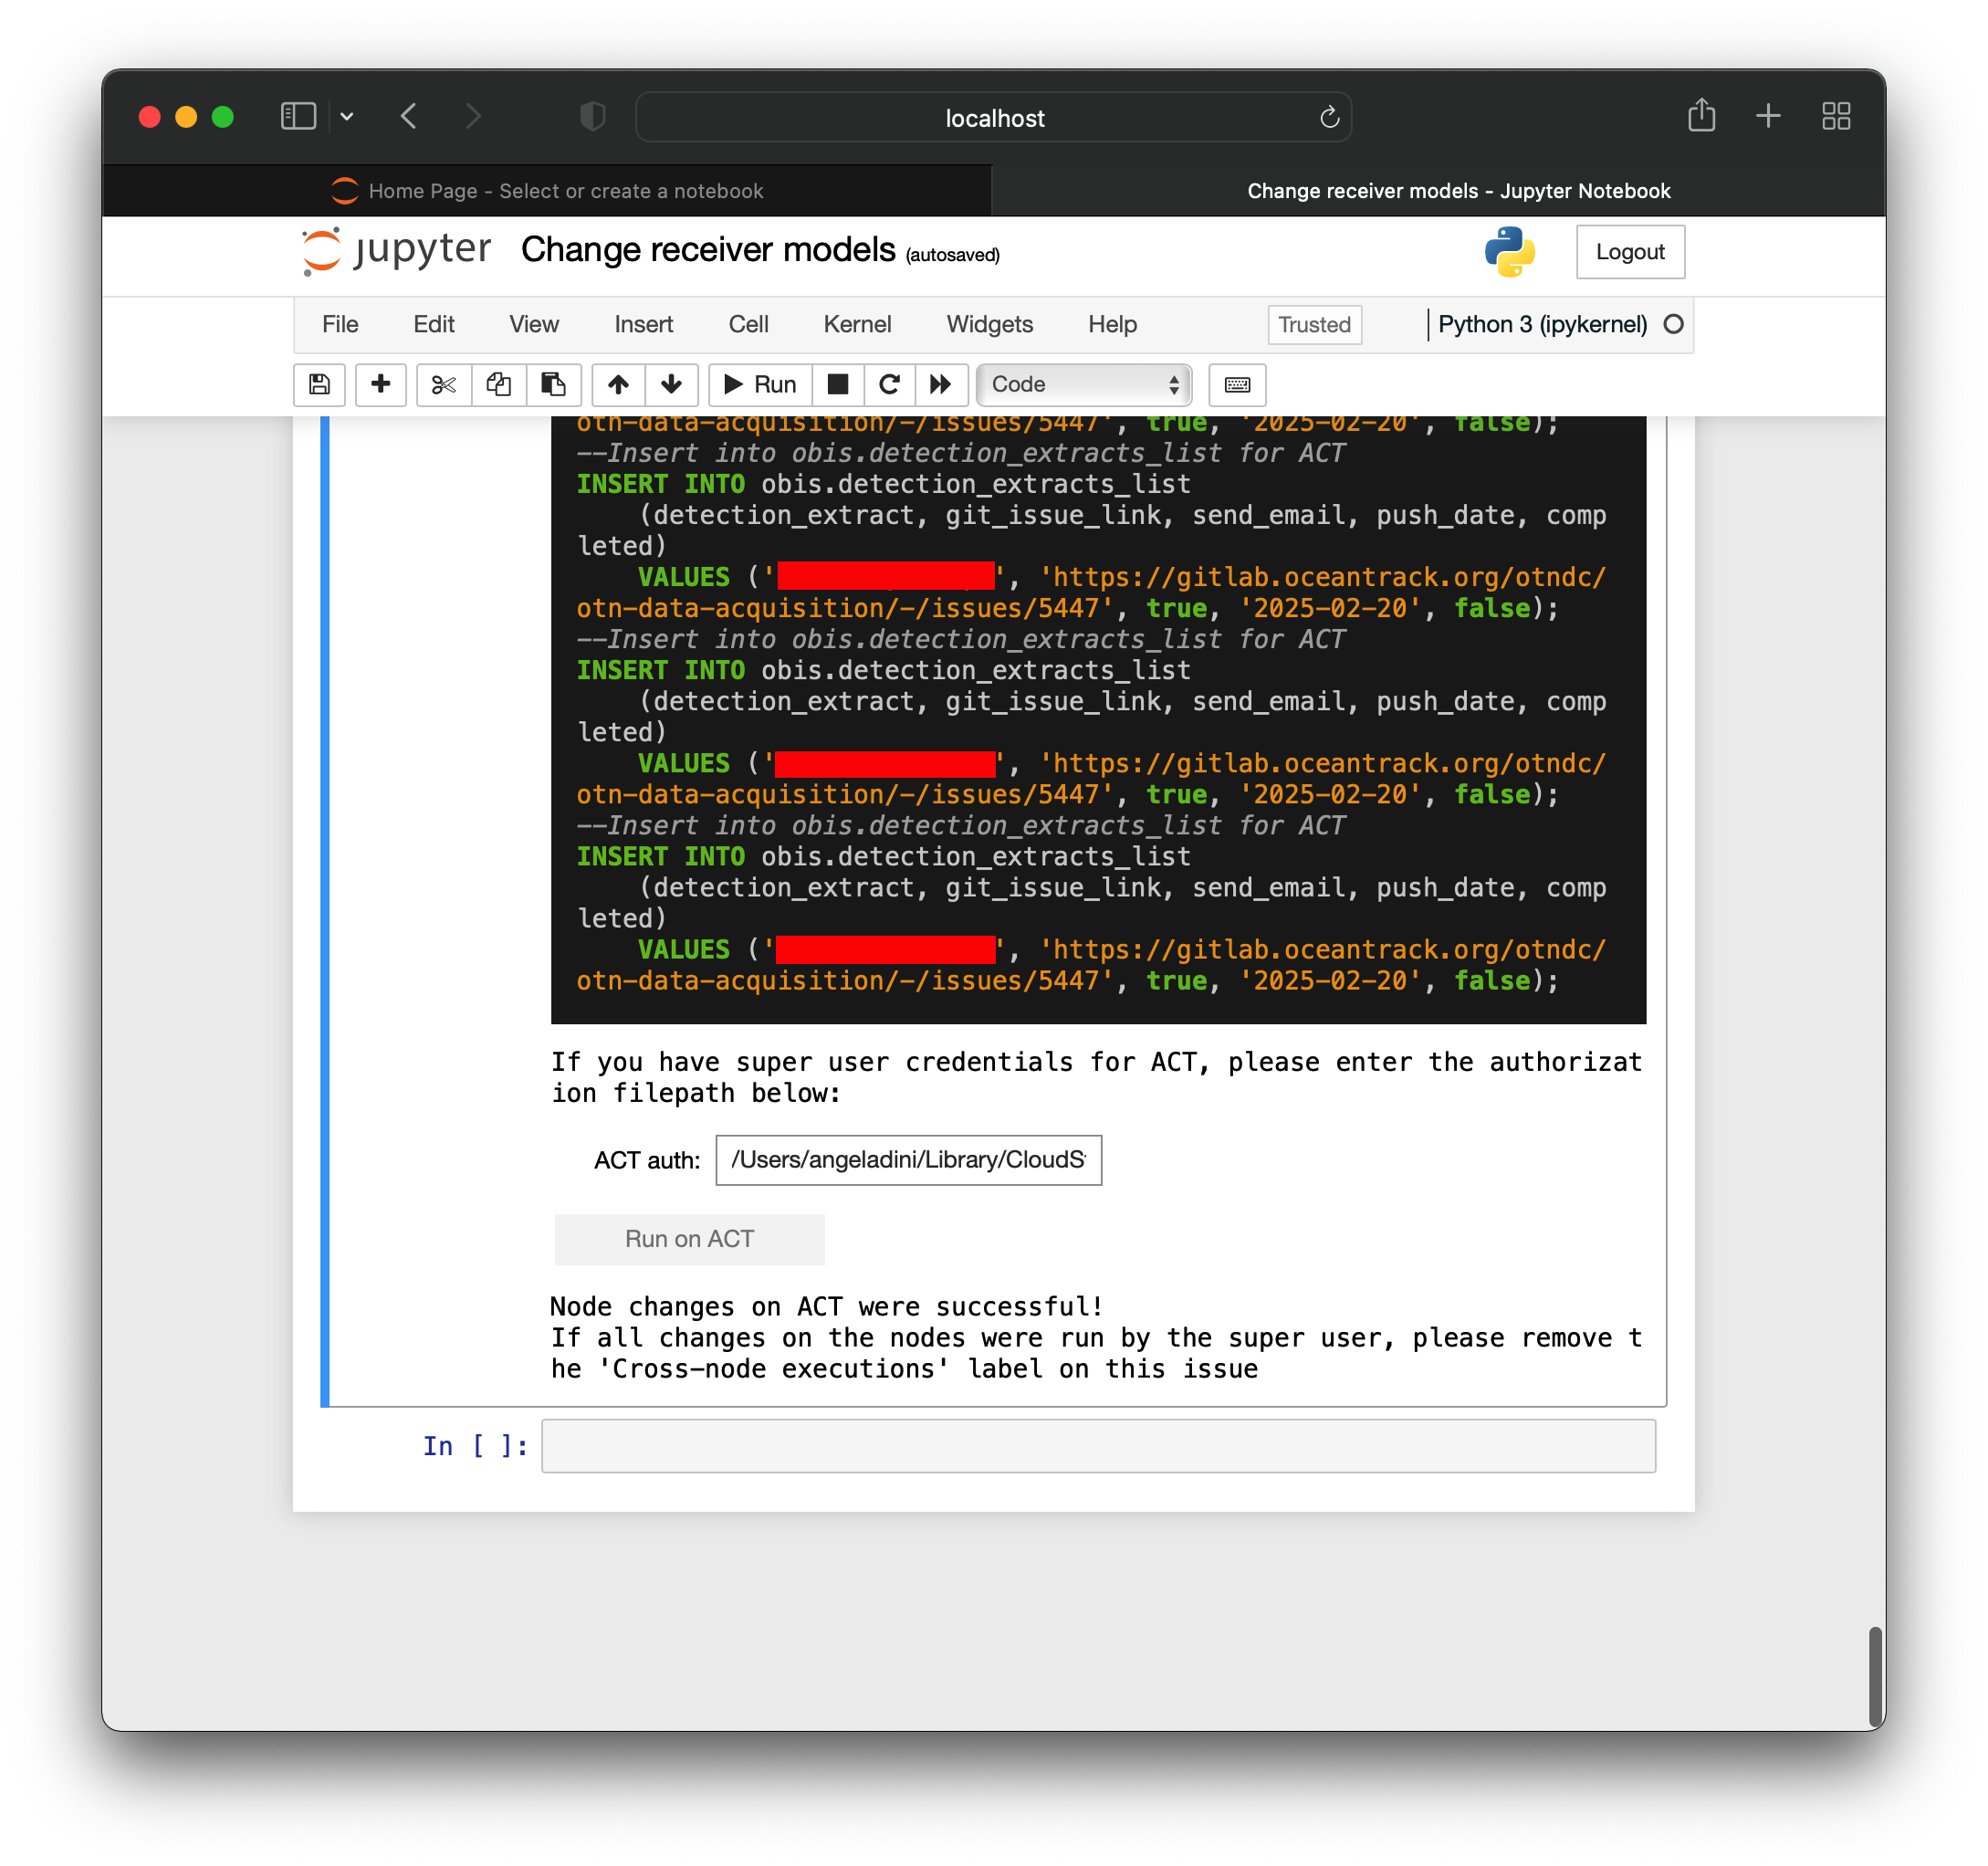
If you do not have the super-user authorizations for the other Node :
- Please inform the associated Node Manager that you have SQL for them to run and send them the SQL.
- After they have run the SQL, please add a comment to the issue saying they have run the SQL
- Remove the ‘Cross-node executions’ label.
Key Points
database-fix-notebooks has many useful notebooks for Node Managers to help them make changes to the database
Data Push
Overview
Teaching: 10 min
Exercises: 0 minQuestions
What is a Data Push?
What do I need to do as a Node Manager for a Data Push?
What are the end products of a Data Push?
Objectives
Understand a basic overview of a Data Push
Understand what a Node Manager’s responsibilities are during a Data Push
Understand the format of Detection Extracts
What is a Data Push?
A Data Push is when the OTN data system is re-verified and any new relevant information is sent to researchers. New data stops being brought in so that what’s in the system can be reliably verified. This way any issues found can be fixed and the data can be in the best form based on the information available at that moment. Once verification is done, detections are matched across nodes and detection extracts are sent out to researchers. This is also the time when summary schemas like discovery, erddap, and geoserver are updated with the newly verified data.
What is the Push Schedule?
Push events happen three times a year. They start on the third Thursday of the “push months” which are February, June, and October.
With the increased number of Nodes joining the Pushes, we are announcing the schedule for the next year. Please prepare in advance and mark your calendars.
Push schedule through 2027:
- June 18, 2026
- October 15, 2026
- February 18, 2027
- June 17, 2027
- October 21, 2027
Pre-Push Schedule
In order to accommodate the increasing number of Nodes and meet Push deadlines, we have also prepared a shared pre-Push timeline for all nodes:
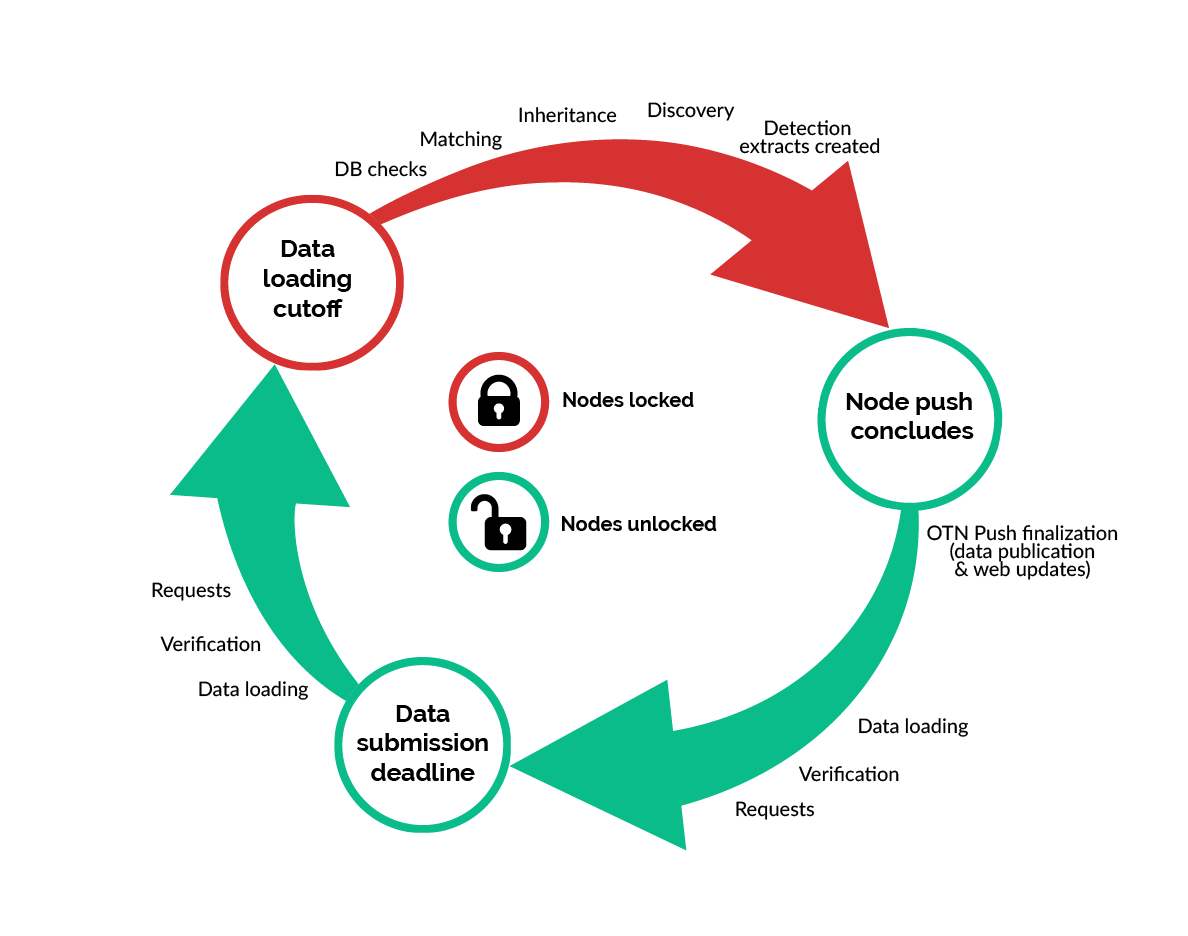
There are 3 important deadlines to remember:
- data submission deadline: recommended 20 days before the push date, but can be set by each node.
- The date you select should leave you enough time to get all your data passed off for verification before the data loading cut-off date.
- This date can change for each push depending on your availability! Ex: if you’re going on vacation, you can set your data submisison deadline date earlier.
- This is the date you tell your collaborators / researchers.
- data loading cut-off date: the 3rd Monday of the push month (Feb, June, Oct).
- this is the date that’s most important for node managers
- tickets must meet both of these criteria by this date:
- ready for verification
- assigned to OTN Database staff (currently Angela or Ying)
- tickets which do not meet this criteria will not make it into the push. This includes tickets that are assigned to OTN DAtabase staff for “loading big files” etc. Only verification tickets count at this stage, the rest have missed the cut-off
- push date: the 3rd Thursday of the push month (Feb, June, Oct)
- this is an internally used metric - not affecting node managers work
- the date we use in the detection extract table (this is often entered when using DB Fix notebooks, so its still important to know)
- the date the OTN Database team starts the push tasks (like matching etc.)
- no verifications should be happening after this date
Node Manager Roles During a Push
Node Managers have two main jobs during a Push:
- The first job is to get the Node’s data loaded in time for the cut-off date. Data will be submitted by researchers on a continuous basis, but will likely increase just before a cut-off date. We recommend loading data as it arrives, to prevent a large backlog.
- The second job for Node Managers is to create and send out Detection Extracts when they are ready to be made. This will be done using the
detections - create detection extractsNodebook.
Once the cut-off date has passed Node Managers are “off duty”! When it’s time for Detection Extracts to be created and disseminated that task will be assigned to the Node Managers, but this does not signify the end of the Push. There are several more “behind the scenes” steps required.
Please refrain from interacting with the Node Database until OTN staff have announced the Push has ended and data may be loaded again.
We have created an OTNDC Bot that announces updates through OTN’s node Slack channels, and will announce each node’s Push status. This means all node managers will be notified when the Push begins and ends in a clear manner. This Bot also sends status reports about Gitlab tickets during non-Push time, to help Node Managers track and stay on top of their ticket queue.
Push Reports
Once a push is completed, statistics are gathered about the overall push as well as metrics about each node. This process creates a snapshot of what each node looked like at the time of that push. The statistics tracked include metrics such as the number of issues in the push, the number of projects a node is managing, the total number of detections, and the size of the database.
Using this data, a push report is generated for each node. These reports provide a summary of the push, including graphs and figures that illustrate how each node is growing over time. In addition to sharing these reports, we try to schedule a check-in meeting with nodes. These meetings are not only a chance for OTN to get information to the nodes but also for you to relay any information to us.
We want node managers to gain as much value as possible from the check-in meetings and reports, so we welcome feedback on the format, content, or any additional details you’d like to see included. Our goal is to ensure every node has the insights they need to succeed.
If you have feedback or specific requests, we’re happy to address them during your check-in. Additionally, if something comes to mind outside of these meetings, please don’t hesitate to reach out to the OTNDC team. We’re always available to discuss and scope your needs with you further.
Copy of the OTN February 2024 Push Report
Detection Extracts
Detection Extracts are the main output of the Push. They contain all the new detection matches for each project. There are multiple types of detection extracts OTN creates:
- ‘qualified’ which contain detections collected by an array but matched to animals of other projects
- ‘unqualified’ which contain the unmatched or mystery detections collected by an array
- ‘sentinel’ which contain the detections matched to test or transceiver tags collected by an array
- ‘tracker’ which contains detections that have been mapped to animals tagged by a project that can originate from any receiver in the entire Network
- ‘external partners’ which is a report with suggested matches to the mystery-tag layers provided by non-Node partner networks. Summary detection information, including a count of the number of potential matches per project is provided. These matches are meant as a starting point for gaining information from non-Node telemetry networks. Researchers will have to contact those networks directly for more detailed information, and to register.
- ‘sentinel-tagger’ which contain the detections matched to test or transceiver tags deployed by a project, and detected by other projects
Detection Extract files are formatted for direct ingestion by analysis packages such as glatos and resonate.
Detections - Create Detection Extracts Nodebook
During the Push process, any new detection matches that are made are noted in the obis.detection_extracts_list table of your Node. These entries will have several pieces of useful information:
detection_extract: this contains the project code, year, and type of extract that needs to be created.- ex:
ABC,2022,twill suggest that project ABC needs the extractmatched to animals 2022(tracker format) created.
- ex:
git_issue_link: the issue in which these detection matches were impactedpush_date: the date of the Push when this extract will have to be made
Using these fields, the detections-create detection extracts Nodebook can determine which extracts need to be created for each push.
As of December 2024, please ensure you are on the main branch of ipython utilities before running this Nodebook
To switch branches in Git, please follow the instructions on this page https://gitlab.oceantrack.org/otn-partner-nodes/ipython-utilities/-/wikis/updating-notebooks-after-bugfixes-and-new-features#changing-branches-of-ipython-utilities
Imports cell
This section will be common for most Nodebooks: it is a cell at the top of the notebook where you will import any required packages and functions to use throughout the notebook. It must be run first, every time.
There are no values here which need to be edited.
User Inputs Database Connection
outputdir = 'C:/Users/path/to/detection extracts/folder/'- Within the quotes, please paste a filepath to the folder in which you’d like to save all the Detection Extracts.
engine = get_engine()- Within the open brackets you need to open quotations and paste the path to your database
.kdbxfile which contains your login credentials. - On MacOS computers, you can usually find and copy the path to your database
.kdbxfile by right-clicking on the file and holding down the “option” key. On Windows, we recommend using the installed software Path Copy Copy, so you can copy a unix-style path by right-clicking. - The path should look like
engine = get_engine(‘C:/Users/username/Desktop/Auth files/database_conn_string.kdbx’).
- Within the open brackets you need to open quotations and paste the path to your database
Once you have added your information, you can run the cell. Successful login is indicated with the following output:
Auth password:········
Connection Notes: None
Database connection established
Connection Type:postgresql Host:db.your.org Database:your_db User:node_admin Node: Node
Testing dblink connections:
	saf-on-fact: DBLink established on user@fact.secoora.org:5002 - Node: FACT
	saf-on-migramar: DBLink established on user@db.load.oceantrack.org:5432 - Node: MIGRAMAR
	saf-on-nep: DBLink established on user@db.load.oceantrack.org:5432 - Node: NEP
	saf-on-otn: DBLink established on user@db.load.oceantrack.org:5432 - Node: OTN
	saf-on-act: DBLink established on user@matos.asascience.com:5432 - Node: ACT
	saf-on-pirat: DBLink established on user@161.35.98.36:5432 - Node: PIRAT
	saf-on-path: DBLink established on user@fishdb.wfcb.ucdavis.edu:5432 - Node: PATH
You may note that there are multiple DB links required here: this is so that you will be able to include detection matches from all the Nodes. If your .kdbx file doesn’t include any of your DB link accounts, reach out to OTN to help set it up for you.
Detection Extract Selection
There are two options for selecting which Detection Extracts to create:
- The manual entry cell. Here you can paste a list of extracts in this format (one per line):
- project code (capitals), year, type
- The cell to query the
obis.detection_extracts_listtable. This is the preferred method.- enter the current Push date like
push_date = 'YYYY-MM-DD'
- enter the current Push date like
Once you have a list of the Detection Extracts to create, you can move on. The next cell will create a list of all the extracts that were just created, which you can use for your own records. It will save in your ipython-utilities folder.
Create Detection Extracts
This cell will begin creating the identified detection extracts, one by one. You will be able to see a summary of the matched projects for each extract. Please wait for them all to complete - indicated by a \({\color{green}green}\) checkmark and a summary of the time it took to complete the extract.
The following section is relevant to Nodes who use Plone as their document management system
Uploading Extracts to Plone
First the Nodebook will print a list of all the extracts that need to be uploaded. It should match the list of those just created.
Next, you will need to connect to Plone using a
.authfile. The format will be like this:plone_auth_path = r'C:/path/to/Plone.auth'. Success will be indicated with this message:Plone authorization was successful. Connected to 'https://members.oceantrack.org' as 'USER'Now the Nodebook will upload all the Detection Extracts into their relevant folders on Plone.
Please wait for them all to complete - indicated by a \({\color{green}green}\) checkmark and a summary of the time it took to complete the extract.
Emailing Researchers - Using Contacts Table
This section of the notebook relies on the obis.detection_extracts_list table, the current Push date, and the project and contact relations currently in each Node to create a single email per contact advising on all the updated data files from the current data push for their projects. This step should be done once all detection extracts are created and posted to the project repositories. This step should only be completed once, as repeating it may result in unecessary emails being sent to researchers
The first step of this section is to connect to the node database, if this has not already been done in the Nodebook.
Next the push date needs to be inputted, this needs to match the push date in the obis.detection_extracts_list table.
The next cell is run without edits, collecting the detection extracts for this push and displaying them.
The following cell is for gathering the contacts for those projects on the extract list.
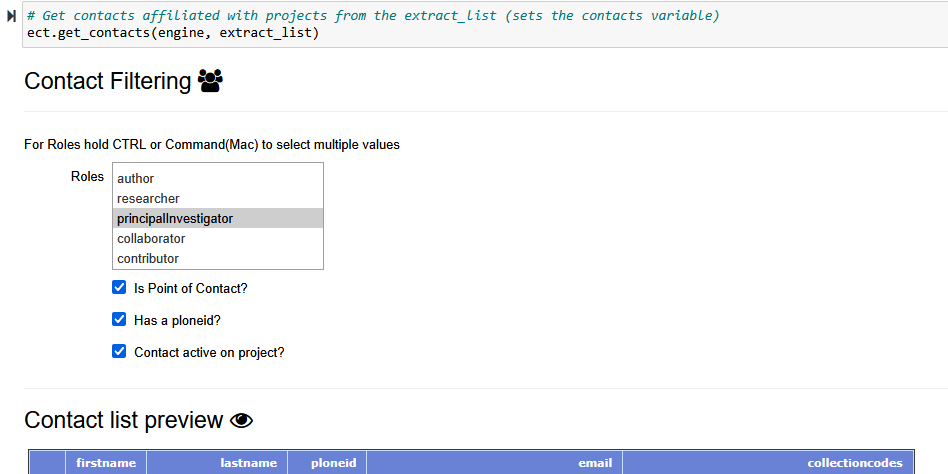
You will then be able to print out your current email template. If necessary, you can edit the template by changing the det_extracts_emailSpecial_perPI.j2 template, or the one specific to your node, in the templates subfolder of ipython-utilities, and changing the filepath to be email_template = 'templates/det_extracts_emailSpecial_perPI.j2', then re-running.
Next you need to supply a .auth file for an email account. The format will be like this: email_auth_path = r'C:/path/to/email.auth'. Success will be indicated with this message:
Email auth is set:
 user= otndc@dal.ca
 host= smtp.office365.com
 cc= otndc@dal.ca
 port= XXX
The next cell will allow for changes to the email subject, the from field, and the email delay before a retry. This is also where a test email can be displayed. Change send_email = False to send_email = True in order to actually send the emails you have constructed.
The last cell of the section sends the emails that you have constructed.
The following section is relevant to Nodes who use Plone as their document management system
Emailing Researchers - Plone (This method will be considered obsolete once the database contact method is fully adopted)
Using the Plone users system, its possible to identify which researchers require an email notification. First you need to supply a
.authfile for an email account. The format will be like this:email_auth_path = r'C:/path/to/email.auth'. Success will be indicated with this message:Email auth is set: user= otndc@dal.ca host= smtp.office365.com cc= otndc@dal.ca port= XXXUpon successful login, you will be able to print out your current email template. If it is not adequate, you can edit the template by changing the
det_extracts_emailSpecial.j2template in thetemplatessubfolder ofipython-utilities, and changing the filepath to beemail_template = 'templates/det_extracts_emailSpecial.j2', then re-running.Finally, this stage will send the emails. Ensure that
date = 'YYYY-MM-DD'for the date you uploaded the extracts to Plone. This is how the Nodebook will determine which links to include in the email template. First: setsend_mail = False. Run the cell, select the projects of interest andSimulate Sending Emails. If you are pleased with the output, you can then changesend_mail = Trueand re-run. ChooseSend Emailsand they will be sent. ————————————–
Emailing Researchers - Manual
If you are not using the Plone system for sending emails, you can use the manual email tool.
You will first enter the collectioncode which has the new Detection Extract file requiring notification: cntct_schema = 'schema'. Please edit to include the project code, in lowercase, between the quotation marks.
An interactive menu will then appear, listing all the contacts associated with the project. You can select each of those you’d like to email.
The following cell will print out the resulting contact list.
Next, you will be able to review the email template. Required input includes:
email_auth_path = '/path/to/email.auth': please paste the filepath to your email.authbetween the quotes.template = './emailtools/templates/email_researcher.html': you can select the template you’d like to use. If the ones provided are not adequate, you can edit the template by changing theemail_researcher.htmltemplate by navigating from theipython-utilitiesmain folder toemailtoolsthen into thetemplatesfolder. Save your edited file and re-run
If the email preview is acceptable, you may run the final cell in this section which will send the emails.
Update Extract Table
Once all extracts are made, uploaded to your file management system and emails have been sent to researchers, the final step is to ensure we mark in the obis.detection_extracts_list table that we have completed these tasks.
Please enter current_push_date = 'yyyy-mm-dd' : the date of the Push when these extracts have been made.
Then, an interactive dataframe will appear. This dataframe will allow you to check off the extracts as completed based on those you were able to successfully create.
Now you’re done with Detection Extracts until next Push!
Key Points
A Data Push is when we verify all the data in the system, fix any issues, and then provide detection matches to researchers
As Node Managers its your responsibility to get the data into the system so OTN can verify and get it ready to be sent out
Detection Extracts are the main end product of the Push
Supplementary notebooks
Overview
Teaching: 15 min
Exercises: 0 minQuestions
What other Nodebooks are there that could be useful for me to know as a Node Manager?
Objectives
Learn about Nodebooks that are useful for Node Managers outside the core data loading notebooks
OTN maintains several additional Nodebooks that fall outside the core tag, deployment and detection tools. These may be useful to Node managers who also deal with these particular scenarios.
Check Environment
This Nodebook checks your system Python environment against our environment.yml. This is to see if the Python packages and libraries you have installed are in line with what is required to run the Nodebooks. This will assist you with updating your packages if they become out-of-date, or if OTN develops and publishes new tools which rely on new packages.
scientific_name_check
This Nodebook uses WoRMS to check animal common and scientific names. It is used to add new species names to obis.scientificnames table for use each project. The instructions for using this Nodebook are the same as the Adding Scientific Names section in the Create and Update Projects Nodebook.
Occasionally, you may have to add a new species to the WoRMS data system. The specifics of doing so are laid out on the WoRMS Contribution page but they amount to: email info@marinespecies.org with a literature record describing the taxa that needs to be added. Traditionally WoRMS was not a register of freshwater species but in recent years they have extended their scope to account for and track marine, brackish, and fresh habitat designations for their supported taxa. So don’t hesitate to reach out to them and help them add new species!
Add Instrument Models to Database
This Nodebook is used to add an instrument model to the obis.instrument_models table.
insert_vendor_sheet
Used to load manufacturer specifications for tags or receivers into the vendor tables.
convert - Fathom (vdat) Export - VRL to CSV
Convert VRLs or VDATs into CSV files using command-line Fathom software. Can also be done using the Fathom app.
Load Health Report
This notebook will load “health reports” collected by LiquidRobotics WaveGliders while remotely offloading VR4 receivers.
Create and Update Contacts Nodebook
This Nodebook can be used to add new contacts to a project and update existing contacts in the database. Note: you cannot change someone’s email address using this tool.
DB Fix Notebooks
These are a series of notebooks for fixing common issues found in the database. More information can be found in the relevant lesson.
Outdated / old workflows:
Active Tracking
Handles active tracking data - detections collected by using a VR100 hydrophone (or similar) during “mobile” tracking activities. (Superseded by Movers workflow)
Slocum Telemetry Notebook
This notebook will process and load detection data collected by a slocum glider mission. Information required includes glider telemetry, glider metadata, and detection files. (Superceded by Movers workflow)
Telemetry Processing for Wave Gliders and Animals
This notebook will process and load detection data collected by a WaveGlider mission. Information required includes glider telemetry, glider metadata, and detection files. (Superseded by Movers workflow)
Key Points
ipython-utilities has many useful notebooks for Node Managers to help them
Nodebook Improvement and Development
Overview
Teaching: 10 min
Exercises: 0 minQuestions
How do I request new features?
How do I report bugs to OTN?
What is my role in Nodebook develeopment?
Objectives
Understand the process for developing the Nodebooks
Understand the process for testing new Nodebook changes
Once you begin using the OTN Nodebooks, you will likely discover tools that are missing, or bugs that hinder your usage. OTN developers are here to help ensure the Nodebooks meet your needs. We are constantly changing our processes and are always open to suggestions to improve! These tools are for you, and we want to ensure they are useful.
New Features
If there is a feature that you’d like to see, you can bring this to OTN’s attention in this way:
- Ask in our Slack channels to see if there is a tool that already exists that will fit your needs. Discuss your ideal feature with OTN developers to help them understand what you need.
- Once the new feature is properly scoped, create a new GitLab Issue here https://gitlab.oceantrack.org/otn-partner-nodes/ipython-utilities/-/issues, using the
new_featuretemplate. You should assign to one of the OTN developers, who can begin to work on the request.
Here is the “new_feature” template, for your information:
            Note that this template is **ONLY** used for tracking new features. Bugs should be filed separately using the Bug template.

            The new feature should be proposed, scoped, and approved **before** you fill out this template.

            ## Summary
            **Provide a general summary of the feature to be built.**

            ## Rationale
            **Why do we want this?**

            ## End Users
            **Who is expected to use this functionality most?**

            ## Scope
            **What are the expected qualities and functionality of this new feature? One per line.**

            ## Minimum viable product
            **What subset of the above functionality is necessary before the feature is considered finished?**

            ## Timeline
            **Give a brief, ballpark estimate on when you would want this done.**
Bug fixes
If you encounter an error in your Nodebooks, its possible there is an issue with your dataset. Sometimes, however, the Nodebook is not functioning as expected. If you believe a certain Nodebook is malfunctioning, identify this bug to OTN developers as soon as possible.
To identify a bug, here are the steps to take:
- Ask in our Slack channels to see if the error is caused by your dataset. This can include posting an error message, or just describing the output from the Nodebook, and why it is not as expected.
- If OTN developers identify that the problem is not your dataset, the next step will be to create a GitLab Issue here, using the
bugtemplate. You should assign to one of the OTN developers, and use the labelbugfix.
Here is the “bug” template, for your information:
            Note that this template is **ONLY** used for reporting bugs. New features must be vetted and filed separately using the New Feature template.

            As such, before you continue, ask yourself:
            **Does this ticket concern existing functionality that is broken? Or is it a deficiency in the system as-designed that needs net new work to complete?**
            If it's the former, then use this template, otherwise, use the New Feature template.

            ## Summary
            **Provide a general summary of the problem.**

            ## Expected Behavior
            **What should be happening?**

            ## Current Behavior
            **What is actually happening?**

            ## Steps to Reproduce
            **How can I see this bug happening? Where does it happen? Provide links to specific pages where the bug is visible, along with steps to reproduce it.**

            ## Priority
            **On a scale from 1 to 5, approximate the severity of the issue. Be honest.**
Testing Features/Fixes
Once OTN developers have attempted to build your new feature, or fix your bug, they will publish their code into the integration branch of our ipython-utilities Nodebooks. You will be asked to test these changes, to ensure the end product is satisfactory. This branch is used for development and testing only, and should not be used for data-loading outside of testing.
Here are instructions for changing branches:
(Replace anything in <> with the sensible value for your installation/situation)
Open git bash or terminal.
From your git bash window, type:
cd "/path/to/your/ipython-utilities"
This will put your terminal or git bash terminal in the folder where this codebase lives on your computer. Now we’re going to
- reset any changes you have made locally (save anything you might want to keep with
git stash), - switch to the new branch
- update that branch with any new code
git reset --hard
git checkout <branch you are moving to ie:integration>
git pull
Resolve python libraries by using the mamba command:
mamba env update -n nodebook -f environment.yml
You will then be able to test the new code. When you are finished, follow the same steps to switch back to the main branch to continue your work. The main branch contains all the production-quality tools.
Key Points
The Nodebooks are for you - OTN wants to ensure they remain useful
17_important data tables
Overview
Teaching: min
Exercises: minQuestions
Objectives
title: “17. Important Data Tables” teaching: 25 exercises: 17 questions:
- “What information can we find in these tables?”
- “What are the corresponsing SQL code to access the data?”
1. Vendor Schema
The OTN Node database format includes a “vendor” schema which contains multiple tables. Each table is formatted to hold tag or receiver speciications for a certain manufactoruer. These tables are used by the Nodebooks during verification processes and it is often important for Node Managers to do further investigating by searching these tables.
These are the tables:
- vendor.c_vemco_tags
- vendor.c_vemco_receivers
- vendor.c_thelma_tags
- vendor.c_thelma_receivers
- vendor.contacts_auths
Here are some useful SQL queries:
select * from vendor.c_vemco_tags where serial_no ='XXXXX'select * from vendor.c_vemco_tags where vue_id ='XXXXX'select * from vendor.c_vemco_receivers where tag_id ='XXXXX'select * from vendor.c_vemco_receivers where serial_no ='XXXXX'select * from vendor.c_thelma_receivers where serial_no ='XXXXX'
When we identify problems like different tag ID or tag life expectancy in tag-1 notebook, we should check which one is correct in vendor.c_vemco_tags.
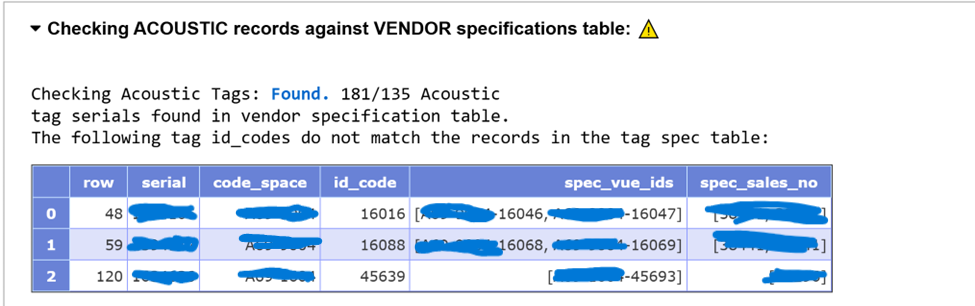
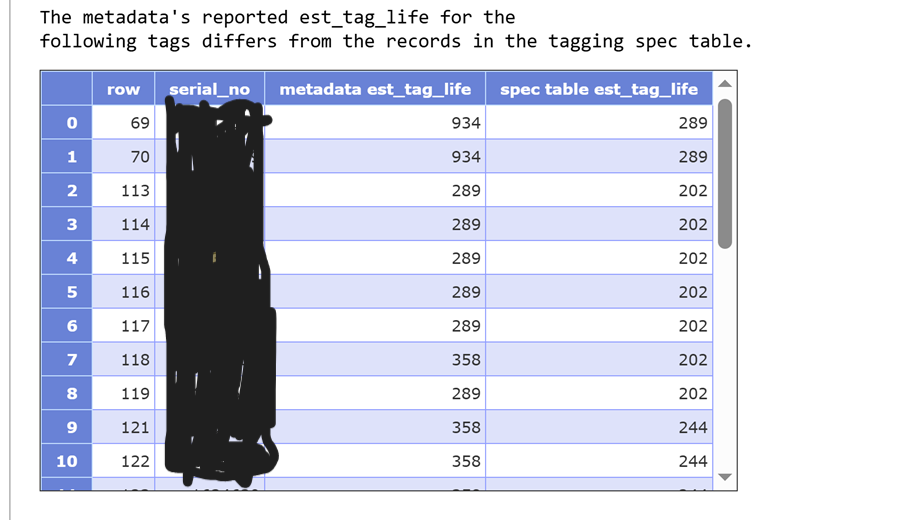
Details about vendor.c_vemco_tags table:
- column
tag_famrepresents tag model type (V7, V9, V16…) - column
vue_idrepresents transmitter ID. Note some tags (the same serials) may have several different transmitter IDs because they have different ID_codes. - column
est_tag_liferepresents a tag’s life expectancy
When we identify problems like different transmitter_IDs in deployment notebook, we want to check which one is correct in vendor.c_vemco_receivers
When there’s a missing INNOVASEA spec (warning shows as below), we want to first check if we have a auth file
SELECT * FROM obis.contacts c
LEFT JOIN vendor.contacts_auths ca
ON c.contact_pk = ca.contact_pk
LEFT JOIN obis.contacts_projects cp
ON c.contact_pk = cp.contact_pk WHERE
  collectioncode = 'XXXXX'
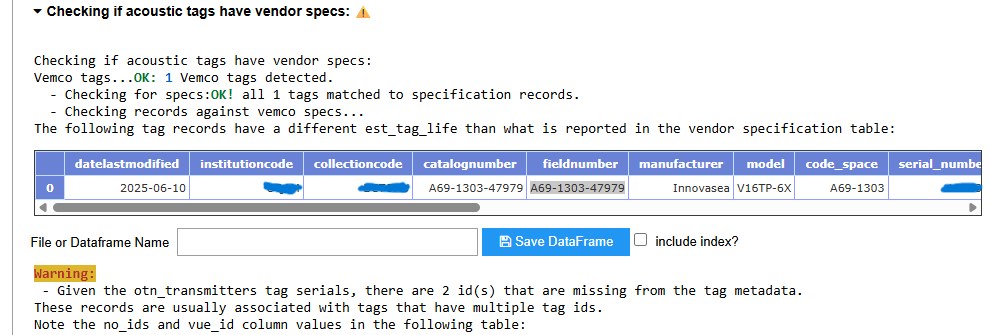
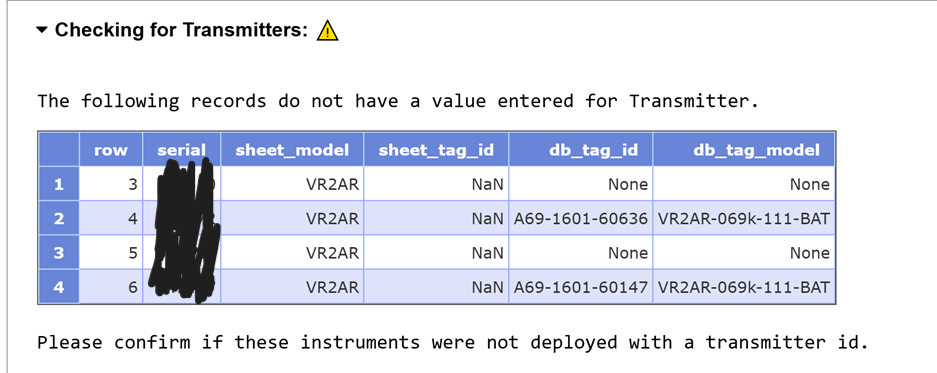
Details about vendor.c_vemco_receivers table:
modelrepresents receiver models (VR2AR, VR2Tx, VR4…)tag_idrepresents transmitter ID.
2. OBIS Schema
The OTN Node database format includes a “OBIS” schema which contains multiple tables. Each table is formatted to hold speiecs, instrument, animal, and project information
There are a couple of important tables:
- obis.scientificnames: list of projects and their associated species.
select * from obis.scientificnames where collectioncode = 'XXX' - obis.lengthtype_codes: a collection of all existing length types and their entry in the standard vocabulary of NERC:
select * from obis.lengthtype_codes - obis.lifestage_codes: a collection of all existing lifestage codes and their entry in the standard vocabulary of NERC:
select * from obis.lifestage_codes - obis.instrument_models: a collection of all existing instrument model types:
select * from obis.instrument_models - obis.institution_codes: a collection of existing institutions with their information:
select * from obis.institution_codes - obis.contacts: a collection of existing contacts with a unique identifier:
select * from obis.contacts - obis.contacts_projects: a table of associations between contacts (with the unique identifier) and the projects they are a part of:
select * from obis.contacts_projects where collectioncode = 'XXXXX' - obis.otn_animals: an aggregation of all the animal information across all projects. This is a read-only table and should not be updated:
select * from obis.otn_animals - obis.moorings: an aggregation of all the receiver and tag deployments information across all projects. This is a read-only table and should not be updated:
select * from obis.moorings- It contains information about all tags, transmitters, VMTs, receivers, events, downloads, etc. In this table, the columns
basisofrecordandrelationshiptypedistinguish which type of data it is.
- It contains information about all tags, transmitters, VMTs, receivers, events, downloads, etc. In this table, the columns
- obis.detection_extracts_list: a collection of all detection extracts for all pushes, with associated Gitlab issue:
select * from obis.detection_extracts_list where push_date = 'YYYY-MM-DD' - obis.otn_resources: a collection of projects and their information:
select * from obis.otn_resources where collectioncode= 'XXXXX' - IN OTNUNIT ONLY: obis.loan_tracking: a collection of project loan information:
select * from obis.loan_tracking
3. Discovery Schema
The OTN Node database format includes a “discovery” schema which contains multiple tables. Each table is formatted to hold a summary of detecion information
This schema holds the summarized information of the data. The tables in this schema include:
- discovery.all_animals: The animal biology information, scientific names, and release locations and times:
select * from discovery.all_animals - discovery.detection_pre_summary: summarized information about detections and their matches grouped by week:
select * from discovery.detection_pre_summary. Some noteworthy columns in this table:collectioncoderepresents the receiver project codetrackercoderepresents the tag project code which is matched to the detectionrelationshiptyperepresents the type of match (i.e. animal, unqualified, transmitter, and test)weekcollectedrepresents the week of the approximate detection timefieldnumberrepresents the transmitter ID of the detectionrcvrcatnumberrepresents the unique identifier of the receiverdetection_countrepresents how many times this fish has been detected during that week (min_detect_datetomax_detect_date)
These tables have many applications, including creating data reports.
Key Points
Virtual Machine Specs for OTN Database Node
Overview
Teaching: 10 min
Exercises: 0 minQuestions
What does a new Node need to get started?
Objectives
Understand what technical specification are required for a Node
Understand the format of Detection Extracts
Virtual Machine Specs for OTN Database Node
To setup an OTN node, a network first has to create technical space for the database, website, and associated infrastructure. If contracting a cloud-based service, the below breakdown of requirements will be important to keep in mind.
## Service-level breakdown
PostgreSQL 14+ with PostGIS and dblinks
- Minimum RAM 1GB
- Storage 100MB for installation and 200GB - 1 TB for medium to large data projects.
Tomcat Services (Optional)
- Geoserver 2.28.x+ (for publication of projects, contacts, and receiver locations)
- Minimum RAM required 2GB with 500 MB needed for base installation.
- Recommended RAM from 4-8 GB.
- Storage is shared between the PostgreSQL database tables.
- Erddap 2.23.x+ (for publication of all relevant tracking data for published projects)
- Minimum system specs: 2 GB of ram with 500 GB of storage depending on the amount of data stored.
- Recommend RAM from 4 - 8 GB based on usage requirements.
Plone 6.1.x (file management and content management system)
- Minimum RAM required 2 GB.
- Recommended RAM is above 2 GB
- Diskspace needed for installation 600 MB
- Maximum Space needed depends on the amount of data loaded to Plone. Roughly equal to the amount of database storage allocated.
Full installation of the OTN stack - recommended specs
- RAM: 16GB+
- Storage: 1TB+ for medium to large data projects. Recommended to use SSD based storage for access speed.
- System Backups should be configured / purchased and confirmed to be enabled.
- Linux operating system (Debian or RedHat based)
- Containerized (Docker) installs will require additional processing overhead, more resources should be allocated for containerized deployments of the OTN system.
Key Points
There are key requirements for a Node