Project Metadata
Overview
Teaching: 30 min
Exercises: 0 minQuestions
How do I register a new project in the Database?
Objectives
Understand how to complete the template
Understand how to use the Gitlab checklist
Learn how to use the
Create and Update ProjectsnotebookLearn how to use the
Create Plone folders and add usersnotebook
The first step when you are contacted by a researcher who wants to register their project with the Database is to request Project Metadata. For most Nodes, this is in the form of a plaintext .txt file, using the template provided here. This file allows the researcher to provide information on the core attributes of the project, including the scientific abstract, associated investigators, geospatial details, temporal and taxonomic range.
Completed Metadata
Immediately, upon receipt of the metadata, a new Gitlab Issue should be created. Please use the Project Metadata Issue checklist template.
Here is the Issue checklist, for reference:
Project Metadata
- [ ] - NAME add label *'loading records'*
- [ ] - NAME define type of project  **select here one of Data, Deployment, Tracker**
- [ ] - NAME create schema and project records (`Creating and Updating project metadata` notebook)
- [ ] - NAME add project contact information (`Creating and Updating project metadata` notebook)
- [ ] - NAME add scientificnames (`Creating and Updating project metadata` notebook)
- [ ] - NAME verify all of above (`Creating and Updating project metadata` notebook)
- [ ] - NAME create new project repository users (`Create Plone Folders and Add Users` notebook)
- [ ] - NAME create project repository folder (`Create Plone Folders and Add Users` notebook)
- [ ] - NAME add project repository users to folder (`Create Plone Folders and Add Users` notebook)
- [ ] - NAME access project repository double-check project repository creation and user access
- [ ] - NAME add project metadata file to project folder (OTN members.oceantrack.org, FACT RW etc)
- [ ] - NAME send onboarding email to PIs
- [ ] - NAME label issue with *'Verify'*
- [ ] - NAME pass issue to OTN analyst for final verification
- [ ] - NAME verify project in database
- [ ] - NAME pass issue to OTN DAQ staff
- [ ] - NAME [OTN only] if this is a loan, update links for PMO
- [ ] - NAME [OTN only] manually identify if this is a loan, if so add record to otnunit.obis.loan_tracking (`Creating and Updating project metadata` notebook)

**project metadata txt file:**
Visual Inspection
Once the completed file is received from a researcher, the Data Manager should complete a visual check for formatting and accuracy.
Things to check:
- Is the PI-provided collection code unique/appropriate? Do you need to create one yourself? Existing schemas/collection codes can be seen in the database.
- Are there typos in the title or abstract?
- Are the contacts formatted correctly?
- Are the species formatted correctly?
- Does the location make sense based on the abstract, and is it formatted correctly (one per line)?
In general, most commonly formatting errors occur in the Contacts section. Pay close attention here.
Below is an example of a properly completed metadata form, for your reference.
===FORM START===
0. Intended/preferred project code, if known? (May be altered by OTNDC)
format: XXXX (3-6 uppercase letters that do not already have a representation in the OTN DB. Will be assigned if left blank)

NSBS

1. Title-style description of the project?
format:  < 70 words in 'paper title' form

OTN NS Blue Shark Tracking

2. Brief abstract of the project?
format: < 500 words in 'abstract' form

In the Northwest Atlantic, the Ocean Tracking Network (OTN), in collaboration with Dalhousie University, is using an acoustic telemetry infrastructure to monitor the habitat use, movements, and survival of juvenile blue sharks (Prionace glauca). This infrastructure includes state-of-the-art acoustic receivers and oceanographic monitoring equipment, and autonomous marine vehicles carrying oceanographic sensors and mobile acoustic receivers. Long-life acoustic tags (n=40) implanted in the experimental animals will provide long-term spatial resolution of shark movements and distribution, trans-boundary migrations, site fidelity, and the species’ response to a changing ocean. This study will facilitate interspecific comparisons, documentation of intra- and interspecific interactions, and permit long-term monitoring of this understudied predator in the Northwest Atlantic. The study will also provide basic and necessary information to better inform fisheries managers and policy makers. This is pertinent given the recent formulation of the Canadian Plan of Action for Shark Conservation.

3. Names, affiliations, email addresses, and ORCID (if available) of researchers involved in the project and their role.

The accepted Project Roles are defined as:
Principal Investigator: PI or Co-PI. The person(s) responsible for the overall planning, direction and management of the project.
Technician: Person(s) responsible for preparation, operation and/or maintenance of shipboard, laboratory or deployed scientific instrumentation, but has no invested interest in the data returned by that instrumentation.
Researcher: Person(s) who may use/analyse the data to answer research questions, but is not the project lead. Can be a student if their involvement spans past the completion of an academic degree.
Student: Person(s) researching as part of a project as part of their work towards an academic degree.
Collaborator: A provider of input/support to a project without formal involvement in the project.

Please add 'Point of Contact' to the contact(s) who will be responsible for communicating with OTN.

format: Firstname Lastname, Employer OR Affiliation, Project Role (choose from above list), email.address@url.com, point of contact (if relevant), ORCID

Fred Whoriskey, OTN, principal investigator, fwhoriskey@dal.ca, 0000-0001-7024-3284
Sara Iverson, OTN, principal investigator, sara.iverson@dal.ca
Caitlin Bate, Dal, researcher, caitlin.bate@dal.ca, point of contact


4. Project URL - can be left blank
format: http[s]://yoursite.com

https://members.oceantrack.org/

5. Species being studied?
format: Common name (scientific name)

Blue shark (Prionace glauca)
Sunfish (Mola mola)

6. Location of the project?
format: (city, state/province OR nearby landmark OR lat/long points in decimal degree), one per line

Halifax, NS
44.19939/-63.24085

7. Start and end dates of the project, if known?
format: YYYY-MM-DD to YYYY-MM-DD ('ongoing' is an acceptable end date)

2013-08-21 to ongoing

8. Citation to use when referencing this project:
format: Lastname, I., Lastname, I. YYYY. [Title from question 1 or suitable alternative] Will be assigned if left blank.


===FORM END===
Quality Control - Create and Update Projects
Each step in the Issue checklist will be discussed here, along with other important notes required to use the Nodebooks.
Imports cell
This section will be common for most Nodebooks: it is a cell at the top of the notebook where you will import any required packages and functions to use throughout the notebook. It must be run first, every time.
You will have to edit one section: engine = get_engine()
- Within the open brackets you need to open quotations and paste the path to your database
.kdbxfile which contains your login credentials. - On MacOS computers, you can usually find and copy the path to your database
.kdbxfile by right-clicking on the file and holding down the “option” key. On Windows, we recommend using the installed software Path Copy Copy, so you can copy a unix-style path by right-clicking. - The path should look like
engine = get_engine('C:/Users/username/Desktop/Auth files/database_connection.kdbx').
Project Metadata Parser
This cell is where you input the information contained in the Project Metadata .txt file. There are two ways to do this:
- You can paste in the filepath to the saved
.txt. You should ensure the formatting follows this example:project_template_path = '/path/to/project_metadata.txt' - You can paste the entire contents of the file, from
===FORM START=== to ===FORM END===inclusive, into the provided triple quotation marks.
Once either option is selected, you can run the cell to complete the quality control checks.
The output will have useful information:
- Are there strange characters in the collectioncode, project title, or abstract?
- Were the names and affiliations of each contact successfully parsed? Are there any affiliated institutions which are not found? Are there any contacts which were not found that you expected to be?
- Is the project URL formatted correctly?
- Are all the species studied found in WoRMS? Are any of them non-accepted taxonomy (the top of the species record should have this success message:
INFO: Halichoerus grypus is an accepted taxon, and has Aphia ID 137080., followed by a URL)? Which ones have common names which are not matching the WoRMS records (look at bottom of each species record for success:OK: Grey seal is an acceptable vernacular name for Halichoerus grypus)? NOTE: any mismatches with commonname can be fixed at a later stage, make a note in the Issue for your records - Is the suggested Bounding Box appropriate based on the abstract? NOTE: any issues with the scale of the bounding box can be fixed at a later stage, make a note in the Issue for your records
- Are the start and end dates formatted correctly?
Generally, most of the error messages arise from the Contacts and Species sections.
If there is information which is not parsing correctly, you should fix the source-file and re-run the cell until you are happy with the output.
Manual Fields - Dropdown Menu
There are some fields which need to be setup by the Data Manager, and not set by the researcher. These are in the next cell.
You will run this cell, and a fillable form will appear.
- Node: select your node
- Collaboration Type: based on the abstract, are they deploying only tags (
Trackerproject), only receivers (Deploymentproject) or both tags and receivers (Dataproject)? - Ocean: choose the most appropriate ocean region based on the abstract.
- Shortname: use the Title provided by the researcher, or something else, which will be used as the name of the Data Portal folder. ex:
OTN Blue Sharks. - Longname: use the Title provided by the researcher, or something else, which is in “scientific-paper” style. ex:
Understanding the movements of Blue sharks through Nova Scotia waters, using acoustic telemetry. - Series Code: this will generally be the name of your node. Compare to values found in the database
obis.otn_resourcesif you’re unsure. - Institution Code: The main institution responsible for maintaining the project. Compare to values found in the database
obis.institution_codesandobis.otn_resourcesif you’re unsure. If this is a new Institution, please make a note in the Issue, so you can add it later on - Country: based upon the abstract. Multiple countries can be listed as such:
CANADA, USA, EGYPTetc. - State: based upon the abstract. Multiple states can be listed as such:
NOVA SCOTIA, NEWFOUNDLANDetc. - Local Area: based upon the abstract. Location information. ex:
Halifax - Locality: based upon the abstract. Finest-scale of location. ex:
Shubenacadie River - Status: is the project completed, ongoing or something else?
To save and parse your inputted values DO NOT re-run the cell - this will clear all your input. Instead, the next cell is the one which needs to be run to parse the information.
Verify the output from the parser cell, looking for several things:
- Are all the fields marked with a green
OK? - Is the following feedback included in the institution code section:
Found institution record for XXX in your database:followed by a small, embedded Table?
If anything is wrong, please begin again from the Manual Field input cell.
If the institution code IS NOT found - compare to values found in the database obis.institution_codes and obis.otn_resources. If this is a new Institution, please make a note in the Issue, so you can add it later on
Task list checkpoint
In Gitlab, this task can be completed at this stage:
- [ ] - NAME define type of project **select here one of Data, Deployment, Tracker**
Please edit to include the selected project type, in harmony with the selected field in the notebook.
Verifying Correct Info
At this stage, we have all the information parsed that we need in order to register the project in the database. There is now a cell that will print out every saved value for your review.
You are looking for:
- Typos
- Strange characters
- Correct information based on abstract
If this information is satisfactory, you can proceed.
Adjust Bounding Box
The cell titled Verify the new project details before writing to the DB is the final step for verification before the values are written to the database. At this stage a map will appear, with the proposed Bounding Box for the project.
Based on the abstract, you can use the Square Draw Tool to re-draw the bounding box until you are happy with it.
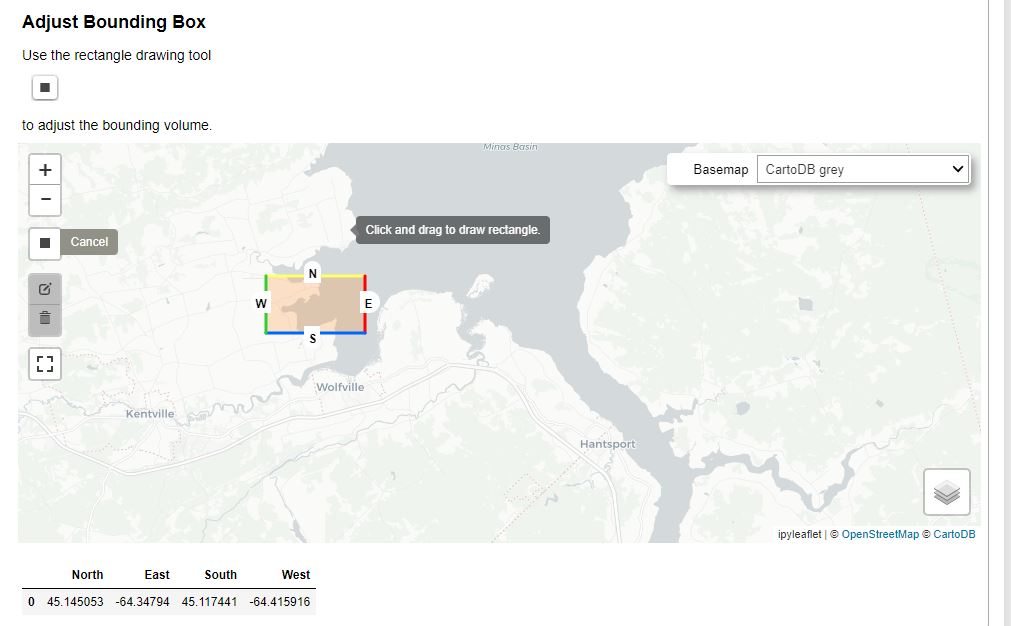
Once you are happy, you can run the next cell in order to save your bounding adjustments. The sucess output should be formatted like this:
--- Midpoint ---
Latitude:
Longitude:
Create New Institution
STOP - confirm there is no Push currently ongoing. If a Push is ongoing, you must wait for it to be completed before processing beyond this point.
Remember above, where we noted whether or not an institution existed on obis.institution_codes or if it was a new institution? This cell is our opportunity to add any institutions if they are new. If all institutions (for each contact, plus for the project as a whole) exist, then you can skip this cell.
To run the cell, you will need to complete:
- Institution Code: a short-code for the institution (ex: DAL)
- Institution Name: the full institution name (ex: Dalhousie University)
- Institution Website: the institution’s website (ex: https://www.dal.ca/). You can confirm the URL is valid with the
Check URLbutton. - Organization ID: Press the
Search Org IDbutton. A list of potential WikiData, GRID, ROR, EDMO and NERC results for the institution will appear. Choose the best match, and paste that URL into the blank Organization ID cell. - Institution Country: the country where the institution is headquartered
- Institution State: the state where the institution is headquartered
- Institution Sector: one of Unknown, Government/Other Publuc, Univserity/College/Research Hospital, Private, or Non-profit.
Once all values are completed, press Create Institution and confirm the following output:
Institution record 'DAL' created.
You can re-run this cell as many times as you need, to add each missing institution.
Write Project to the Database
STOP - confirm there is no Push currently ongoing. If a Push is ongoing, you must wait for it to be completed before processing beyond this point.
Finally, it is time to write the project records to the database and create the new project!
First, you should run this cell with printSQL = True. If there are no errors, you can edit and change to printSQL = False and run again. This will register the project!
You will see some output - confirm each line is accompanied by a green OK.
Task list checkpoint
In Gitlab, this task can be completed at this stage:
- [ ] - NAME create schema and project records ("Creating and Updating project metadata" notebook)
Save Contact Information
At this stage, the next step is to add contact information for all identified collaborators.
This cell will gather and print out all contacts and their information. Review for errors. If none exist, move to the next cell.
The next cell writes to the database: STOP - confirm there is no Push currently ongoing. This cell will add each contact to the database, into the obis.contacts and obis.contacts_projects tables, as needed.
There should be output similar to this:
Valid contact:  Fred Whoriskey OTN principalInvestigator fwhoriskey@dal.ca
Created contact Fred Whoriskey
Task list checkpoint
In Gitlab, this task can be completed at this stage:
- [ ] - NAME add project contact information ("Creating and Updating project metadata" notebook)
Add Species Information
The following section will allow you to add the required information into the obis.scientific_names table.
The first cell imports the required function.
The second cell, when run, will create an editable input form for each animal.
You should review to confirm the following:
- the scientific name is matching to an accepted WoRMS taxon. There should be a URL provided, and no error messages.
- the common name is acceptable. If it is not, you can choose a value from the dropdown menu (taken directly from WoRMS’
vernacularlist) OR you can enter a custom value to match the common name provided by the researcher.
Once you are sure that both the scientific and common names are correct, based on the information provided by both the project and the notebook, you may click the Add to project button for each animal record you’d like to insert.
There will be a confirmation display in the notebook to demonstrate if the insertion was successful.
Task list checkpoint
In Gitlab, this task can be completed at this stage:
- [ ] - NAME add scientificnames ("Creating and Updating project metadata" notebook)
OPTIONAL: Add Project Loan Information
The following section is used by OTN staff to track projects which are recipients of OTN-equipment loans. This section is not within the scope of this Node Manager Training, because it requires a login-file for the
otnunitdatabase.
Skip to Verification
Once you scroll past the Project Loan Information section, you will see a yellow star and the words Skip to the new project Verification. You should click the button provided, which will help you scroll to the bottom of the notebook, where the Verify section is located.
This is a chance to visually review all the fields you just entered. You should enter run these cells and review all output to ensure the database values align with the intended insertions.
Task list checkpoint
In Gitlab, this task can be completed at this stage:
- [ ] - NAME verify all of above ("Creating and Updating project metadata" notebook)
Other Features of this Notebook
There are more features in the Create and Update Projects notebook than those covered above.
Schema extension
This section is to be used when you have a project which is either Tracker or Deployment and is expanding to become a Data project. Ex: a project which was only tagging has begun deploying receivers.
You can use this notebook to create the missing tables for the schema. Ex: if a tagging project begins deploying receivers, the schema would now need stations, rcvr_locations, and moorings tables created.
Schema updating
This section is to be used to change the values contained in obis.otn_resources. The first cell will open an editable form with the existing database values. You can change the required fields (ex: abstract).
To save and parse your inputted values DO NOT re-run the cell - this will clear all your input. Instead, the next cell is the one which needs to be run to parse the information.
Review the output of the parser cell and check for typos.
The next cell will show the changes that will be made to the project data. You can copy this output and paste it into the relevant Gitlab Issue for tracking.
The final cell will make the desired changes in the database. Ensure printSQL = False if you want the cell to execute directly.
The output should look like this to confirm success:
'Resource record for HFX has been updated.'
The following, highlighted section is relevant only to Nodes who use Plone for their document management system
Quality Control - Create Plone Users and Access
If you are part of a Node that uses Plone as your document repository, then the following will be relevant for you.
Imports cell
This section will be common for most Nodebooks: it is a cell at the top of the notebook where you will import any required packages and functions to use throughout the notebook. It must be run first, every time.
You will have to edit one section:
engine = get_engine()
- Within the open brackets you need to open quotations and paste the path to your database
.kdbxfile which contains your login credentials.- On MacOS computers, you can usually find and copy the path to your database
.kdbxfile by right-clicking on the file and holding down the “option” key. On Windows, we recommend using the installed software Path Copy Copy, so you can copy a unix-style path by right-clicking.- The path should look like
engine = get_engine(‘C:/Users/username/Desktop/Auth files/database_connection.kdbx’).Plone Login
The first cell is another import step.
The second cell requires input:
- Proper Plone log-in information must be written in the
plone_auth = get_plone_auth('./plonetools/plone_auth.json')file.- In order to do this, click on the
Jupytericon in the top left corner of the page.- This will bring you to a list of folders and notebooks. Select the
plonetoolsfolder. From there, select theplone_auth.jsonfile and input your Plone base URL, username, and password. Hint: ensure the base_url in your json file ends in a slash, likehttps://members.oceantrack.org/!- You can now successfully log into Plone.
Now, when you run the cell, you should get following output:
Auth Loaded:
------------------------------------------------------------------------------
base_url: https://members.oceantrack.org/
user_name: user
verify ssl: False
Finally, the third cell in this section will allow you to login. You should see this message:
Login Successful!Access Project Info
Some information is needed in order to create the project Plone folders.
There are three ways to enter this information:
- Access Project Information from Database
- Manual Project Information Form - Parse Contacts
- Manual Project Information Form - Insert Contacts into Textfields
The first option is generally the easiest, if the project has already been successfully written to the database using the
Create and Update Projectsnotebook. To do this, you enter thecollectioncodeof your project, and run the cell. If there are no errors, you can click theSKIPbutton which will take you down the notebook to the next section.Create Missing Users
This section will use the registered project contacts and compare against existing Plone users. It will compare by 1) email, 2) fullname, 3) lastname.
If a user is found: you will not need to create a new account for them.
If a user is not found: you will have to create an account for them. To do this, you can use the editable form in the next cell.
The editable cell will allow you to choose each contact that you’d like to register, and will autofill the information (including a suggested username). The password should be left blank. Once you are happy with the form, click
Add User. An email will be sent to the new user, prompting them to set a password. Then you can repeat by selecting the next contact, etc.Once all contacts have Plone accounts (new or otherwise) you are finished.
Task list checkpoint
In Gitlab, this task can be completed at this stage:
- [ ] - NAME create new project repository users ("Create Plone Folders and Add Users" notebook)Create Project Repository
To create the project folder you must first enter the relevant Node information:
- otnunit:
node = None- safnode, migramar, nepunit:
node = "node"- lowercase with quotation marks, fill in the value based on the path in Plone.- all other nodes (not hosted by OTN):
node = NoneRunning this cell will print out an example of the URL, for your confirmation. Ensure the collectioncode and Node are correct.
The expected format:
https://members.oceantrack.org/data/repository/node_name/collectioncode(node name is for SAF, MigraMar and NEP only)If you are confident the folder path is correct, you can run the next cell and confirm the following success message:
Creating collection folder 'collectioncode'. Done!
https://members.oceantrack.org/data/repository/node_name/collectioncode
Task list checkpoint
In Gitlab, this task can be completed at this stage:
- [ ] - NAME create project repository folder ("Create Plone Folders and Add Users" notebook)Add Users to Repository
Now that the users AND folder have been created, the users must be given access to the new folder.
Using the final cell in the
Plone repository folder creationsection, you will be provided with an editable search-bar.Type in the Plone username of each contact (new and existing). Search results will appear:
- select the User who you would like to add
- choose their permissions
- click “Change repo permissions” to add them to the folder.
Review for the following success message:
Changed https://members.oceantrack.org/data/repository/node_name/collectioncode sharing for username:
	Contributor=True Reviewer=True Editor=True Reader=True
Then you may choose
Add another userand begin again.The acceptable folder permissions may vary depending on the project role of the contact. Here are some guidelines:
- Principal Investigator: all permissions
- Researcher: all permissions except
Reviewer- Student: all permissions except
Reviewer- Technician: only
ContributorandReader- Collaborator: only
ContributorandReaderThis is very fluid and can be edited at any time. These are guidelines only!
Task list checkpoint
In Gitlab, this task can be completed at this stage:
- [ ] - NAME add project repository users to folder ("Create Plone Folders and Add Users" notebook)OPTIONAL: Add Project Loan Information
The following section is used by OTN staff to track projects which are recipients of OTN-equipment loans. This section is not within the scope of this Node Manager Training, because it requires a login-file for the
otnunitdatabase.
Final Steps
The remaining steps in the Gitlab Checklist are completed outside the notebooks.
First: you should access the created Repository folder in your browser and confirm if the title and sharing information is correct. If so, add the project metadata .txt file into the “Data and Metadata” folder to archive.
Next, you should send an email to the project contacts letting them know their project code and other onboarding information.
Finally, the Issue can be passed off to an OTN-analyst for final verification in the database.
Key Points
Loading project metadata requires judgement from the Data Manager
Loading project metadata is the first step towards a functioning project