Tagging Metadata
Overview
Teaching: 20 min
Exercises: 0 minQuestions
How do I load new tags into the Database?
Objectives
Understand the proper template-completion
Understand how to use the Gitlab checklist
Learn how to use the
Tag-1notebookLearn how to use the
Tag-1bnotebookLearn how to use the
Tag-2notebook
Once a project has been registered, the next step (for Tracker and Data project types) is to quality control and load the tagging metadata into the database. Tagging metadata should be reported to the Node in the template provided here. This file will contain information about the deployment of tags (acoustic, PIT, satellite, floy etc.) in or on animals for the purposes of tracking their movements using either listening stations or via mark/recapture. Any biological metrics that were measured at tagging time, i.e. length, weight, population, are recorded for future analysis.
Remembering a previous lesson, there are multiple levels of data-tables in the database for tagging records: raw tables, cache tables and otn tables. The process for loading tagging metadata reflects this, as does the Gitlab task list.
Completed Metadata
Immediately, upon receipt of the metadata, a new Gitlab Issue should be created. Please use the Tag Metadata Issue checklist template.
Here is the Issue checklist, for reference:
Tag Meta Data
- [ ] - NAME add label *'loading records'*
- [ ] - NAME load raw tag metadata (`tag-1` notebook) **put_table_name_in_ticket**
- [ ] - NAME confirm no duplicates in raw table, review and remove (`tag-1b` notebook)
- [ ] - NAME verify raw table (`tag-2` notebook)
- [ ] - NAME post updated metadata to project folder (OTN members.oceantrack.org, FACT RW etc) if needed
- [ ] - NAME build cache tables (`tag-2` notebook)
- [ ] - NAME verify cache tables (`tag-2` notebook)
- [ ] - NAME load otn tables (`tag-2` notebook)
- [ ] - NAME verify otn tables (`tag-2` notebook)
- [ ] - NAME verify tags are not part of another collection (`tag-2` notebook)
- [ ] - NAME label issue with *'Verify'*
- [ ] - NAME pass issue to analyst for final verification
- [ ] - NAME check for double reporting (verification_notebooks/Tag Verification notebook)
Visual Inspection
Once the completed file is received from a researcher, the Data Manager should first complete a visual check for formatting and accuracy.
In general, Tagging Metadata has 3 sections:
- information about the tag
- information about the animal
- information about the tag deployment
Information about the tag is obtained from Tag Specifications and is mandatory. Information about the animal is limited to the sampling conducted. The minimum requirement here is simply the common/scientific names. All other columns for biological parameters are optional. Information about the tag deployment includes location and dates and is mandatory to complete.
Things to visually check in the metadata:
- Is there any information missing from the essential columns? These are:
- tag_type
- tag_manufacturer
- tag_model
- tag_serial_number (if not completed,
unknowncan be entered ONLY IF animal_id is also completed with unique values) - tag_id_code
- tag_code_space
- tag_implant_type
- est_tag_life
- common_name_e
- scientific_name
- release_location
- release_latitude
- release_longitude
- utc_release_date_time
- If any of the above mandatory fields are blank, follow-up with the researcher will be required if:
- you cannot discern the values yourself
- you do not have access to the Tag Specifications from the manufacturer (relevant for the columns containing
taginformation).
- Are the
tag_id_codeandtag_code_spacevalues formatted correctly? - Is the
UTC_release_date_timecolumn formatted correctly?
In general, most commonly formatting errors occur in the information about the tag section. Pay close attention here.
The metadata template available here has a Sample Data Row as an example of properly-formatted metadata, along with the Data Dictionary sheet which contains detailed expectations for each column. Refer back to these often. We have also included some recommendations on our FAQ page. Here are some guidelines:
- Animals with >1 associated tag (sensors, or double-tagging): add one line PER
TRANSMITTER IDinto the Tag Metadata form. TheANIMAL_IDcolumn, or theTAG_SERIAL_NUMBERcolumn must be the same between the rows in order to link those two (or more) records together. - Animals with ONLY a floy tag: ensure the
TAG_TYPEcolumn =FLOY. You may leave the following columns empty -tag_manufacturer,tag_model,tag_id_code,tag_code_spaceandest_tag_life. - Animals with satellite tags: ensure the
TAG_TYPEcolumn =SATELLITE. You may leave the following columns empty -tag_id_codeandtag_code_space.
Quality Control - Tag-1 Notebook
Each step in the Issue checklist will be discussed here, along with other important notes required to use the Nodebook.
Imports cell
This section will be common for most Nodebooks: it is a cell at the top of the notebook where you will import any required packages and functions to use throughout the notebook. It must be run first, every time.
There are no values here which need to be edited.
Path to File
In this cell, you need to paste a filepath to the relevant Tagging Metadata file. The filepath will be added between the provided quotation marks.
Correct formatting looks something like this:
# Path to your tagging metadata file - Formats Accepted: (csv, xls or xlsx)
filepath = r"C:/Users/path/to/tag_metadata.xlsx"
Once you have added your filepath, you can run the cell.
Verification of File Contents - formatting
First, you must choose which sheet you would like to quality control. Generally, it will be names Tag Metadata but is often customized by researchers. Once you have selected the sheet name, do not re-run the cell to save the output - simply ensure the correct sheet is highlighted and move onto the next cell.
This cell will now complete the first round of Quality Control checks.
The output will have useful information:
- Is the sheet formatted correctly? Correct column names, datatypes in each column etc.
- Are either the
animal_idortag_serial_numbercolumns completed? - Are there any
harvest_datevalues in the metadata? Are they all after theutc_release_date_time? - Are the information about the
animalformatted according to the Data Dictionary? - Are there any tags which are used twice in the same sheet?
- Are there potential transcription errors in the
tag_code_space? Ex: drag-and-drop errors from Excel - Are the scientific and common names used accepted by WoRMS? If there are errors flagged here which state
Vernacular records not found for Aphia ID: 12345please make a note, but continue on. This will be fixed at a later stage
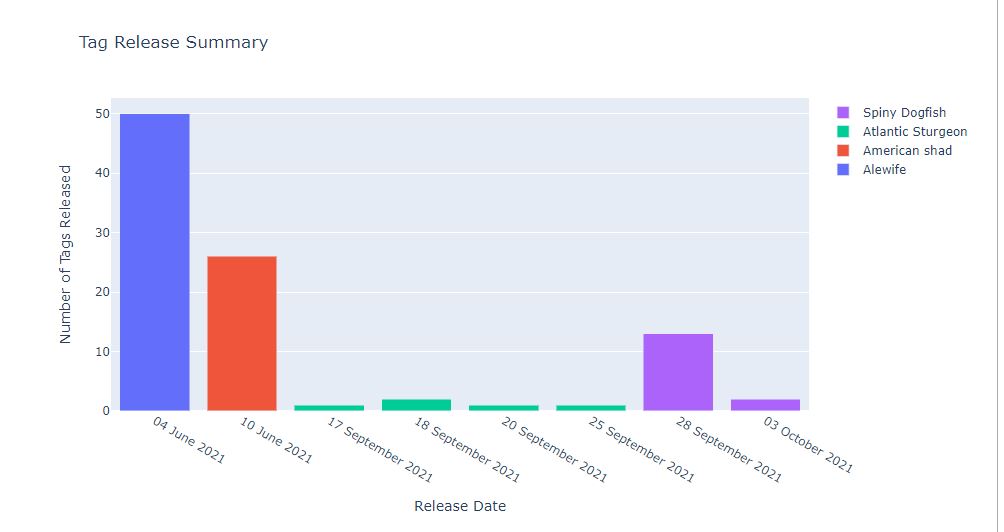
The notebook will indicate the sheet had passed quality control by adding a ✔️green checkmark beside each section. There should also be an interactive plot generated, summarizing the tags released over time, by species, for you to explore.
If there is information which is not passing quality control, you should fix the source-file (potentially speaking to the researcher) and try again.
Connection to Database
You will have to edit two sections:
schema = 'collectioncode'- please edit to include the relevant project code, in lowercase, between the quotes.
engine = get_engine()- Within the open brackets you need to open quotations and paste the path to your database
.kdbxfile which contains your login credentials. - On MacOS computers, you can usually find and copy the path to your database
.kdbxfile by right-clicking on the file and holding down the “option” key. On Windows, we recommend using the installed software Path Copy Copy, so you can copy a unix-style path by right-clicking. - The path should look like
engine = get_engine(‘C:/Users/username/Desktop/Auth files/database_connection.kdbx’).
- Within the open brackets you need to open quotations and paste the path to your database
Once you have added your information, you can run the cell. Successful login is indicated with the following output:
Auth password:········
Connection Notes: None
Database connection established
Connection Type:postgresql Host:db.load.oceantrack.org Database:otnunit User:admin Node:OTN
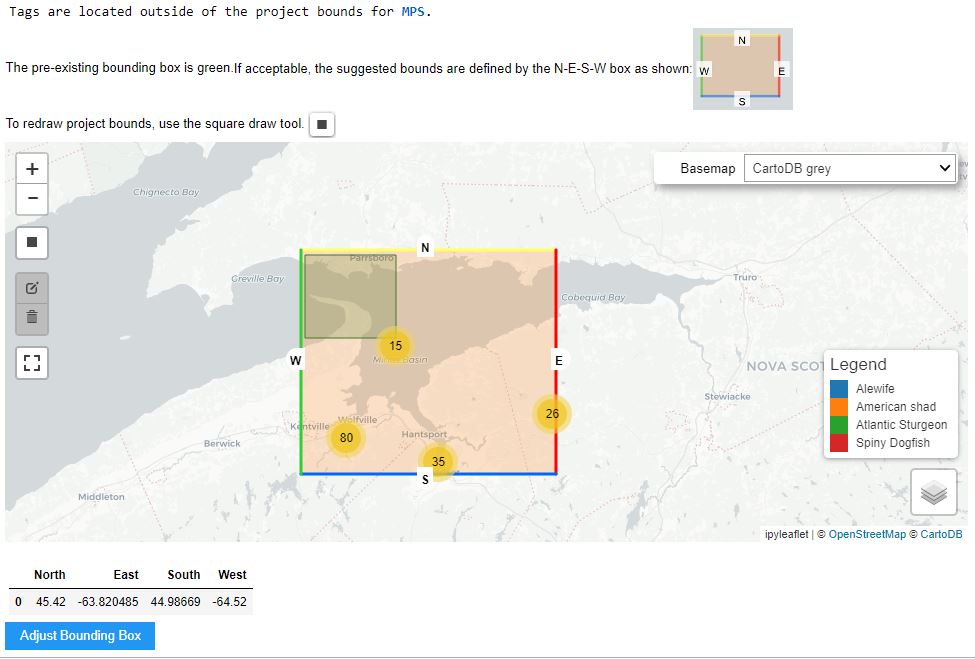
Bounding Box Check
The following cell will map the locations of all the tag deployments, compared to the Bounding Box of the project. This is used to confirm the following:
- the tag release locations are in the part of the world expected based on the project abstract. Ex: lat/long have correct +/- signs
- the project bounding box is correct
If it appears the tag release locations have incorrect signs, you can fix it in the source file and re-run the cell.
If it appears there are tag release locations which are on land, you may want to reach out to the researcher for corrected coordinates.
If the bounding box needs to be expanded to include the tags, you can use the Square Draw Tool to re-draw the bounding box until you are happy with it. Once all tags are drawn inside the bounding box, press the Adjust Bounding Box button to save the results.
Verification of File Contents - against database
This cell will now complete the second round of Quality Control checks.
The output will have useful information:
- Have these tags been used on other projects in the database? Check the dates to ensure they don’t overlap, and double-reporting is not taking place.
- Do we have the Tag Specifications from the manufacturer? Do the
tag_id_code,tag_code_spaceandest_tag_lifematch the specifications for each provided serial number? Are there typos or errors that require clarification from the researcher? - Is the information about the
animalformatted according to the Data Dictionary?- Are all the life stages in the
obis.lifestage_codestable? If not, the reported life stage should be compared to the values in theobis.lifestage_code table, and adjusted if possible. Otherwise, use theadd_lifestage_codesnotebook - Are all length types in the
obis.length_type_codestable? If not, the reported length type code should be compared to the values in theobis.length_type_codestable, and adjusted if possible. Otherwise, use theadd_lengthtype_codesnotebook - Are all the age units in the
obis.control_unitstable? If not, the reported age units should be compared to the values in theobis.control_unitstable, and adjusted if possible. Otherwise, use theadd_control_unitsnotebook
- Are all the life stages in the
- Are there any tags in this sheet which have been previously reported on this project in the metadata? ex: duplicates.
- Do the scientific and common names match the records which are previously added to
obis.scientificnamesfor this schema? If not, please check the records in theobis.scientificnamesand the source file to confirm there are no typos. If this is a new species tagged by this project, use thescientific_name_checknotebook to add the new species. - Are all the provided
tag_modelvalues present in theobis.instrument_modelstable? If not, please check the records in theobis.instrument_modelsand the source file to confirm there are no typos. If this is a new model which has never been used before, use theadd instrument_modelsnotebook to add the new tag model. - Are there any tags in this sheet which have been previously reported on this project in the metadata, but with different deployment dates? ex: overlapping/missing harvest dates
- Are there any tags being flagged as overlapping tag deployments, but not as duplicate tags? There may be an error with the tag’s serial number. Check if the tag’s ID exists in the otn_transmitters table of the schema or in the
vendor.c_vemco_tagstable, and compare it to the tag in the tagging metadata sheet. Fix the tag in the tagging metadata sheet if any errors are found. - Are there any release dates in the future?
The notebook will indicate the sheet had passed quality control by adding a ✔️green checkmark beside each section.
If there is information which is not passing quality control, you should fix the source-file (potentially speaking to the researcher) and try again.
Loading the Raw Table
ONLY once the source file has successfully passed ALL quality control checks can you load the raw table to the database.
In this cell, you will have to edit one section in order to name the raw table. Between the quotes, please add your custom table suffix. We recommend using year_month or similar, to indicate the most-recently tagged animal in the metadata sheet.
table_suffix = "YYYY_mm"
The notebook will indicate the success of the table-creation with the following message:
Reading file: otn_metadata_tagging.xlsx.
Tag Metadata sheet found, reading file... OK
Loading 'otn_metadata_tagging.xlsx' file into collectioncode.c_tag_meta_YYYY_mm... OK
Loaded 37 records into table collectioncode.c_tag_meta_YYYY_mm
True
Task list checkpoint
In Gitlab, this task can be completed at this stage:
- [ ] - NAME load raw tag metadata ('tag-1' notebook) **put_table_name_in_ticket**
Ensure you paste the table name (ex: c_tag_meta_YYYY_mm) into the section indicated, before you check the box.
Quality Control - Tag-1b Notebook
Once the raw table is successfully loaded, the next step is to ensure any previously-loaded tags are not re-added to the database (causing duplication errors).
Imports cell
This section will be common for most Nodebooks: it is a cell at the top of the notebook where you will import any required packages and functions to use throughout the notebook. It must be run first, every time.
There are no values here which need to be edited.
Table Name and Database Connection
You will have to edit three sections:
engine = get_engine()- Within the open brackets you need to open quotations and paste the path to your database
.kdbxfile which contains your login credentials. - On MacOS computers, you can usually find and copy the path to your database
.kdbxfile by right-clicking on the file and holding down the “option” key. On Windows, we recommend using the installed software Path Copy Copy, so you can copy a unix-style path by right-clicking. - The path should look like
engine = get_engine(‘C:/Users/username/Desktop/Auth files/database_conn_string.kdbx’).
- Within the open brackets you need to open quotations and paste the path to your database
schema = 'collectioncode'- please edit to include the relevant project code, in lowercase, between the quotes.
table_name = 'c_tag_meta_YYYY_mm'- Within the quotes, please add the name of the raw table.
Once you have added your information, you can run the cell. Successful login is indicated with the following output:
Auth password:········
Connection Notes: None
Database connection established
Connection Type:postgresql Host:db.load.oceantrack.org Database:otnunit User:admin Node:OTN
Checking for Duplicates
This cell, once run, may print out that there are No Duplicates Found. If so, you can move on.
If there is output identifying duplicates, some review is necessary.
Immediately, the notebook will create a new table, named schema.c_tag_meta_YYYY_mm_no_dup which is an exact copy of your raw table. There will be a print-out saying the following (under a table):
Building schema.c_tag_meta_YYYY_mm_no_dup table:
The following SQL queries will display the differences/similarities between the raw table (schema.c_tag_meta_YYYY_mm_no_dup) record and the otn_animals or otn_transmitters table record.
Then, there will be two interactive tables provided, which can be used to identify and delete any duplicate records from the no_dup table.
- Comparison to otn_animals
- Comparison to otn_transmitters
All text should be black, and you should scroll through the entire table, row-by-row, to review any values where the cell is highlighted/flashing RED. These are highlighting differences between the values in the raw table vs values in the otn table, for this animal record.
If there are no highlighted/flashing red cells in a row, you can delete the record from the no_dup table by using the delete button on the left-side of the table. You can also use the Select All button if appropriate.
If there are highlighted/flashing red cells in a row, you must compare the highlighted values. These cannot be deleted without previous review since they are not exact duplicates, and could indicate an update to the database records is needed.
Ex: life_stage from the raw table might = SMOLT while lifestage from otn_animals might = ADULT. This will cause the column lifestage_equal? to read FALSE and the cells to flash red. In this example, it could indicate that the researcher was correcting an error in the previously-submitted record (this animal was actually a smolt, not adult) and therefore we need to update the record in our database. In this case, you would need to email the researcher to confirm, pause processing this Issue, and create a new DB_fix Issue with the information which needs updating.
If you review all the flashing red cells and find they are only rounding errors, or similar non-significant data changes, you can determine that they are indeed duplicate records. You can now use the delete button on the left-side of the table. You can also use the Select All button, if all records are true duplicates.
Once you have selected a row to be deleted, the text will turn red to help you visualize your selection.
Deleting Duplicates
Once you have identified all the true duplicate records, this next cell will remove them from the no_dup table. Success will be indicated with this message, and a table:
Compiling list of deletions to the schema.c_tag_meta_YYYY_mm_no_dup table.
Delete the following XXX records from schema.c_tag_meta_YYYY_mm_no_dup?
You will be able to press the button to confirm, and the notebook will remove all the records.
Task list checkpoint
In Gitlab, this task can be completed at this stage:
- [ ] - NAME confirm no duplicates in raw table, review and remove ("tag-1b" notebook)
Ensure you paste the no_dup table name(ex: c_tag_meta_2021_09_no_dup), if relevant, into the Issue before you check the box. This is now the raw table that will be used for the result of the data-loading process.
Quality Control - Tag-2 Notebook
Now that the raw table is free from duplicates, we can begin to move the records into the higher-level cache and otn tables, where they will be matched to detections.
Imports cell
This section will be common for most Nodebooks: it is a cell at the top of the notebook where you will import any required packages and functions to use throughout the notebook. It must be run first, every time.
There are no values here which need to be edited.
Database Connection
You will have to edit one section:
engine = get_engine()- Within the open brackets you need to open quotations and paste the path to your database
.kdbxfile which contains your login credentials. - On MacOS computers, you can usually find and copy the path to your database
.kdbxfile by right-clicking on the file and holding down the “option” key. On Windows, we recommend using the installed software Path Copy Copy, so you can copy a unix-style path by right-clicking. - The path should look like
engine = get_engine(‘C:/Users/username/Desktop/Auth files/database_conn_string.kdbx’).
- Within the open brackets you need to open quotations and paste the path to your database
Once you have added your information, you can run the cell. Successful login is indicated with the following output:
Auth password:········
Connection Notes: None
Database connection established
Connection Type:postgresql Host:db.load.oceantrack.org Database:otnunit User:admin Node:OTN
Table Name
You will have to edit two sections:
table_name = 'c_tag_meta_YYYY_mm'- Within the quotes, please add the name of the raw table. Might be the
no_duptable if relevant.
- Within the quotes, please add the name of the raw table. Might be the
schema = 'collectioncode'- please edit to include the relevant project code, in lowercase, between the quotes.
Verification of File Contents - against database
This cell will now complete the final round of Quality Control checks. These are exactly the same as the checks at the end of the tag-1 notebook.
The output will have useful information:
- Have these tags been used on other projects in the database? Check the dates to ensure they don’t overlap, and double-reporting is not taking place.
- Do we have the Tag Specifications from the manufacturer? Do the
tag_id_code,tag_code_spaceandest_tag_lifematch the specifications for each provided serial number? Are there typos or errors that require clarification from the researcher? - Is the information about the
animalformatted according to the Data Dictionary?- Are all the life stages in the
obis.lifestage_codestable? If not, the reported life stage should be compared to the values in theobis.lifestage_code table, and adjusted if possible. Otherwise, use theadd_lifestage_codesnotebook - Are all length types in the
obis.length_type_codestable? If not, the reported length type code should be compared to the values in theobis.length_type_codestable, and adjusted if possible. Otherwise, use theadd_lengthtype_codesnotebook - Are all the age units in the
obis.control_unitstable? If not, the reported age units should be compared to the values in theobis.control_unitstable, and adjusted if possible. Otherwise, use theadd_control_unitsnotebook
- Are all the life stages in the
- Are there any tags in this sheet which have been previously reported on this project in the metadata? ex: duplicates.
- Do the scientific and common names match the records which are previously added to
obis.scientificnamesfor this schema? If not, please check the records in theobis.scientificnamesand the source file to confirm there are no typos. If this is a new species tagged by this project, use thescientific_name_checknotebook to add the new species. - Are all the provided
tag_modelvalues present in theobis.instrument_modelstable? If not, please check the records in theobis.instrument_modelsand the source file to confirm there are no typos. If this is a new model which has never been used before, use theadd instrument_modelsnotebook to add the new tag model. - Are there any tags in this sheet which have been previously reported on this project in the metadata, but with different deployment dates? ex: overlapping/missing harvest dates
- Are there any tags being flagged as overlapping tag deployments, but not as duplicate tags? There may be an error with the tag’s serial number. Check if the tag’s ID exists in the otn_transmitters table of the schema or in the
vendor.c_vemco_tagstable, and compare it to the tag in the tagging metadata sheet. Fix the tag in the tagging metadata sheet if any errors are found. - Are there any release dates in the future?
The notebook will indicate the sheet had passed quality control by adding a ✔️green checkmark beside each section.
If there is information which is not passing quality control, you should fix the source-file (potentially speaking to the researcher), delete or edit the raw table, and try again.
Task list checkpoint
In Gitlab, this task can be completed at this stage:
- [ ] - NAME verify raw table ("tag-2" notebook)
Loading to Cache Tables
The first cell will create the cache tables, with the following success messaging:
Creating table schema.tagcache_YYYY_mm
Creating table schema.animalcache_YYYY_mm
Table creation finished.
The next step will populate the tag_cache and animal_cache tables, but splitting apart the information about the tag and the information about the animal, joining the records by a unique catalognumber based on the tag deployment information.
Running this cell will provide the following success message:
Added XX records to the schema.animalcache_YYYY_mm table
Added XX records to the schema.tagcache_YYYY_mm table
You need to pay special attention to the number of records loaded to the animal and tag caches. If this number doesn’t match you may need to investigate why there are more tags than animals or vice versa. Possible reasons the values may not match:
- There are some animals with only FLOY tags, no acoustic tags (no record added to
tag_cache). - There are some animals with >1 tag attached, or a tag with >1 pinger ID (multiple records added to
tag_cache, for each animal)
If the values are acceptable, you can move on.
Task list checkpoint
In Gitlab, this task can be completed at this stage:
- [ ] - NAME build cache tables ("tag-2" notebook)
Verifying Cache Tables
This cell will now complete the Quality Control checks of the cache tables.
The output will have useful information:
- Are there more animals than tags?
- Were all records loaded from raw to cache successfully?
- Do all animals have tag records, and all tags have animal records?
- Are there blank strings that need to be set to NULL? If so, press the
Set to NULLbutton. - Is the species information and location information formatted correctly?
- Are the sex, age, common name and instrument model records present in the
obistable controlled vocabulary? - Visually confirm that the length/weight values make sense for that species/lifestage, and if not, change in the
animal_cachetable. - Confirm there are no overlapping tags remaining
- Confirm there are Tag Specifications available, and they match the records. Be mindful that harvested tags will have a different tag life than is stated in the Specifications.
The notebook will indicate the sheet had passed quality control by adding a ✔️green checkmark beside each section.
If there are any errors go into database and fix the cache tables themselves, and re-run
Task list checkpoint
In Gitlab, this task can be completed at this stage:
- [ ] - NAME verify cache tables ("tag-2" notebook)
Loading to OTN Tables
STOP - confirm there is no Push currently ongoing. If a Push is ongoing, you must wait for it to be completed before processing beyond this point
This cell will populate the otn_animals and otn_transmitters master-tables, with the following success messaging:
Added XX records to schema.otn_animals table from animalcache_YYYY_mm
Added XX records to schema.otn_transmitters table from tagcache_YYYY_mm
The number of records added should match the number from the cache table loading step.
Task list checkpoint
In Gitlab, these tasks can be completed at this stage:
- [ ] - NAME load otn tables ("tag-2" notebook)
Verifying OTN Tables
This cell will now complete the Quality Control checks of the tag and animal records contained in the entire schema. We are no longer checking our newly-loaded records only, but also each previously-loaded record.
The output will have useful information:
- Are there more animals than tags?
- Do all animals have tag records, and all tags have animal records? Do their SNs/Datetimes match?
- Are there overlapping tags within the schema?
- Are there tags outside of the project bounding box?
- Are the values formatted properly for
the_geom,lenthtype,length2type,ageunits,sex - Are there blank strings that need to be set to NULL? If so, press the
Set to NULLbutton in that cell. - Are there extra spaces that need to be clipped? If so, press the
Remove extra spacesbutton. - Visually confirm that the length/weight values make sense for that species/lifestage, and if not, change in the
otn_animalstable, or contact researcher. - Are the date-fields formatted correctly?
- Confirm there are Tag Specifications available, and they match the records provided. Be mindful that harvested tags will have a different tag life than is stated in the Specifications.
- Have these tags been used on other projects in the database? Check the dates to ensure they don’t overlap, and double-reporting is not taking place.
The notebook will indicate the sheet had passed quality control by adding a ✔️green checkmark beside each section.
If there are any errors, go into the database and fix the otn tables themselves, or contact the researcher, and re-run.
Task list checkpoint
In Gitlab, these tasks can be completed at this stage:
- [ ] - NAME verify otn tables ("tag-2" notebook)
- [ ] - NAME verify tags are not part of another collection (`tag-2` notebook)
Final Steps
The remaining steps in the Gitlab Checklist are completed outside the notebooks.
First: you should access the Repository folder in your browser and add the cleaned Tag Metadata .xlsx file into the “Data and Metadata” folder.
Finally, the Issue can be passed off to an OTN-analyst for final verification in the database.
Key Points
Loading tagging metadata requires judgement from the Data Manager
Communication with the researcher is essential when errors are found