Deployment Metadata
Overview
Teaching: 30 min
Exercises: 0 minQuestions
How do I load new deployments into the Database?
Objectives
Understand the proper template-completion
Understand how to use the GitLab checklist
Learn how to use the
Deploynotebook
Once a project has been registered, the next step (for Deployment and Data project types) is to quality control and load the instrument deployment metadata into the database. Deployment metadata should be reported to the Node in the template provided here. This file will contain information about the deployment of any instruments used to detect tagged subjects or collect related data. This includes stationary test tags, range test instruments, non-acoustic environmental sensors etc. Geographic location, as well as the duration of the deployment for each instrument, is recorded. The locations of these listening stations are used to fix detections geographically.
Remembering our previous lessons, there are multiple levels of data-tables in the database for deployment records: raw tables, rcvr_locations, stations and moorings. The process for loading instrument metadata reflects this, as does the GitLab task list.
Submitted Metadata
Immediately, upon receipt of the metadata, a new GitLab Issue should be created. Please use the Receiver_metadata Issue checklist template.
Here is the Issue checklist, for reference:
Receiver Metadata
- [ ] - NAME add label *'loading records'*
- [ ] - NAME load raw receiver metadata (`deploy` notebook) **put_table_name_in_ticket**
- [ ] - NAME check that station locations have not changed station "NAMES" since last submission (manual check)
- [ ] - NAME verify raw table (`deploy` notebook)
- [ ] - NAME post updated metadata file to project repository (OTN members.oceantrack.org, FACT RW etc)
- [ ] - NAME load station records (`deploy` notebook)
- [ ] - NAME verify stations (`deploy` notebook)
- [ ] - NAME load to rcvr_locations (`deploy` notebook)
- [ ] - NAME verify rcvr_locations (`deploy` notebook)
- [ ] - NAME add transmitter records receivers with integral pingers (`deploy` notebook)
- [ ] - NAME load to moorings (`deploy` notebook)
- [ ] - NAME verify moorings (`deploy` notebook)
- [ ] - NAME label issue with *'Verify'*
- [ ] - NAME pass issue to OTN DAQ for reassignment to analyst
- [ ] - NAME check if project is OTN loan, if yes, check for lost indicator in recovery column, list receiver serial numbers for OTN inventory updating.
- [ ] - NAME pass issue to OTN analyst for final verification
- [ ] - NAME check for double reporting (verification_notebooks/Deployment Verification notebook)

**receiver deployment files/path:**
Visual Inspection
Once the completed file is received from a researcher, the Data Manager should first complete a visual check for formatting and accuracy.
In general, the deployment metadata contains information on the instrument, the deployment location, and the deployment/recovery times.
Things to visually check in the metadata:
- Is there any information missing from the essential columns? These are:
- otn_array
- station_no
- deploy_date
- deploy_lat
- deploy_long
- ins_model_no
- ins_serial_no
- recovered
- recover_date
- If any of the above mandatory fields are blank, follow-up with the researcher will be required if:
- you cannot discern the values yourself.
- you do not have access to the Tag or Receiver Specifications from the manufacturer (relevant for the columns containing
transmitterinformation).
- Are all lat/longs in the correct sign? Are they in the correct format (decimal degrees)?
- Do all transceivers/test tags have their transmitters provided?
- Are all recoveries from previous years recorded?
- Do comments suggest anything was lost or damaged, where recovery indicator doesn’t say “lost” or “failed”?
In general, the most common formatting errors occur in records where there are >1 instrument deployed at a station, or if the receiver was deployed and recovered from the same site.
The metadata template available here has a Data Dictionary sheet which contains detailed expectations for each column. Refer back to these definitions often. We have also included some recommendations on our FAQ page. Here are some guidelines:
- Deployment, download, and recovery information for each station is entered on a single line.
- When more than one instrument is deployed, downloaded, or recovered at the same station, enter each one on a separate line using the same
OTN_ARRAY,STATION_NO. - When sentinel tags are co-deployed with receivers, their information can be added to
TRANSMITTERandTRANSMIT_MODELcolumns, on the same line as the receiver deployment. - If a sentinel tag is deployed alone then a new line for that station, with as much information as possible, is added.
- When an instrument is deemed lost, a value of
lorlostshould be entered in the “recovered” field; if the instrument is found, this can be updated by changing the recovery field toforfoundand resubmitting the metadata sheet. - Every time an instrument is brought to the surface, enter
yto indicate it was successfully recovered, even if only for downloading and redeployment. A new line for the redeployment is required.
Quality Control - Deploy Notebook
Each step in the Issue checklist will be discussed here, along with other important notes required to use the Nodebook.
Imports cell
This section will be common for most Nodebooks: it is a cell at the top of the notebook where you will import any required packages and functions to use throughout the notebook. It must be run first, every time.
There are no values here which need to be edited.
Path to File
In this cell, you need to paste a filepath to the relevant Deployment Metadata file. The filepath will be added between the provided quotation marks.
Correct formatting looks something like this:
# Shortfrom metadata path (xls, csv)
filepath = r'C:/Users/path/to/deployment_metadata.xlsx'
You also must select the format of the Deployment metadata. Currently, only the FACT Network uses a slightly different format than the template available here. If its relevant for your Node, you can edit the excel_fmt section.
Correct formatting looks something like this:
excel_fmt = 'otn' # Deployment metadata format 'otn' or 'fact'
Once you have added your filepath and chosen your template format, you can run the cell.
Next, you must choose which sheet you would like to quality control. Generally, it will be named Deployment but is often customized by researchers. Once you have selected the sheet name, do not re-run the cell to save the output - simply ensure the correct sheet is highlighted and move onto the next cell.
Table Name and Database
You will have to edit three sections:
schema = 'collectioncode'- please edit to include the relevant project code, in lowercase, between the quotes.
table_name = 'c_shortform_YYYY_mm'- Within the quotes, please add your custom table suffix. We recommend using
year_monthor similar, to indicate the most-recently deployed/recovered instrument in the metadata sheet.
- Within the quotes, please add your custom table suffix. We recommend using
engine = get_engine()- Within the open brackets you need to open quotations and paste the path to your database
.kdbxfile which contains your login credentials. - On MacOS computers, you can usually find and copy the path to your database
.kdbxfile by right-clicking on the file and holding down the “option” key. On Windows, we recommend using the installed software Path Copy Copy, so you can copy a unix-style path by right-clicking. - The path should look like
engine = get_engine('C:/Users/username/Desktop/Auth files/database_conn_string.kdbx').
- Within the open brackets you need to open quotations and paste the path to your database
Once you have added your information, you can run the cell. Successful login is indicated with the following output:
Auth password:········
Connection Notes: None
Database connection established
Connection Type:postgresql Host:db.for.your.org Database:your_db_name User:your_node_admin Node:Node
Verification of File Contents
This cell will now complete the first round of Quality Control checks.
The output will have useful information:
- Is the sheet formatted correctly? Correct column names, datatypes in each column etc.
- Compared to the
stationstable in the database, are the station names correct? Have stations “moved” location? Are the reported bottom_depths significantly different (check for possibleftvsmvsftmerrors). - Are all recovery dates after the deployment dates?
- Are all the provided
ins_model_novalues present in theobis.instrument_modelstable? If not, please check the records in theobis.instrument_modelsand the source file to confirm there are no typos. If this is a new model which has never been used before, use theadd instrument_modelsnotebook to add the new instrument model. - Do all transceivers/test tags have their transmitters provided? Do these match any manufacturer Specifications we have in the database?
- Are there any overlapping deployments (one serial number deployed at multiple locations for a period of time)?
- Are all the deployments within the Bounding Box of the project. If the bounding box needs to be expanded to include the stations, you can use the
Square Draw Toolto re-draw the bounding box until you are happy with it. Once all stations are drawn inside the bounding box, press theAdjust Bounding Boxbutton to save the results. - Are there possible gaps in the metadata, based on previously-loaded
detectionsfiles? This will be investigated in theDetections-3bnotebook if you need more details.
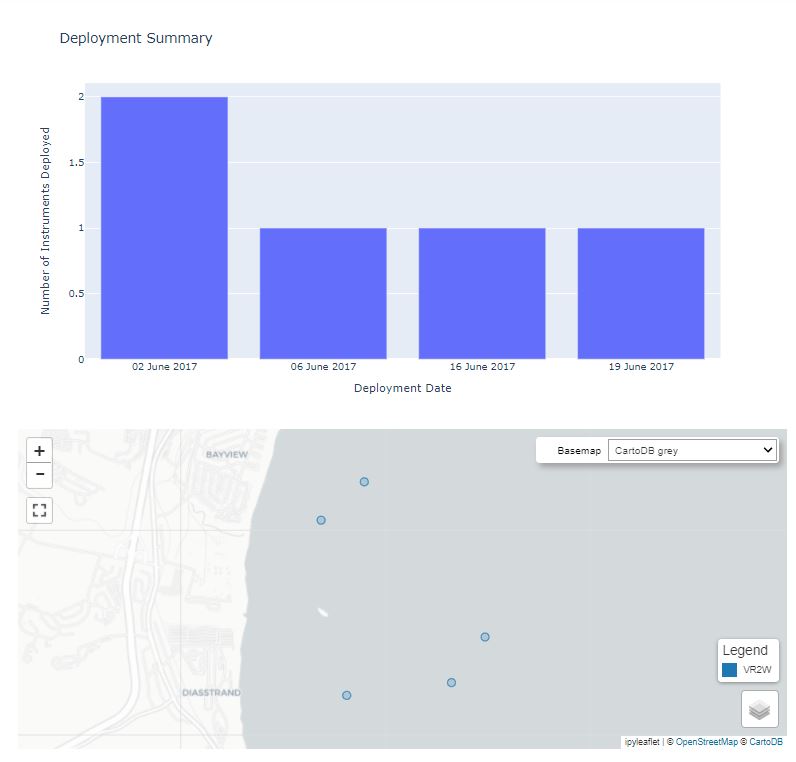
The notebook will indicate the sheet has passed quality control by adding a ✔️green checkmark beside each section. There should also be an interactive plot generated, summarizing the instruments deployed over time for you to explore, and a map of the deployments.
Using the map, please confirm the following:
- the instrument deployment locations are in the part of the world expected based on the project abstract. Ex: lat/long have correct +/- signs
- the instrument deployments do not occur on land
If there is information which is not passing quality control, you should fix the source-file (potentially after speaking to the researcher) and try again.
Loading the Raw Table
ONLY once the source file has successfully passed ALL quality control checks can you load the raw table to the database.
You have already named the table above, so there are no edits needed in this cell.
The notebook will indicate the success of the table-creation with the following message:
Reading file 'deployment_metadata.xlsx' as otn formatted Excel.
Table Loading Complete:
 Loaded XXX records into table schema.c_shortform_YYYY_mm
Task list checkpoint
In GitLab, these tasks can be completed at this stage:
- [ ] - NAME load raw receiver metadata ("deploy" notebook) **put_table_name_in_ticket**
- [ ] - NAME check that station locations have not changed station "NAMES" since last submission (manual check)
Ensure you paste the table name (ex: c_shortform_YYYY_mm) into the section indicated, before you check the box.
Verify Raw Table
This cell will now complete the Quality Control checks of the raw table. This is to ensure the Nodebook loaded the records correctly from the Excel sheet.
The output will have useful information:
- Are there any duplicate records?
- Is there missing information in the
ar_model_noandar_serial_nocolumns? If so, ensure that it makes sense for receivers to be deployed without Acoustic Releases in this location (ex: diver deployed). - Do all transceivers/test tags have their transmitters provided? Do these match any manufacturer Specifications we have in the database?
- Are there any non-numeric serial numbers? Do these makes sense (ex: environmental sensors)?
- Are the deployments within the bounding box?
- Is the
recoveredcolumn completed correctly, based on thecommentsand therecovery_datecolumns? - Are there blank strings that need to be set to NULL? If so, press the
Set to NULLbutton in that cell.
The notebook will indicate the sheet had passed quality control by adding a ✔️green checkmark beside each section.
If there are any errors go into database and fix the raw table directly, or contact the researcher, and re-run.
Task list checkpoint
In GitLab, this task can be completed at this stage:
- [ ] - NAME verify raw table ("deploy" notebook)
Loading Stations Records
STOP - confirm there is no Push currently ongoing. If a Push is ongoing, you must wait for it to be completed before processing beyond this point
Only once the raw table has successfully passed ALL quality control checks can you load the stations information to the database stations table.
Running this cell will first check for any new stations to add, then confirm the records in the stations table matches the records in the moorings table where basisofrecord = 'STATION'.
If new stations are identified:
- Compare these station names to existing stations in the
stationstable in the database. Are they truly new, or is there a typo in the raw table? Did the station change names, but is in the same location as a previous station? - If there are fixes to be made, change the records in the
rawtable, or contact the researcher. - If all stations are truly new, you should review the information in the editable form, then select
Add New Stations.
The success message will look like:
Adding station records to the stations table.
Creating new stations...
Added XXX new stations to schema.moorings
If the stations and moorings tables are not in-sync, the difference between the two will need to be compared and possibly updated.
Task list checkpoint
In GitLab, this task can be completed at this stage:
- [ ] - load station records ("deploy" notebook)
Verify Stations Table
This cell will now complete the Quality Control checks of the stations records contained in the entire schema. We are no longer only checking against our newly-loaded records, but also each previously-loaded record in this schema/project. This will help catch historical errors.
The output will have useful information:
- Were all the stations from our
rawtable promoted to thestationstable, and themooringstable? - Are all stations in unique locations?
- Are all stations within the project’s bounding box?
- Does the date in the
stationstable match the first deployment date for that station? - Are there blank strings that need to be set to NULL? If so, press the
Set to NULLbutton in that cell. - Are any of the dates in the future?
The notebook will indicate the sheet had passed quality control by adding a ✔️green checkmark beside each section.
If there are any errors go into database and fix the raw table directly, or contact the researcher, and re-run. If there are problems with records that have already been promoted to the stations or moorings table, you will need to contact an OTN database staff member to resolve these.
Task list checkpoint
In GitLab, this task can be completed at this stage:
- [ ] - verify stations("deploy" notebook)
Load to rcvr_locations
Once the station table is verified, the receiver deployment records can now be promoted to the “intermediate” rcvr_locations table.
The cell will identify any new deployments to add, and any previously-loaded deployments which need updating (ex: they have been recovered).
If new deployments are identified:
- Compare these deployments to existing deployments in the
rcvr_locationstable in the database. Are they truly new, or is there a typo in the raw table? Did the station change names, but is in the same location as before? Did the serial number change, but the deployment location and date are the same? - If there are fixes to be made, change the records in the
rawtable, or contact the researcher. - If all deployments are truly new, you can then select
Add Deployments.
If deployment updates are identified:
- Review the suggested changes: do not select changes which remove information (ex: release 590023 –>
Noneis not a good change to accept). - Use the check boxes to select only the appropriate changes
- Once you are sure the changes are correct, you can then select
Update Deployments.
Each instance will give a success message such as:
Loading deployments into the rcvr_locations_table
Loaded XX records into the schema.rcvr_locations table.
Task list checkpoint
In GitLab, this task can be completed at this stage:
- [ ] - load to rcvr_locations ("deploy" notebook)
Verify rcvr_locations
This cell will now complete the Quality Control checks of the rcvr_locations records contained in the entire schema. We are no longer only checking our newly-loaded records, but also each previously-loaded record for this schema/project. This will help catch historical errors.
The output will have useful information:
- Have all deployments been loaded from the raw table? Please note that instruments where a sentinel tag is deployed alone at a station will not be loaded to rcvr_locations, and so these will likely be flagged in this section for your review.
- Are there blank strings that need to be set to NULL? If so, press the
Set to NULLbutton in that cell. - Based on comments, are there any instances where a receiver’s status should be changed to “lost”?
- Are all instruments in the
obis.instrument_modelstable? - Are there any overlapping deployments?
- Is the geom, serial number and catalognumber formatted correctly?
The notebook will indicate the table has passed quality control by adding a ✔️green checkmark beside each section.
If there are any errors contact OTN, or contact the researcher, to resolve.
Task list checkpoint
In GitLab, this task can be completed at this stage:
- [ ] - verify rcvr_locations ("deploy" notebook)
Load Transmitter Records to Moorings
The transmitter values associated with transceivers, co-deployed sentinel tags or stand-alone test tags will be loaded to the moorings table in this section. Existing transmitter records will also be updated if relevant.
If new transmitters are identified:
- Review for accuracy then select
Add Transmitters.
If transmitter updates are identified:
- Review the suggested changes: do not select changes which remove information (ex: release 590023 –>
Noneis not a good change to accept). - Use the check boxes to select only the appropriate changes
- Once you are sure the changes are correct, you can then select
Update Transmitters.
Task list checkpoint
In GitLab, this task can be completed at this stage:
- [ ] - load transmitter records receivers with integral pingers ("deploy" notebook)
Load Receivers to Moorings
The final, highest-level table for instrument deployments is moorings.
The cell will identify any new deployments to add, and any previously-loaded deployments which need updating (ex: they have been recovered).
Please review all new deployments and deployment update for accuracy, then press the associated buttons to make the changes. At this stage, the updates are not editable: any updates chosen from the rcvr_locations section will be processed here.
You may be asked to select an instrumenttype for certain receivers. Use the drop-down menu to select before adding the deployment.
Task list checkpoint
In GitLab, this task can be completed at this stage:
- [ ] - load to moorings ("deploy" notebook)
Verify Moorings
This cell will now complete the Quality Control checks of the moorings records contained in the entire schema. We are no longer only checking our newly-loaded records, but also each previously-loaded record in this project/schema.
The output will have useful information:
- Have all deployments been loaded from rcvr_locations?
- Do we have manufacturer specifications for the receivers or tags deployed?
- Are there blank strings that need to be set to NULL? If so, press the
Set to NULLbutton in that cell. - Do the
STATIONSrecords match the information in thestationstable? - Are all instruments in the
obis.instrument_modelstable? - Are there any overlapping deployments or receivers or tags?
- Are there duplicate download records?
- Is the lat/long, geom, serial number and catalognumber formatted correctly?
The notebook will indicate the table has passed quality control by adding a ✔️ green checkmark beside each section.
If there are any errors contact OTN to resolve.
Task list checkpoint
In GitLab, this task can be completed at this stage:
- [ ] - verify moorings ("deploy" notebook)
Final Steps
The remaining steps in the GitLab Checklist are completed outside the notebooks.
First: you should access the Repository folder in your browser and add the cleaned Deployment Metadata .xlsx file into the “Data and Metadata” folder.
Finally, the Issue can be passed off to an OTN-analyst for final verification in the database.
Key Points
Loading receiver metadata requires judgement from the Data Manager
Communication with the researcher is essential when errors are found